Free Download: Flowing borders & ribbons
 With the increasingly geometric nature of website design, especially now that flat-design is all the rage, it’s refreshing to see sites that replace the mechanical with an organic feeling alternative.
This charming set of 46 hand-drawn frame and ribbon vectors, by Frisk Web is a case in point. And we’re delighted to be able to provide a free download of the set.
Scribbled onto a page and then digitized, the liberated borders look like they were drawn in the heyday of UPA cartoons; I half expect to see Mr. Magoo, or Gerald McBoing Boing, come wandering across the page.
Add a light watercolor wash and combine them with a heavily scrolling script typeface and they’d make a lovely, and personal feeling, addition to any wedding stationery.
The files are available in both .ai and .eps formats. The designs are free for both personal and commercial projects (redistribution isn’t permitted).

Please enter your email address below and click the download button. The download link will be sent to you by email, or if you have already subscribed, the download will begin immediately.
Source
]]>
With the increasingly geometric nature of website design, especially now that flat-design is all the rage, it’s refreshing to see sites that replace the mechanical with an organic feeling...
http://www.webdesignerdepot.com/2013/07/free-download-flowing-borders-ribbons/
https://my3.my.umbc.edu/api/v0/pixel/news/32420/guest@my.umbc.edu/0ec1c6b27c79deba8c13236fa351482d/api/pixel
art
css
design
development
freebies
html
html5
illustrator
javascript
mysql
oracle
photoshop
php
sql
Web Developer - Build Group
https://my3.my.umbc.edu/groups/retired-583
https://assets3-my.umbc.edu/system/shared/avatars/groups/000/000/583/fc60f5d7abc2e080599bb6dc465db54d/xsmall.png?1363101197
https://assets4-my.umbc.edu/system/shared/avatars/groups/000/000/583/fc60f5d7abc2e080599bb6dc465db54d/original.jpg?1363101197
https://assets4-my.umbc.edu/system/shared/avatars/groups/000/000/583/fc60f5d7abc2e080599bb6dc465db54d/xxlarge.png?1363101197
https://assets4-my.umbc.edu/system/shared/avatars/groups/000/000/583/fc60f5d7abc2e080599bb6dc465db54d/xlarge.png?1363101197
https://assets3-my.umbc.edu/system/shared/avatars/groups/000/000/583/fc60f5d7abc2e080599bb6dc465db54d/large.png?1363101197
https://assets3-my.umbc.edu/system/shared/avatars/groups/000/000/583/fc60f5d7abc2e080599bb6dc465db54d/medium.png?1363101197
https://assets4-my.umbc.edu/system/shared/avatars/groups/000/000/583/fc60f5d7abc2e080599bb6dc465db54d/small.png?1363101197
https://assets3-my.umbc.edu/system/shared/avatars/groups/000/000/583/fc60f5d7abc2e080599bb6dc465db54d/xsmall.png?1363101197
https://assets4-my.umbc.edu/system/shared/avatars/groups/000/000/583/fc60f5d7abc2e080599bb6dc465db54d/xxsmall.png?1363101197
Web Developer - Build Group
0
0
true
Fri, 05 Jul 2013 10:15:37 -0400
Fri, 05 Jul 2013 10:15:37 -0400
MySQL RIGHT JOIN
The MySql RIGHT JOIN, joins two tables and fetches rows based on a condition, which are matching in both the tables, and the unmatched rows will also be available from the table written after the JOIN clause.
]]>
The MySql RIGHT JOIN, joins two tables and fetches rows based on a condition, which are matching in both the tables, and the unmatched rows will also be available from the table written after the...
http://feedproxy.google.com/~r/w3resource/~3/BWDjy2lBbl0/mysql-right-join.php
https://my3.my.umbc.edu/api/v0/pixel/news/32254/guest@my.umbc.edu/b414bf1e95872fb09554177610a35e04/api/pixel
backend
css
frontend
html
html5
javascript
nosql
sql
xhtml
xml
Web Developer - Build Group
https://my3.my.umbc.edu/groups/retired-583
https://assets3-my.umbc.edu/system/shared/avatars/groups/000/000/583/fc60f5d7abc2e080599bb6dc465db54d/xsmall.png?1363101197
https://assets4-my.umbc.edu/system/shared/avatars/groups/000/000/583/fc60f5d7abc2e080599bb6dc465db54d/original.jpg?1363101197
https://assets4-my.umbc.edu/system/shared/avatars/groups/000/000/583/fc60f5d7abc2e080599bb6dc465db54d/xxlarge.png?1363101197
https://assets4-my.umbc.edu/system/shared/avatars/groups/000/000/583/fc60f5d7abc2e080599bb6dc465db54d/xlarge.png?1363101197
https://assets3-my.umbc.edu/system/shared/avatars/groups/000/000/583/fc60f5d7abc2e080599bb6dc465db54d/large.png?1363101197
https://assets3-my.umbc.edu/system/shared/avatars/groups/000/000/583/fc60f5d7abc2e080599bb6dc465db54d/medium.png?1363101197
https://assets4-my.umbc.edu/system/shared/avatars/groups/000/000/583/fc60f5d7abc2e080599bb6dc465db54d/small.png?1363101197
https://assets3-my.umbc.edu/system/shared/avatars/groups/000/000/583/fc60f5d7abc2e080599bb6dc465db54d/xsmall.png?1363101197
https://assets4-my.umbc.edu/system/shared/avatars/groups/000/000/583/fc60f5d7abc2e080599bb6dc465db54d/xxsmall.png?1363101197
Web Developer - Build Group
0
0
true
Fri, 05 Jul 2013 10:01:53 -0400
Thu, 15 May 2014 09:16:23 -0400
Accessible RWD
With the rise in popularity for responsive web design, Alastair Campbell says websites need to be accessible, too
 ]]>
With the rise in popularity for responsive web design, Alastair Campbell says websites need to be accessible, too
http://feedproxy.google.com/~r/net/topstories/~3/9yeIbNLWwbM/story01.htm
https://my3.my.umbc.edu/api/v0/pixel/news/32256/guest@my.umbc.edu/b39e9f7edc060d112e0d79b0b8edad95/api/pixel
css
development
html
javascript
mysql
net
php
sql
web
Web Developer - Build Group
https://my3.my.umbc.edu/groups/retired-583
https://assets3-my.umbc.edu/system/shared/avatars/groups/000/000/583/fc60f5d7abc2e080599bb6dc465db54d/xsmall.png?1363101197
https://assets4-my.umbc.edu/system/shared/avatars/groups/000/000/583/fc60f5d7abc2e080599bb6dc465db54d/original.jpg?1363101197
https://assets4-my.umbc.edu/system/shared/avatars/groups/000/000/583/fc60f5d7abc2e080599bb6dc465db54d/xxlarge.png?1363101197
https://assets4-my.umbc.edu/system/shared/avatars/groups/000/000/583/fc60f5d7abc2e080599bb6dc465db54d/xlarge.png?1363101197
https://assets3-my.umbc.edu/system/shared/avatars/groups/000/000/583/fc60f5d7abc2e080599bb6dc465db54d/large.png?1363101197
https://assets3-my.umbc.edu/system/shared/avatars/groups/000/000/583/fc60f5d7abc2e080599bb6dc465db54d/medium.png?1363101197
https://assets4-my.umbc.edu/system/shared/avatars/groups/000/000/583/fc60f5d7abc2e080599bb6dc465db54d/small.png?1363101197
https://assets3-my.umbc.edu/system/shared/avatars/groups/000/000/583/fc60f5d7abc2e080599bb6dc465db54d/xsmall.png?1363101197
https://assets4-my.umbc.edu/system/shared/avatars/groups/000/000/583/fc60f5d7abc2e080599bb6dc465db54d/xxsmall.png?1363101197
Web Developer - Build Group
0
0
true
Fri, 05 Jul 2013 10:00:00 -0400
Build a Gmail-Style Expanding CSS3 Navigation Menu
]]>
With the rise in popularity for responsive web design, Alastair Campbell says websites need to be accessible, too
http://feedproxy.google.com/~r/net/topstories/~3/9yeIbNLWwbM/story01.htm
https://my3.my.umbc.edu/api/v0/pixel/news/32256/guest@my.umbc.edu/b39e9f7edc060d112e0d79b0b8edad95/api/pixel
css
development
html
javascript
mysql
net
php
sql
web
Web Developer - Build Group
https://my3.my.umbc.edu/groups/retired-583
https://assets3-my.umbc.edu/system/shared/avatars/groups/000/000/583/fc60f5d7abc2e080599bb6dc465db54d/xsmall.png?1363101197
https://assets4-my.umbc.edu/system/shared/avatars/groups/000/000/583/fc60f5d7abc2e080599bb6dc465db54d/original.jpg?1363101197
https://assets4-my.umbc.edu/system/shared/avatars/groups/000/000/583/fc60f5d7abc2e080599bb6dc465db54d/xxlarge.png?1363101197
https://assets4-my.umbc.edu/system/shared/avatars/groups/000/000/583/fc60f5d7abc2e080599bb6dc465db54d/xlarge.png?1363101197
https://assets3-my.umbc.edu/system/shared/avatars/groups/000/000/583/fc60f5d7abc2e080599bb6dc465db54d/large.png?1363101197
https://assets3-my.umbc.edu/system/shared/avatars/groups/000/000/583/fc60f5d7abc2e080599bb6dc465db54d/medium.png?1363101197
https://assets4-my.umbc.edu/system/shared/avatars/groups/000/000/583/fc60f5d7abc2e080599bb6dc465db54d/small.png?1363101197
https://assets3-my.umbc.edu/system/shared/avatars/groups/000/000/583/fc60f5d7abc2e080599bb6dc465db54d/xsmall.png?1363101197
https://assets4-my.umbc.edu/system/shared/avatars/groups/000/000/583/fc60f5d7abc2e080599bb6dc465db54d/xxsmall.png?1363101197
Web Developer - Build Group
0
0
true
Fri, 05 Jul 2013 10:00:00 -0400
Build a Gmail-Style Expanding CSS3 Navigation Menu
Users of GMail should be familiar with sliding effects of the inbox side navigation. In the most recent design you will find the GChat/Hangouts box along with other various email tags(inbox, trash, etc.). When you have a large number of links in that menu some will be hidden by default, and then expanded further once you hover. I really like this technique and I feel it is easy to replicate with just a few CSS3 effects.
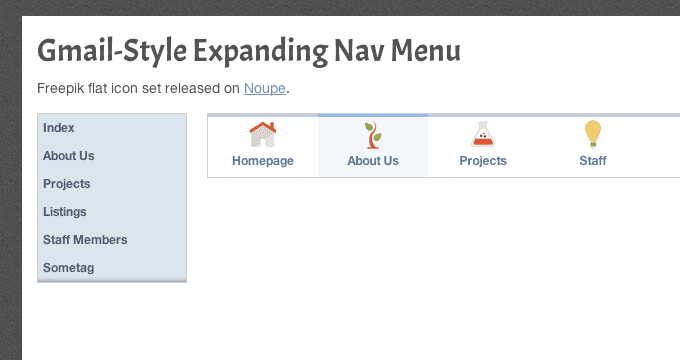
In this tutorial I want to demonstrate both a horizontal and vertical menu with hidden content. As you hover, the CSS transition properties will expand to reveal more content, and then retract after losing focus. Many of these techniques can also be enhanced using jQuery UI easing effects, but CSS3 is a nice place to start because you are not reliant on any other 3rd party libraries. Check out my live sample demo to get an idea of what we are creating.
Live Demo – Download Source Code
Building the Menus
The two navigation menus are not overly complicated aside from typical HTML elements. I am using a copy of the jQuery library as a fallback for the CSS3 animations, along with a custom Google Web Font. Inside the page body I setup two main divs labeled #sidebar and #maincontent.
<div class="container clearfix">
      <div id="sidebar">
    	<div id="vertical-nav">
    	  <ul>
    		<li><a href="#">Index</a></li>
    		<li><a href="#">About Us</a></li>
    		<li><a href="#">Projects</a></li>
    		<li><a href="#">Listings</a></li>
    		<li><a href="#">Staff Members</a></li>
    		<li><a href="#">Sometag</a></li>
    		<li><a href="#">Another Page</a></li>
    		<li><a href="#">Lorem Ipsum</a></li>
    		<li><a href="#">Last Page(maybe)</a></li>
    	  </ul>
    	</div><!-- @end #vertical-nav -->
      </div><!-- @end #sidebar -->
      <div id="maincontent">
    	<div id="horizontal-nav">
    	  <ul class="clearfix">
    		<li><a href="#"><span class="navicon"><img src="images/home.png"></span>Homepage</a></li>
    		<li><a href="#"><span class="navicon"><img src="images/root.png"></span>About Us</a></li>
    		<li><a href="#"><span class="navicon"><img src="images/flask.png"></span>Projects</a></li>
    		<li><a href="#"><span class="navicon"><img src="images/bulb.png"></span>Staff</a></li>
    		<li><a href="#"><span class="navicon"><img src="images/letter.png"></span>Contact</a></li>
    	  </ul>
    	</div>
      </div><!-- @end #maincontent -->
    </div><!-- @end .container -->
Each navigation menu is designed using an unordered list of links. The container div is given a specific ID pertaining to #horizontal-nav and #vertical-nav. This is helpful when we need to recognize hover events in CSS3. Obviously you can update this to be any container element within your own codes.
Also in the horizontal menu each link includes a span with the class .navicon along with an internal icon image. The interface is supposed to conceal each link text and only display an icon at first, which then reveals more content as you hover. The links could even include subtext if you wanted a super-detailed navigation.
Style & Animate with CSS3
We can start delving into CSS by looking at the vertical menu first. The initial properties setup a height at 170px which is the fixed design for my layout. The links expand well beyond 170 and these are kept off the page using overflow:hidden.
/* vertical navigation */
    #vertical-nav {
      display: block;
      overflow: hidden;
      height: 170px;
      background: #dbe4ee;
      border: 1px solid #ccc;
      -webkit-box-shadow: inset 1px -8px 8px -9px rgba(0,0,0,0.7);
      -moz-box-shadow: inset 1px -8px 8px -9px rgba(0,0,0,0.7);
      box-shadow: inset 1px -8px 8px -9px rgba(0,0,0,0.7);
      -webkit-transition: height 0.4s linear;
      -moz-transition: height 0.4s linear;
      transition: height: 0.4s linear;
    }
    #vertical-nav:hover {
      height: 280px;
    }

    #vertical-nav ul { list-style: none; }

    #vertical-nav ul li { display: block; font-size: 1.2em; font-weight: bold; }

    #vertical-nav ul li a {
      text-decoration: none;
      color: #4f5e70;
      display: block;
      padding: 8px 5px;
    }
    #vertical-nav ul li a:hover {
      background: #fff;
    }
The transition properties will only expand once you hover over the navigation. Once your mouse is off that div it will automatically reverse the transition effect. This is a nice way of writing code because you only need to declare one set of transitions and CSS3 will handle the rest.
With the horizontal navigation I set things up in a similar manner. I am using a fixed width of 552px on the content section because this perfectly encapsulates each menu item. Without the borders it might fit into any place on the page, but I am using this demo for better clarity. The default height is set at 38px which is just enough to display icons without the text.
/* horizontal navigation */
    #horizontal-nav {
      display: block;
      overflow: hidden;
      height: 38px;
      border: 1px solid #cdcdcd;
      -webkit-transition: height 0.2s linear;
      -moz-transition: height 0.2s linear;
      transition: height: 0.2s linear;
    }
    #horizontal-nav:hover {
      height: 65px;
    }

    #horizontal-nav ul { list-style: none; }
    #horizontal-nav ul li { display: block; float: left; width: 110px; }

    #horizontal-nav ul li a {
      display: block;
      width: 100%;
      padding-top: 2px;
      padding-bottom: 10px;
      font-weight: bold;
      font-size: 1.2em;
      text-align: center;
      text-decoration: none;
      color: #5c789a;
      border-top: 3px solid #c1cddc;
    }
    #horizontal-nav ul li a:hover {
      border-top-color: #96bae6;
      background: #f3f6f9;
    }

    #horizontal-nav ul li a .navicon { display: block; width: 100%; text-align: center; margin-bottom: 4px; }
This hover style works the same way by targeting #horizontal-nav and then adjusting for the new height value. Additionally you may notice that I have created anchor hover link rules for the internal items. The border color will update on hover but it does not follow the same transitions. These can be duplicated to apply onto the anchors, but the effect looks brilliant either way.
Using a jQuery Fallback
If your visitors are using older browser versions then it may be worth catering to this crowd with jQuery animations. Typically the event handler .on() is enough to get this working but we can simplify the process by using .hover(). This function allows for two parameters defining actions on the mouseenter and mouseleave events.
$(function(){
      $('#vertical-nav a, #horizontal-nav a').on('click', function(e){
        // stop anchor links from loading
        e.preventDefault();
      });


      $('#vertical-nav').hover(
        function(){
          $(this).animate({
            height: '280px'
          }, 300);
        },
        function(){
          $(this).animate({
            height: '170px'
          }, 300);
        }
      );
    });
This JS code can be found at the very bottom of my index.html file. In the demo I have this commented out so that jQuery effects are not running. However you should leave these in if you feel that your audience will not mostly support CSS3 transitions. The jQuery .animate() function is really easy to learn and it behaves similar to the transitions, except you will need to define actions for both states of hover/non-hover interactions.
Also the small tidbit at the top of the script is for handling click events onto the menu anchor links. The default HREF value is set to a hash sign(#) which doesn’t do much aside from jump to the top of the page. We can stop this value from loading with the e.preventDefault() method placed inside a click event handler. If you are using my demo code then be sure to remove this block or else your anchor links will not load anything!
Live Demo – Download Source Code
Final Thoughts
The expanding navigation technique is not anything new and it certainly wasn’t invented by Google. Their GMail interface is a great example of modern web applications running a fantastic user interface design. I hope these codes are useful to other developers who would want to build something similar in their own websites. By keeping jQuery as a fallback method you can ensure almost every browser will be supported.
The post Build a Gmail-Style Expanding CSS3 Navigation Menu appeared first on Treehouse Blog.
]]>
Users of GMail should be familiar with sliding effects of the inbox side navigation. In the most recent design you will find the GChat/Hangouts box along with other various email tags(inbox,...
http://feedproxy.google.com/~r/teamtreehouse/~3/1aH4RVWrFik/build-a-gmail-style-expanding-css3-navigation-menu
https://my3.my.umbc.edu/api/v0/pixel/news/32253/guest@my.umbc.edu/e2f5aeb88f1792a5d42834544c6cb539/api/pixel
android
animated-menu-css3
code
css
css3
css3-navigation
css3-navigation-menu
design
development
html
ios
javascript
learn-to-code
make-a-website
responsive
web
Web Developer - Build Group
https://my3.my.umbc.edu/groups/retired-583
https://assets3-my.umbc.edu/system/shared/avatars/groups/000/000/583/fc60f5d7abc2e080599bb6dc465db54d/xsmall.png?1363101197
https://assets4-my.umbc.edu/system/shared/avatars/groups/000/000/583/fc60f5d7abc2e080599bb6dc465db54d/original.jpg?1363101197
https://assets4-my.umbc.edu/system/shared/avatars/groups/000/000/583/fc60f5d7abc2e080599bb6dc465db54d/xxlarge.png?1363101197
https://assets4-my.umbc.edu/system/shared/avatars/groups/000/000/583/fc60f5d7abc2e080599bb6dc465db54d/xlarge.png?1363101197
https://assets3-my.umbc.edu/system/shared/avatars/groups/000/000/583/fc60f5d7abc2e080599bb6dc465db54d/large.png?1363101197
https://assets3-my.umbc.edu/system/shared/avatars/groups/000/000/583/fc60f5d7abc2e080599bb6dc465db54d/medium.png?1363101197
https://assets4-my.umbc.edu/system/shared/avatars/groups/000/000/583/fc60f5d7abc2e080599bb6dc465db54d/small.png?1363101197
https://assets3-my.umbc.edu/system/shared/avatars/groups/000/000/583/fc60f5d7abc2e080599bb6dc465db54d/xsmall.png?1363101197
https://assets4-my.umbc.edu/system/shared/avatars/groups/000/000/583/fc60f5d7abc2e080599bb6dc465db54d/xxsmall.png?1363101197
Web Developer - Build Group
0
0
true
Fri, 05 Jul 2013 09:30:39 -0400
Bits: Rediscovering Radio Through Apps
Despite the popularity of listening to music on services like iTunes, Spotify and Pandora, radio suddenly becomes more appealing for its human element.
 ]]>
Despite the popularity of listening to music on services like iTunes, Spotify and Pandora, radio suddenly becomes more appealing for its human element.
http://bits.blogs.nytimes.com/2013/07/05/digital-diary-rediscovering-radio-through-apps/?partner=rss&emc=rss
https://my3.my.umbc.edu/api/v0/pixel/news/32250/guest@my.umbc.edu/12003abb78f855da1af15c987183235c/api/pixel
digital-diary
kcrw-fm
los-angeles-calif
music
new
pandora-media-inc
pandora-media-inc-p-nyse
radio
spotify
start-ups
technology
york
Web Developer - Build Group
https://my3.my.umbc.edu/groups/retired-583
https://assets3-my.umbc.edu/system/shared/avatars/groups/000/000/583/fc60f5d7abc2e080599bb6dc465db54d/xsmall.png?1363101197
https://assets4-my.umbc.edu/system/shared/avatars/groups/000/000/583/fc60f5d7abc2e080599bb6dc465db54d/original.jpg?1363101197
https://assets4-my.umbc.edu/system/shared/avatars/groups/000/000/583/fc60f5d7abc2e080599bb6dc465db54d/xxlarge.png?1363101197
https://assets4-my.umbc.edu/system/shared/avatars/groups/000/000/583/fc60f5d7abc2e080599bb6dc465db54d/xlarge.png?1363101197
https://assets3-my.umbc.edu/system/shared/avatars/groups/000/000/583/fc60f5d7abc2e080599bb6dc465db54d/large.png?1363101197
https://assets3-my.umbc.edu/system/shared/avatars/groups/000/000/583/fc60f5d7abc2e080599bb6dc465db54d/medium.png?1363101197
https://assets4-my.umbc.edu/system/shared/avatars/groups/000/000/583/fc60f5d7abc2e080599bb6dc465db54d/small.png?1363101197
https://assets3-my.umbc.edu/system/shared/avatars/groups/000/000/583/fc60f5d7abc2e080599bb6dc465db54d/xsmall.png?1363101197
https://assets4-my.umbc.edu/system/shared/avatars/groups/000/000/583/fc60f5d7abc2e080599bb6dc465db54d/xxsmall.png?1363101197
Web Developer - Build Group
0
0
true
Fri, 05 Jul 2013 08:10:06 -0400
Fri, 05 Jul 2013 15:55:58 -0400
Gadgetwise: Adding Pictures to the Windows 8 Photos App
The Photos app in Windows 8 can show off the pictures on your computer, as long as you have those pictures in the right place.
]]>
Despite the popularity of listening to music on services like iTunes, Spotify and Pandora, radio suddenly becomes more appealing for its human element.
http://bits.blogs.nytimes.com/2013/07/05/digital-diary-rediscovering-radio-through-apps/?partner=rss&emc=rss
https://my3.my.umbc.edu/api/v0/pixel/news/32250/guest@my.umbc.edu/12003abb78f855da1af15c987183235c/api/pixel
digital-diary
kcrw-fm
los-angeles-calif
music
new
pandora-media-inc
pandora-media-inc-p-nyse
radio
spotify
start-ups
technology
york
Web Developer - Build Group
https://my3.my.umbc.edu/groups/retired-583
https://assets3-my.umbc.edu/system/shared/avatars/groups/000/000/583/fc60f5d7abc2e080599bb6dc465db54d/xsmall.png?1363101197
https://assets4-my.umbc.edu/system/shared/avatars/groups/000/000/583/fc60f5d7abc2e080599bb6dc465db54d/original.jpg?1363101197
https://assets4-my.umbc.edu/system/shared/avatars/groups/000/000/583/fc60f5d7abc2e080599bb6dc465db54d/xxlarge.png?1363101197
https://assets4-my.umbc.edu/system/shared/avatars/groups/000/000/583/fc60f5d7abc2e080599bb6dc465db54d/xlarge.png?1363101197
https://assets3-my.umbc.edu/system/shared/avatars/groups/000/000/583/fc60f5d7abc2e080599bb6dc465db54d/large.png?1363101197
https://assets3-my.umbc.edu/system/shared/avatars/groups/000/000/583/fc60f5d7abc2e080599bb6dc465db54d/medium.png?1363101197
https://assets4-my.umbc.edu/system/shared/avatars/groups/000/000/583/fc60f5d7abc2e080599bb6dc465db54d/small.png?1363101197
https://assets3-my.umbc.edu/system/shared/avatars/groups/000/000/583/fc60f5d7abc2e080599bb6dc465db54d/xsmall.png?1363101197
https://assets4-my.umbc.edu/system/shared/avatars/groups/000/000/583/fc60f5d7abc2e080599bb6dc465db54d/xxsmall.png?1363101197
Web Developer - Build Group
0
0
true
Fri, 05 Jul 2013 08:10:06 -0400
Fri, 05 Jul 2013 15:55:58 -0400
Gadgetwise: Adding Pictures to the Windows 8 Photos App
The Photos app in Windows 8 can show off the pictures on your computer, as long as you have those pictures in the right place.
 ]]>
The Photos app in Windows 8 can show off the pictures on your computer, as long as you have those pictures in the right place.
http://gadgetwise.blogs.nytimes.com/2013/07/05/qa-adding-pictures-to-the-windows-8-photos-app/?partner=rss&emc=rss
https://my3.my.umbc.edu/api/v0/pixel/news/32247/guest@my.umbc.edu/92961817714ffe7f319307e8b8b61baa/api/pixel
computers-and-the-internet
desktop-computers
microsoft-corporation
microsoft-corporation-msft-nasdaq
new
photography
q-and-a
technology
york
Web Developer - Build Group
https://my3.my.umbc.edu/groups/retired-583
https://assets3-my.umbc.edu/system/shared/avatars/groups/000/000/583/fc60f5d7abc2e080599bb6dc465db54d/xsmall.png?1363101197
https://assets4-my.umbc.edu/system/shared/avatars/groups/000/000/583/fc60f5d7abc2e080599bb6dc465db54d/original.jpg?1363101197
https://assets4-my.umbc.edu/system/shared/avatars/groups/000/000/583/fc60f5d7abc2e080599bb6dc465db54d/xxlarge.png?1363101197
https://assets4-my.umbc.edu/system/shared/avatars/groups/000/000/583/fc60f5d7abc2e080599bb6dc465db54d/xlarge.png?1363101197
https://assets3-my.umbc.edu/system/shared/avatars/groups/000/000/583/fc60f5d7abc2e080599bb6dc465db54d/large.png?1363101197
https://assets3-my.umbc.edu/system/shared/avatars/groups/000/000/583/fc60f5d7abc2e080599bb6dc465db54d/medium.png?1363101197
https://assets4-my.umbc.edu/system/shared/avatars/groups/000/000/583/fc60f5d7abc2e080599bb6dc465db54d/small.png?1363101197
https://assets3-my.umbc.edu/system/shared/avatars/groups/000/000/583/fc60f5d7abc2e080599bb6dc465db54d/xsmall.png?1363101197
https://assets4-my.umbc.edu/system/shared/avatars/groups/000/000/583/fc60f5d7abc2e080599bb6dc465db54d/xxsmall.png?1363101197
Web Developer - Build Group
0
0
true
Fri, 05 Jul 2013 06:03:26 -0400
Fri, 05 Jul 2013 06:03:26 -0400
Responsively retrofit older sites
You can use responsive techniques on older sites as a first step toward better small-screen experiences. Check your idealism at the door, says Ben Callahan
]]>
The Photos app in Windows 8 can show off the pictures on your computer, as long as you have those pictures in the right place.
http://gadgetwise.blogs.nytimes.com/2013/07/05/qa-adding-pictures-to-the-windows-8-photos-app/?partner=rss&emc=rss
https://my3.my.umbc.edu/api/v0/pixel/news/32247/guest@my.umbc.edu/92961817714ffe7f319307e8b8b61baa/api/pixel
computers-and-the-internet
desktop-computers
microsoft-corporation
microsoft-corporation-msft-nasdaq
new
photography
q-and-a
technology
york
Web Developer - Build Group
https://my3.my.umbc.edu/groups/retired-583
https://assets3-my.umbc.edu/system/shared/avatars/groups/000/000/583/fc60f5d7abc2e080599bb6dc465db54d/xsmall.png?1363101197
https://assets4-my.umbc.edu/system/shared/avatars/groups/000/000/583/fc60f5d7abc2e080599bb6dc465db54d/original.jpg?1363101197
https://assets4-my.umbc.edu/system/shared/avatars/groups/000/000/583/fc60f5d7abc2e080599bb6dc465db54d/xxlarge.png?1363101197
https://assets4-my.umbc.edu/system/shared/avatars/groups/000/000/583/fc60f5d7abc2e080599bb6dc465db54d/xlarge.png?1363101197
https://assets3-my.umbc.edu/system/shared/avatars/groups/000/000/583/fc60f5d7abc2e080599bb6dc465db54d/large.png?1363101197
https://assets3-my.umbc.edu/system/shared/avatars/groups/000/000/583/fc60f5d7abc2e080599bb6dc465db54d/medium.png?1363101197
https://assets4-my.umbc.edu/system/shared/avatars/groups/000/000/583/fc60f5d7abc2e080599bb6dc465db54d/small.png?1363101197
https://assets3-my.umbc.edu/system/shared/avatars/groups/000/000/583/fc60f5d7abc2e080599bb6dc465db54d/xsmall.png?1363101197
https://assets4-my.umbc.edu/system/shared/avatars/groups/000/000/583/fc60f5d7abc2e080599bb6dc465db54d/xxsmall.png?1363101197
Web Developer - Build Group
0
0
true
Fri, 05 Jul 2013 06:03:26 -0400
Fri, 05 Jul 2013 06:03:26 -0400
Responsively retrofit older sites
You can use responsive techniques on older sites as a first step toward better small-screen experiences. Check your idealism at the door, says Ben Callahan
 ]]>
You can use responsive techniques on older sites as a first step toward better small-screen experiences. Check your idealism at the door, says Ben Callahan
http://feedproxy.google.com/~r/net/topstories/~3/rd67LDOg4_Y/story01.htm
https://my3.my.umbc.edu/api/v0/pixel/news/32246/guest@my.umbc.edu/f3625647b6eeae4cc170f8f8c5285960/api/pixel
css
development
html
javascript
mysql
net
php
sql
web
Web Developer - Build Group
https://my3.my.umbc.edu/groups/retired-583
https://assets3-my.umbc.edu/system/shared/avatars/groups/000/000/583/fc60f5d7abc2e080599bb6dc465db54d/xsmall.png?1363101197
https://assets4-my.umbc.edu/system/shared/avatars/groups/000/000/583/fc60f5d7abc2e080599bb6dc465db54d/original.jpg?1363101197
https://assets4-my.umbc.edu/system/shared/avatars/groups/000/000/583/fc60f5d7abc2e080599bb6dc465db54d/xxlarge.png?1363101197
https://assets4-my.umbc.edu/system/shared/avatars/groups/000/000/583/fc60f5d7abc2e080599bb6dc465db54d/xlarge.png?1363101197
https://assets3-my.umbc.edu/system/shared/avatars/groups/000/000/583/fc60f5d7abc2e080599bb6dc465db54d/large.png?1363101197
https://assets3-my.umbc.edu/system/shared/avatars/groups/000/000/583/fc60f5d7abc2e080599bb6dc465db54d/medium.png?1363101197
https://assets4-my.umbc.edu/system/shared/avatars/groups/000/000/583/fc60f5d7abc2e080599bb6dc465db54d/small.png?1363101197
https://assets3-my.umbc.edu/system/shared/avatars/groups/000/000/583/fc60f5d7abc2e080599bb6dc465db54d/xsmall.png?1363101197
https://assets4-my.umbc.edu/system/shared/avatars/groups/000/000/583/fc60f5d7abc2e080599bb6dc465db54d/xxsmall.png?1363101197
Web Developer - Build Group
0
0
true
Fri, 05 Jul 2013 06:00:00 -0400
Samsung Cuts Its Forecast as Sales Growth Slows for Its Costliest Smartphones
The Korean electronics giant estimated quarterly profit of $8.3 billion, short of analysts’ expectations, as sales of Galaxy S4 smartphones slowed.
]]>
You can use responsive techniques on older sites as a first step toward better small-screen experiences. Check your idealism at the door, says Ben Callahan
http://feedproxy.google.com/~r/net/topstories/~3/rd67LDOg4_Y/story01.htm
https://my3.my.umbc.edu/api/v0/pixel/news/32246/guest@my.umbc.edu/f3625647b6eeae4cc170f8f8c5285960/api/pixel
css
development
html
javascript
mysql
net
php
sql
web
Web Developer - Build Group
https://my3.my.umbc.edu/groups/retired-583
https://assets3-my.umbc.edu/system/shared/avatars/groups/000/000/583/fc60f5d7abc2e080599bb6dc465db54d/xsmall.png?1363101197
https://assets4-my.umbc.edu/system/shared/avatars/groups/000/000/583/fc60f5d7abc2e080599bb6dc465db54d/original.jpg?1363101197
https://assets4-my.umbc.edu/system/shared/avatars/groups/000/000/583/fc60f5d7abc2e080599bb6dc465db54d/xxlarge.png?1363101197
https://assets4-my.umbc.edu/system/shared/avatars/groups/000/000/583/fc60f5d7abc2e080599bb6dc465db54d/xlarge.png?1363101197
https://assets3-my.umbc.edu/system/shared/avatars/groups/000/000/583/fc60f5d7abc2e080599bb6dc465db54d/large.png?1363101197
https://assets3-my.umbc.edu/system/shared/avatars/groups/000/000/583/fc60f5d7abc2e080599bb6dc465db54d/medium.png?1363101197
https://assets4-my.umbc.edu/system/shared/avatars/groups/000/000/583/fc60f5d7abc2e080599bb6dc465db54d/small.png?1363101197
https://assets3-my.umbc.edu/system/shared/avatars/groups/000/000/583/fc60f5d7abc2e080599bb6dc465db54d/xsmall.png?1363101197
https://assets4-my.umbc.edu/system/shared/avatars/groups/000/000/583/fc60f5d7abc2e080599bb6dc465db54d/xxsmall.png?1363101197
Web Developer - Build Group
0
0
true
Fri, 05 Jul 2013 06:00:00 -0400
Samsung Cuts Its Forecast as Sales Growth Slows for Its Costliest Smartphones
The Korean electronics giant estimated quarterly profit of $8.3 billion, short of analysts’ expectations, as sales of Galaxy S4 smartphones slowed.
 ]]>
The Korean electronics giant estimated quarterly profit of $8.3 billion, short of analysts’ expectations, as sales of Galaxy S4 smartphones slowed.
http://www.nytimes.com/2013/07/06/business/global/samsung-earnings.html?partner=rss&emc=rss
https://my3.my.umbc.edu/api/v0/pixel/news/32248/guest@my.umbc.edu/9021b825c55e80d8edae3cafe65ae7f5/api/pixel
company-reports
new
samsung-group
technology
york
Web Developer - Build Group
https://my3.my.umbc.edu/groups/retired-583
https://assets3-my.umbc.edu/system/shared/avatars/groups/000/000/583/fc60f5d7abc2e080599bb6dc465db54d/xsmall.png?1363101197
https://assets4-my.umbc.edu/system/shared/avatars/groups/000/000/583/fc60f5d7abc2e080599bb6dc465db54d/original.jpg?1363101197
https://assets4-my.umbc.edu/system/shared/avatars/groups/000/000/583/fc60f5d7abc2e080599bb6dc465db54d/xxlarge.png?1363101197
https://assets4-my.umbc.edu/system/shared/avatars/groups/000/000/583/fc60f5d7abc2e080599bb6dc465db54d/xlarge.png?1363101197
https://assets3-my.umbc.edu/system/shared/avatars/groups/000/000/583/fc60f5d7abc2e080599bb6dc465db54d/large.png?1363101197
https://assets3-my.umbc.edu/system/shared/avatars/groups/000/000/583/fc60f5d7abc2e080599bb6dc465db54d/medium.png?1363101197
https://assets4-my.umbc.edu/system/shared/avatars/groups/000/000/583/fc60f5d7abc2e080599bb6dc465db54d/small.png?1363101197
https://assets3-my.umbc.edu/system/shared/avatars/groups/000/000/583/fc60f5d7abc2e080599bb6dc465db54d/xsmall.png?1363101197
https://assets4-my.umbc.edu/system/shared/avatars/groups/000/000/583/fc60f5d7abc2e080599bb6dc465db54d/xxsmall.png?1363101197
Web Developer - Build Group
0
0
true
Fri, 05 Jul 2013 05:56:41 -0400
Fri, 05 Jul 2013 16:25:55 -0400
How to develop a custom Tumblr theme
]]>
The Korean electronics giant estimated quarterly profit of $8.3 billion, short of analysts’ expectations, as sales of Galaxy S4 smartphones slowed.
http://www.nytimes.com/2013/07/06/business/global/samsung-earnings.html?partner=rss&emc=rss
https://my3.my.umbc.edu/api/v0/pixel/news/32248/guest@my.umbc.edu/9021b825c55e80d8edae3cafe65ae7f5/api/pixel
company-reports
new
samsung-group
technology
york
Web Developer - Build Group
https://my3.my.umbc.edu/groups/retired-583
https://assets3-my.umbc.edu/system/shared/avatars/groups/000/000/583/fc60f5d7abc2e080599bb6dc465db54d/xsmall.png?1363101197
https://assets4-my.umbc.edu/system/shared/avatars/groups/000/000/583/fc60f5d7abc2e080599bb6dc465db54d/original.jpg?1363101197
https://assets4-my.umbc.edu/system/shared/avatars/groups/000/000/583/fc60f5d7abc2e080599bb6dc465db54d/xxlarge.png?1363101197
https://assets4-my.umbc.edu/system/shared/avatars/groups/000/000/583/fc60f5d7abc2e080599bb6dc465db54d/xlarge.png?1363101197
https://assets3-my.umbc.edu/system/shared/avatars/groups/000/000/583/fc60f5d7abc2e080599bb6dc465db54d/large.png?1363101197
https://assets3-my.umbc.edu/system/shared/avatars/groups/000/000/583/fc60f5d7abc2e080599bb6dc465db54d/medium.png?1363101197
https://assets4-my.umbc.edu/system/shared/avatars/groups/000/000/583/fc60f5d7abc2e080599bb6dc465db54d/small.png?1363101197
https://assets3-my.umbc.edu/system/shared/avatars/groups/000/000/583/fc60f5d7abc2e080599bb6dc465db54d/xsmall.png?1363101197
https://assets4-my.umbc.edu/system/shared/avatars/groups/000/000/583/fc60f5d7abc2e080599bb6dc465db54d/xxsmall.png?1363101197
Web Developer - Build Group
0
0
true
Fri, 05 Jul 2013 05:56:41 -0400
Fri, 05 Jul 2013 16:25:55 -0400
How to develop a custom Tumblr theme
 As a freelance web designer and developer I have become accustomed to working in a specific order from start to finish on a typical client’s website. My typical workflow starts with programming/sketching which then leads to development and revisions all with constant contact with the client along the way.
When I was asked about developing for Tumblr my mind initially went blank. Tumblr at the time was something I never knew of or understood why someone would want to use it. I had no clue how customizable it truly was until I dug deeper.
The purpose of this post is to share some insight about Tumblr and how you can use it effectively for your own upcoming projects.
Key benefits
The true benefits of Tumblr are within the blogging section of each site. The one concept that stood out to me was FREE hosting for your theme. There are steps to make this work but once you carry them out all you need is the domain name and you’re golden.
The same rules apply when it comes to developing a traditional website with tumblr but any includes such as CSS or JavaScript files need to have absolute URLs (more on this in a bit).
Getting started
To get started you first need to create a Tumblr account. Set one up and then navigate to the settings area after logging in. For each client I’ll typically set up two Tumblr blogs or use my own testing Tumblr and create a password-protected blog for development and viewing before the site goes live. For the purpose of this demo I’ve included my band’s most recent blog design (music coming soon :)). Inside the sidebar you see my test blog and then the main blog featuring the band’s Tumblr.

You may be wondering why I created two blogs? Well to password protect a blog or make it private you need to have a base blog in place on Tumblr, which I did here in order to do so. Later on you can switch this feature off and either keep the sitename.tumblr.com extension or switch it to a direct URL like I have. You can also just skip this step if you’re not worried about only releasing the site once it’s fully developed.
To create a private blog click on the Create a new blog link inside the side bar and you’ll be taken to the page below. Make sure the Privacy tick is selected and you’re good to go.

Moving forward
Now we move into the meat of Tumblr: after you have your site designed and finalized it is then time to move into the slicing and dicing of it to optimize it for Tumblr. There are two types of operators to render content into your existing HTML. You will need to have a basic HTML shell built when starting a custom theme.
Some key terms and useful lins:
-
Variables: are used to insert dynamic data like your blog’s title or description.
-
Blocks: are used to render HTML or set data like a previous link or a blog post.
There is a complete list of the different types of Variables and Blocks you can assign to your HTML here. Rather than copy the site I HIGHLY recommend you visit this page and get familiar with it. It would be best to even do this before you start your design. There are a lot of features available for any Tumblr theme which can be used or not used inside your own design. My band’s site is a bare bones site. I needed a place for people to go to find out more and see what we are always up to and that’s about it.
You’ll want to have a plan for all types of posts that are available inside of Tumblr. Code these and style them properly for every blog you create and of course see the documentation to include other elements that are essential like navigation, pagination, meta data, reposts, comments (notes) etc:
-
{block:Posts} This is a wrapper or sorts to any post {/block:Posts}
-
{block:Text} For text based posts {/block:Text}
-
{block:Photo} For photo posts {/block:Photo}
-
{block:Photoset} For photo posts in gallery form {/block:Photoset}
-
{block:Quote} For quotes {/block:Quote}
-
{block:Link} For Links {/block:Link}
-
{block:Audio} For audio posts {/block:Audio}
-
{block:Video} For video posts {/block:Video}
So where do I put my code?
To import your freshly polished HTML into your custom theme you will need to login and select the appropriate blog on the left sidebar inside the Settings section of the dashboard. Look for the Heading titled Theme and click the Customize button.
Once you click the button you are greeted with a new page with some custom editing options for your site. Below you see how my finished site currently looks with Tumblr dummy content. This area is great to see updates to any changes you make inside Tumblr’s code editor but I really recommend developing the site using a basic code editor and browser from the start. Once the code is in place you can insert the custom Tumblr based variables and block elements within the HTML. Then simply copy and paste your changes into each custom Tumblr page.

To edit the HTML click the Edit HTML button (yes it’s that easy) and a new side window appears. You’ll see some HTML with whatever base theme you are customizing. Delete or alter that code to match your own style and design and then click Update Preview to see the page update to your right. One thing I cannot stress enough is to use absolute URL’s to host your images, CSS, JavaScript, and whatever includes you may have because they will not link properly inside of Tumblr if you don’t. I happen to have hosting for my own website so I just created a directory to link the images and includes. You could just as easily use an image or file hosting service for free. I would only do that if you are completely sure the links won’t drop and leave your website without styles or images, etc…

What if I want more pages?
Easy. After you’ve clicked the Edit HTML button like I mentioned above, scroll down to the pages section of the sidebar on the left that appears. Here you’ll see the example I’ve provided with additional pages of my band’s website. You can drag the order of them and edit each individually.
Simply click the +Add a page link to create another. With each new page you will need to update the content as well as navigation if, for example, you have active states that change via CSS. This should be a no brainer if you’ve worked with HTML and CSS before. If not, you should check out the numerous tutorials and posts on this subject on this site.

One thing to note is that when you click edit beside an existing page you will see a new browser window appear like below. Be sure to have the custom layout active in the drop down as you are creating a custom layout for each page. The option is there to use a standard layout and have a navigation link redirect to another.

Advanced features
On top of creating your own CSS styles and HTML documents you have the ability to use some of Tumblr’s advanced features, which are bundled with each blog. Right below the Pages section you will see an Advanced section with a few options available.

Most of these are self-explanatory. If your site doesn’t have a mobile optimized layout like mine does then I would switch on the use optimized mobile layout option. Descriptive URLS make the permalink to any post much more identifiable. Finally, if you’re in a pinch, you can insert some custom CSS below that but it’s just as easy to include your own CSS via absolute link.
I don’t want the .tumblr extension
The folks at Tumblr made this easy. All that is required is that you own the domain name you are trying to redirect your Tumblr blog to.

To lose the extension you’ll need to navigate to the settings area of your dashboard. From there select Use a custom domain name inside the URL section. Enter the appropriate domain you have registered and then make sure to test your domain by clicking the blue button staring back at you. Once you do that you’ll need to update the A-record of your current domain supplier to point to Tumblr’s, which is 66.6.44.4. Complete directions on how to do this are available here.
To summarize
Using Tumblr is a great option for anyone interested in keeping an active blog or even developing a complete website.
I built the example site you’ve seen throughout this tutorial from the ground up. The website was first designed inside of photoshop. Once I decided on the style and look I began translating the static design into an interactive experience much like a similar website but then added the variables and blocks required for Tumblr to function as an additional, but easy step. From there I optimized it to fit on mobile devices and the rest is history.
There are plenty more customizations available like incorporating Google analytics, customizable options which can be turned on and off from the settings panel, the connection to other apps like Instagram, Facebook, and more, but the process overall was very easy and highly recommended to anyone interested in a new way to host a blogging based website.
This tutorial is meant to be a very broad overview of how to start developing websites with Tumblr. To get more information and to gain a better understanding please read the full documentation provided by Tumblr.
Have you built a project around Tumblr? What tips would you add? Let us know in the comments.
Source
 ]]>
As a freelance web designer and developer I have become accustomed to working in a specific order from start to finish on a typical client’s website. My typical workflow starts with...
http://rss.feedsportal.com/c/35285/f/661066/s/2e3e3609/l/0L0Swebdesignerdepot0N0C20A130C0A70Chow0Eto0Edevelop0Ea0Ecustom0Etumblr0Etheme0C/story01.htm
https://my3.my.umbc.edu/api/v0/pixel/news/32245/guest@my.umbc.edu/137f1eb8faee3f1a4ec26f2eb453c21a/api/pixel
art
css
design
development
how-to
html
html5
illustrator
javascript
mysql
oracle
photoshop
php
sql
Web Developer - Build Group
https://my3.my.umbc.edu/groups/retired-583
https://assets3-my.umbc.edu/system/shared/avatars/groups/000/000/583/fc60f5d7abc2e080599bb6dc465db54d/xsmall.png?1363101197
https://assets4-my.umbc.edu/system/shared/avatars/groups/000/000/583/fc60f5d7abc2e080599bb6dc465db54d/original.jpg?1363101197
https://assets4-my.umbc.edu/system/shared/avatars/groups/000/000/583/fc60f5d7abc2e080599bb6dc465db54d/xxlarge.png?1363101197
https://assets4-my.umbc.edu/system/shared/avatars/groups/000/000/583/fc60f5d7abc2e080599bb6dc465db54d/xlarge.png?1363101197
https://assets3-my.umbc.edu/system/shared/avatars/groups/000/000/583/fc60f5d7abc2e080599bb6dc465db54d/large.png?1363101197
https://assets3-my.umbc.edu/system/shared/avatars/groups/000/000/583/fc60f5d7abc2e080599bb6dc465db54d/medium.png?1363101197
https://assets4-my.umbc.edu/system/shared/avatars/groups/000/000/583/fc60f5d7abc2e080599bb6dc465db54d/small.png?1363101197
https://assets3-my.umbc.edu/system/shared/avatars/groups/000/000/583/fc60f5d7abc2e080599bb6dc465db54d/xsmall.png?1363101197
https://assets4-my.umbc.edu/system/shared/avatars/groups/000/000/583/fc60f5d7abc2e080599bb6dc465db54d/xxsmall.png?1363101197
Web Developer - Build Group
0
0
true
Fri, 05 Jul 2013 05:15:10 -0400
Fri, 05 Jul 2013 05:15:10 -0400
How to develop a custom Tumblr theme
]]>
As a freelance web designer and developer I have become accustomed to working in a specific order from start to finish on a typical client’s website. My typical workflow starts with...
http://rss.feedsportal.com/c/35285/f/661066/s/2e3e3609/l/0L0Swebdesignerdepot0N0C20A130C0A70Chow0Eto0Edevelop0Ea0Ecustom0Etumblr0Etheme0C/story01.htm
https://my3.my.umbc.edu/api/v0/pixel/news/32245/guest@my.umbc.edu/137f1eb8faee3f1a4ec26f2eb453c21a/api/pixel
art
css
design
development
how-to
html
html5
illustrator
javascript
mysql
oracle
photoshop
php
sql
Web Developer - Build Group
https://my3.my.umbc.edu/groups/retired-583
https://assets3-my.umbc.edu/system/shared/avatars/groups/000/000/583/fc60f5d7abc2e080599bb6dc465db54d/xsmall.png?1363101197
https://assets4-my.umbc.edu/system/shared/avatars/groups/000/000/583/fc60f5d7abc2e080599bb6dc465db54d/original.jpg?1363101197
https://assets4-my.umbc.edu/system/shared/avatars/groups/000/000/583/fc60f5d7abc2e080599bb6dc465db54d/xxlarge.png?1363101197
https://assets4-my.umbc.edu/system/shared/avatars/groups/000/000/583/fc60f5d7abc2e080599bb6dc465db54d/xlarge.png?1363101197
https://assets3-my.umbc.edu/system/shared/avatars/groups/000/000/583/fc60f5d7abc2e080599bb6dc465db54d/large.png?1363101197
https://assets3-my.umbc.edu/system/shared/avatars/groups/000/000/583/fc60f5d7abc2e080599bb6dc465db54d/medium.png?1363101197
https://assets4-my.umbc.edu/system/shared/avatars/groups/000/000/583/fc60f5d7abc2e080599bb6dc465db54d/small.png?1363101197
https://assets3-my.umbc.edu/system/shared/avatars/groups/000/000/583/fc60f5d7abc2e080599bb6dc465db54d/xsmall.png?1363101197
https://assets4-my.umbc.edu/system/shared/avatars/groups/000/000/583/fc60f5d7abc2e080599bb6dc465db54d/xxsmall.png?1363101197
Web Developer - Build Group
0
0
true
Fri, 05 Jul 2013 05:15:10 -0400
Fri, 05 Jul 2013 05:15:10 -0400
How to develop a custom Tumblr theme
As a freelance web designer and developer I have become accustomed to working in a specific order from start to finish on a typical client’s website. My typical workflow starts with programming/sketching which then leads to development and revisions all with constant contact with the client along the way.
When I was asked about developing for Tumblr my mind initially went blank. Tumblr at the time was something I never knew of or understood why someone would want to use it. I had no clue how customizable it truly was until I dug deeper.
The purpose of this post is to share some insight about Tumblr and how you can use it effectively for your own upcoming projects.
Key benefits
The true benefits of Tumblr are within the blogging section of each site. The one concept that stood out to me was FREE hosting for your theme. There are steps to make this work but once you carry them out all you need is the domain name and you’re golden.
The same rules apply when it comes to developing a traditional website with tumblr but any includes such as CSS or JavaScript files need to have absolute URLs (more on this in a bit).
Getting started
To get started you first need to create a Tumblr account. Set one up and then navigate to the settings area after logging in. For each client I’ll typically set up two Tumblr blogs or use my own testing Tumblr and create a password-protected blog for development and viewing before the site goes live. For the purpose of this demo I’ve included my band’s most recent blog design (music coming soon :)). Inside the sidebar you see my test blog and then the main blog featuring the band’s Tumblr.
You may be wondering why I created two blogs? Well to password protect a blog or make it private you need to have a base blog in place on Tumblr, which I did here in order to do so. Later on you can switch this feature off and either keep the sitename.tumblr.com extension or switch it to a direct URL like I have. You can also just skip this step if you’re not worried about only releasing the site once it’s fully developed.
To create a private blog click on the Create a new blog link inside the side bar and you’ll be taken to the page below. Make sure the Privacy tick is selected and you’re good to go.
Moving forward
Now we move into the meat of Tumblr: after you have your site designed and finalized it is then time to move into the slicing and dicing of it to optimize it for Tumblr. There are two types of operators to render content into your existing HTML. You will need to have a basic HTML shell built when starting a custom theme.
Some key terms and useful lins:
-
Variables: are used to insert dynamic data like your blog’s title or description.
-
Blocks: are used to render HTML or set data like a previous link or a blog post.
There is a complete list of the different types of Variables and Blocks you can assign to your HTML here. Rather than copy the site I HIGHLY recommend you visit this page and get familiar with it. It would be best to even do this before you start your design. There are a lot of features available for any Tumblr theme which can be used or not used inside your own design. My band’s site is a bare bones site. I needed a place for people to go to find out more and see what we are always up to and that’s about it.
You’ll want to have a plan for all types of posts that are available inside of Tumblr. Code these and style them properly for every blog you create and of course see the documentation to include other elements that are essential like navigation, pagination, meta data, reposts, comments (notes) etc:
-
{block:Posts} This is a wrapper or sorts to any post {/block:Posts}
-
{block:Text} For text based posts {/block:Text}
-
{block:Photo} For photo posts {/block:Photo}
-
{block:Photoset} For photo posts in gallery form {/block:Photoset}
-
{block:Quote} For quotes {/block:Quote}
-
{block:Link} For Links {/block:Link}
-
{block:Audio} For audio posts {/block:Audio}
-
{block:Video} For video posts {/block:Video}
So where do I put my code?
To import your freshly polished HTML into your custom theme you will need to login and select the appropriate blog on the left sidebar inside the Settings section of the dashboard. Look for the Heading titled Theme and click the Customize button.
Once you click the button you are greeted with a new page with some custom editing options for your site. Below you see how my finished site currently looks with Tumblr dummy content. This area is great to see updates to any changes you make inside Tumblr’s code editor but I really recommend developing the site using a basic code editor and browser from the start. Once the code is in place you can insert the custom Tumblr based variables and block elements within the HTML. Then simply copy and paste your changes into each custom Tumblr page.
To edit the HTML click the Edit HTML button (yes it’s that easy) and a new side window appears. You’ll see some HTML with whatever base theme you are customizing. Delete or alter that code to match your own style and design and then click Update Preview to see the page update to your right. One thing I cannot stress enough is to use absolute URL’s to host your images, CSS, JavaScript, and whatever includes you may have because they will not link properly inside of Tumblr if you don’t. I happen to have hosting for my own website so I just created a directory to link the images and includes. You could just as easily use an image or file hosting service for free. I would only do that if you are completely sure the links won’t drop and leave your website without styles or images, etc…
What if I want more pages?
Easy. After you’ve clicked the Edit HTML button like I mentioned above, scroll down to the pages section of the sidebar on the left that appears. Here you’ll see the example I’ve provided with additional pages of my band’s website. You can drag the order of them and edit each individually.
Simply click the +Add a page link to create another. With each new page you will need to update the content as well as navigation if, for example, you have active states that change via CSS. This should be a no brainer if you’ve worked with HTML and CSS before. If not, you should check out the numerous tutorials and posts on this subject on this site.
One thing to note is that when you click edit beside an existing page you will see a new browser window appear like below. Be sure to have the custom layout active in the drop down as you are creating a custom layout for each page. The option is there to use a standard layout and have a navigation link redirect to another.
Advanced features
On top of creating your own CSS styles and HTML documents you have the ability to use some of Tumblr’s advanced features, which are bundled with each blog. Right below the Pages section you will see an Advanced section with a few options available.
Most of these are self-explanatory. If your site doesn’t have a mobile optimized layout like mine does then I would switch on the use optimized mobile layout option. Descriptive URLS make the permalink to any post much more identifiable. Finally, if you’re in a pinch, you can insert some custom CSS below that but it’s just as easy to include your own CSS via absolute link.
I don’t want the .tumblr extension
The folks at Tumblr made this easy. All that is required is that you own the domain name you are trying to redirect your Tumblr blog to.
To lose the extension you’ll need to navigate to the settings area of your dashboard. From there select Use a custom domain name inside the URL section. Enter the appropriate domain you have registered and then make sure to test your domain by clicking the blue button staring back at you. Once you do that you’ll need to update the A-record of your current domain supplier to point to Tumblr’s, which is 66.6.44.4. Complete directions on how to do this are available here.
To summarize
Using Tumblr is a great option for anyone interested in keeping an active blog or even developing a complete website.
I built the example site you’ve seen throughout this tutorial from the ground up. The website was first designed inside of photoshop. Once I decided on the style and look I began translating the static design into an interactive experience much like a similar website but then added the variables and blocks required for Tumblr to function as an additional, but easy step. From there I optimized it to fit on mobile devices and the rest is history.
There are plenty more customizations available like incorporating Google analytics, customizable options which can be turned on and off from the settings panel, the connection to other apps like Instagram, Facebook, and more, but the process overall was very easy and highly recommended to anyone interested in a new way to host a blogging based website.
This tutorial is meant to be a very broad overview of how to start developing websites with Tumblr. To get more information and to gain a better understanding please read the full documentation provided by Tumblr.
Have you built a project around Tumblr? What tips would you add? Let us know in the comments.
Source
]]>
As a freelance web designer and developer I have become accustomed to working in a specific order from start to finish on a typical client’s website. My typical workflow starts with...
http://www.webdesignerdepot.com/2013/07/how-to-develop-a-custom-tumblr-theme/
https://my3.my.umbc.edu/api/v0/pixel/news/32421/guest@my.umbc.edu/6098872e51d8fed68aa43f59c5b3852d/api/pixel
art
css
design
development
how-to
html
html5
illustrator
javascript
mysql
oracle
photoshop
php
sql
Web Developer - Build Group
https://my3.my.umbc.edu/groups/retired-583
https://assets3-my.umbc.edu/system/shared/avatars/groups/000/000/583/fc60f5d7abc2e080599bb6dc465db54d/xsmall.png?1363101197
https://assets4-my.umbc.edu/system/shared/avatars/groups/000/000/583/fc60f5d7abc2e080599bb6dc465db54d/original.jpg?1363101197
https://assets4-my.umbc.edu/system/shared/avatars/groups/000/000/583/fc60f5d7abc2e080599bb6dc465db54d/xxlarge.png?1363101197
https://assets4-my.umbc.edu/system/shared/avatars/groups/000/000/583/fc60f5d7abc2e080599bb6dc465db54d/xlarge.png?1363101197
https://assets3-my.umbc.edu/system/shared/avatars/groups/000/000/583/fc60f5d7abc2e080599bb6dc465db54d/large.png?1363101197
https://assets3-my.umbc.edu/system/shared/avatars/groups/000/000/583/fc60f5d7abc2e080599bb6dc465db54d/medium.png?1363101197
https://assets4-my.umbc.edu/system/shared/avatars/groups/000/000/583/fc60f5d7abc2e080599bb6dc465db54d/small.png?1363101197
https://assets3-my.umbc.edu/system/shared/avatars/groups/000/000/583/fc60f5d7abc2e080599bb6dc465db54d/xsmall.png?1363101197
https://assets4-my.umbc.edu/system/shared/avatars/groups/000/000/583/fc60f5d7abc2e080599bb6dc465db54d/xxsmall.png?1363101197
Web Developer - Build Group
0
0
true
Fri, 05 Jul 2013 05:15:10 -0400
Fri, 05 Jul 2013 05:15:10 -0400


