    
|
|
|

As a web designer, masters of the digital realm, you might have never faced the situation where your designs are going to be sent to a print shop.
Or perhaps you’re an Internet business owner in a place right now where you need printed materials for an event (a conference, a meet-up, billboard advertising, and so forth). You might be an online retailer, a SaaS company, a web development agency, etc.
What happens when you’ve only got web graphics at hand? Graphics designed to be displayed on electronic devices like computer monitors and smartphones.
When prepping graphics that you intend to have printed, there are several vital factors you must consider.
I’ll discuss the most important factors in this beginner-level guide to preparing your designs for printing.
Web and print don’t reproduce color in the same way. Let’s discuss the differences.
Web graphics operate using the RGB color model where each color is created using a combination of red, green and blue pixels.
The RGB color model is designed specifically for electronic devices such as your computer monitor or your tablet device or your TV.
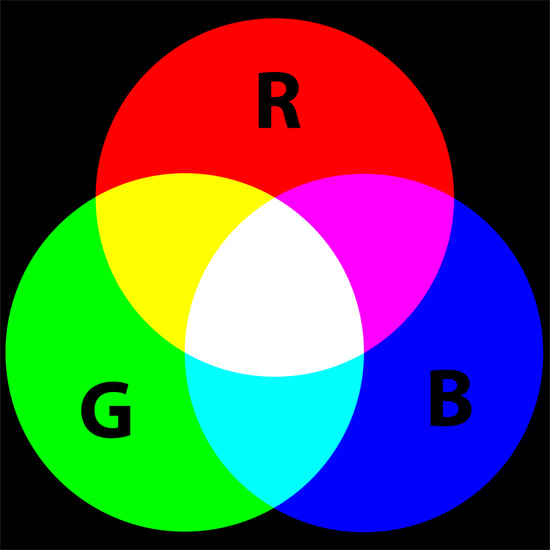
Print, on the other hand, tends to involve either PMS or CMYK (four-color process).
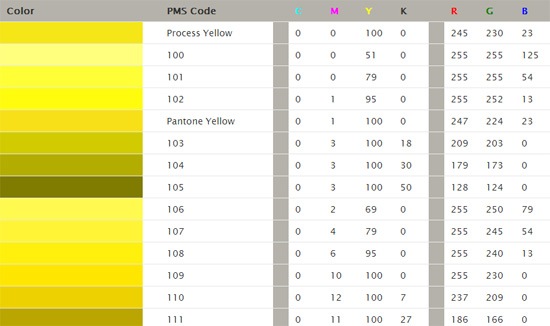
PMS (Pantone Color Matching System) uses pre-mixed inks with established color values.
PMS is a proprietary color system by the New-Jersey-based corporation, Pantone Inc.
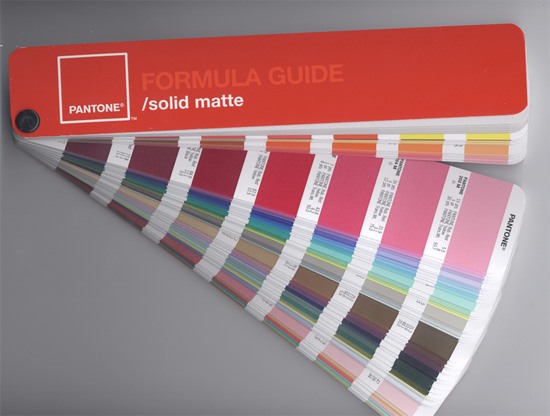 Image source: Parhamr
Using the Pantone system guarantees that you get the exact colors you want because of the standardized inks.
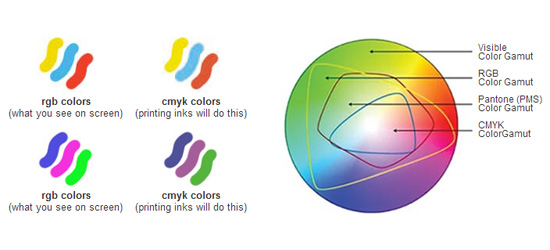
CMYK (also known as four-color process) uses a combination of cyan, magenta, yellow and black inks to reproduce different colors.
 Image source: Quark67
The ideal situation would be that a graphics specialist such as a logo designer has professionally designed your graphics assets.
Your logo, for instance, should have been provided to you in two different versions: One specifically designed for Web use, and one specifically for print use. Two different logo designs for two distinctly different display environments.
However if you’re reading this guide, chances are that you don’t have the files you need.
So what do you need to do?
So what do you do when you only have web graphics for printing?
Web graphics are saved to the RGB color model and won’t work properly for your printer. What will happen is the colors might not turn out to be accurate when your printer uses the PMS or CMYK to print your web graphics.
So it’s important to convert and re-save your graphics to either the CMYK color model or PMS for printing. This is a simple process most of the time — you just need your graphics software. But the results aren’t guaranteed to be accurate.
The choice is up to you whether you choose CMYK or PMS, but there’s no print shop that will be able to print files using the RGB color model.

After converting your RGB artwork to a print-ready color system, it’s recommended that you test the output by printing just a small amount of your artwork before going into full production to ensure that the color system conversion was accurate (or accurate enough for your needs).
Here are some guides and resources that will be helpful in color conversion:


A problem that’s likely to come up when dealing with web graphics is their resolution and ability to be resized without loss of quality. This poses an issue when you want your web graphics to be printed on bigger mediums like billboards or magazine covers.
Image resolution refers to the amount of details an image has.
Image resolution for digital images are measured using spatial resolution units, and the poplar unit of measurements are in pixels per inch (ppi) or dots per inch (dpi).
The more pixels or dots there are in a given square inch, the more detail the image has, i.e., the higher its resolution.

Images on the Web are typically compressed to a lower resolution — typically 72dpi — so that they download faster and because most screens don’t need/can’t take advantage of a higher resolution.
Lower-res graphics may look fine on your computer monitor, but that same image will look different when printed.
The biggest issue you might encounter with image resolution is pixelation. Pixelation occurs when you scale an image up and it doesn’t have sufficient enough resolution that it makes the image too blurry.
Look at the difference between a web-resolution image being scaled up in dimension below.
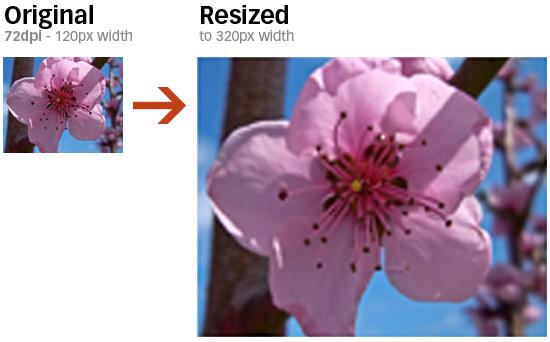
Notice the pixelation occurring as a result of us trying to enlarge the image when it doesn’t have sufficient enough detail.
For this reason, it’s vital to use the highest resolution images possible — at least 300dpi — when creating print-ready graphics.
If you don’t have access to the original file that was used to create your web graphics — which should be in PSD or vector file format (EPS, AI, etc.) — it may be necessary to recreate it.
With a vector file format, you can scale the design up to whatever size you require without any loss of quality.
The Web offers very few restrictions when it comes to color representation.
Print, on the other hand, comes with certain limitations.
When using PMS printing, each new color means an additional cost, making multicolored web graphics less practical with this method.
And, although four-color process can be used to reproduce most multicolored web graphics, one- or two-color PMS printing is often a more cost-effective option.
For this reason (among others), many logo designers will first design a logo using only black and white. If the logo maintains the same visual impact in its simplest, monochromatic form, you’ll have a much easier time when you recreate it using one-color printing.
While the object below is certainly distinctive when it’s multicolored, it’s not terribly interesting to look at in black and white.
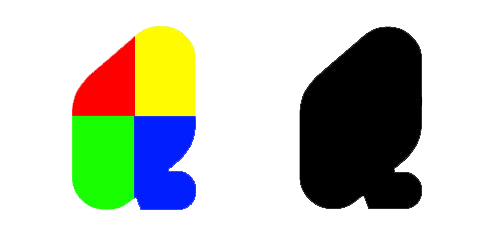
Just as PMS printing presents certain design limitations, four-color process also comes with complications to consider — specifically, it can be difficult to accurately reproduce some colors (including orange and navy blue) with the CMYK color model.
If you intend to print your logo using four-color process and it contains any orange or navy blue elements, you may want to replace them with another color — or, alternatively, have those areas spot printed with the proper PMS colors.
Check with your printer if you think your artwork may contain colors that present a problem for CMYK printing.
Popular image formats for web use include JPG and PNG — formats designed for computer monitors but don’t always work as well for printing.
In general, your high-res, print-ready artwork should be in the most "raw" format possible.
The most common formats for this purpose are:
Just because your artwork opens fine on your computer doesn’t necessarily mean it will work for a commercial printer.
When high-quality image files such as PSDs incorporate fonts, you’ll need the proper font files to view them correctly — files that your printer might not have immediate access to, especially if you’re using uncommon fonts.
Be sure to include any necessary font files when sending your artwork to a printer.
On a Mac, these files can be found in System/Library/Fonts.
In Windows, check the Fonts folder inside your main Windows directory.
Most printers will let you include font files in a ZIP along with your artwork files.
Alternatively, you can convert fonts to outlines in Illustrator or InDesign so that you won’t need to include additional files.
The best way to ensure that your logo looks great in print as well as on the Web is to design it with both mediums in mind from the very beginning. However, if you’re stuck in a bind, there are ways to make the best out of the situation.
For more information related to ensuring your graphics is suitable for print, be sure to check out this print-ready checklist that I made.
 Vladimir Gendelman is the founder and CEO of Company Folders, Inc. With years of web and print design experience, he leads a team of talented graphic artists and marketing specialists who help businesses put forth the best image possible. You can follow him on Google+ and Twitter.
The post Are Your Web Graphics Print-Ready? appeared first on Six Revisions.
]]> A couple of weeks ago the famous Foundation framework released its fourth version. If you have never heard of Foundation we’re going to guide you through using this responsive framework.
Since version 3 of Foundation was built from the ground up using SASS — a CSS pre-processor that helps in the writing of more efficient CSS — this new version is also mobile-friendly and provides a lot of features in its grid that you don’t get from other frameworks.
Let’s dive into Foundation and see why it’s so popular…
Foundation uses a 12 column nestable grid that will adapt to any size screen, if you have already used grids this should all be very familiar to you. All the divs in Foundation use box-sizing: border-box so that the borders and padding do not affect the element’s width and height, making the math a little bit easier for us. But the amazing thing about the Foundation grid is that you actually get 2 grids, a big grid for when the screen is bigger than 768px in width and a smaller grid that you can control just as simply. To that end Foundation uses the small-# and large-# classes, like so:
<div class="row"> <div class="small-3 large-4 columns">Lorem Ipsum</div> <div class="small-3 large-4 columns">Lorem Ipsum</div> <div class="small-6 large-4 columns">Lorem Ipsum</div> </div>
In this code we created a row in which there are 3 divs that are the exact same width when the browser is wider than 768px but when it’s smaller, as you can see by that small class in the divs, the last one will occupy half the screen while the other two will occupy 25% each, this gives you immense control of how our website will look on all screens.
Foundation also allows you to offset a column, by which I mean that you can have a row with 2 columns that are only 3 columns wide but you can offset the second one that it floats to the right and to do that we use the large-offset class or the small-offset class:
<div class="row"> <div class="large-3 columns"></div> <div class="large-3 large-offset-6 columns">3, offset 6</div> </div>
The block grid is just a nice little extra, it is a way for you to split the content of a list within the grid, it’s useful for when you wish this particular part of your website to stay evenly spaced no matter what the size of the browser. This type of grid uses the small-block-grid and the large-block-grid classes, if you only set the first one the grid will keep the desired spacing no matter what the viewport is but if you only use the large-block-grid class when the viewport reaches the breakpoint of 768px the grid items will stack on top of each other, you can always take more control by using both of these classes, like so:
<ul class="small-block-grid-2 large-block-grid-4"> <li><img src="image1.png"></li> <li><img src="image2.png"></li> <li><img src="image3.png"></li> <li><img src="image4.png"></li> </ul>
Using this, the images will be evenly spaced no matter the size. When the viewport is bigger than 768px they will only occupy one row, and when it’s smaller than that they will occupy two rows with 2 images each.
Now that we’ve covered the grid in Foundation and how it gives you plenty of control in all environments, we will talk about something we’ll nearly always use on our sites: a top navigation bar. And of course this navigation can also be flexible with little to no work using this framework. To create a simple responsive navigation using Foundation you use:
<nav class="top-bar"> <ul class="title-area"> <li class="name"> <h1><a href="/">Website Title</a></h1> </li> <li class="toggle-topbar menu-icon"><a href="#"><span>Menu</span></a></li> </ul> <ul class="right"> <li><a href="#">Item 1</a></li> <li><a href="#">Item 2</a></li> <li><a href="#">Item 3</a></li> <li><a href="#">Item 4</a></li> </ul> </nav>
This bit of HTML creates a simple navigation bar that has the title of the website on the left and then on the right it has four menu items. Also note that when the viewport is smaller than 768px this menu will be replaced by a list icon making this menu responsive. If you want this grid to have its position fixed as you scroll down the page you just need to wrap it in a div with a class of fixed. To add dropdowns to your navigation you just need to add something like this to the place where you want your dropdown:
<li class="has-dropdown"><a href="#">Dropdown Level 2c</a> <ul class="dropdown"> <li><label>Dropdown Menu</label></li> <li><a href="#">Sub menu Item 1</a></li> <li><a href="#">Sub menu Item 1</a></li> <li><a href="#">Sub menu Item 3</a></li> </ul> </li>
There is also the ability to add a divider to your list item adding a little grey vertical line, to do that you just need to place a list item with the class of divider between the two list items you wish to divide.
No framework would be complete without some predefined buttons and Foundation actually has more than one style of button predefined, it has the default one that uses a blue color and then it adds the success, alert and secondary styles. By adding the class of radius you give this button a little bit of border-radius and by giving it the class of round you make the button almost entirely round. You can also add the class disabled to the button and there are 4 size classes to make the button as big as you need it.
<!-- Size Classes --> <a href="#" class="button">Default Button</a> <a href="#" class="tiny button">Tiny Button</a> <a href="#" class="small button">Small Button</a> <a href="#" class="large button">Large Button</a> <!-- Color Classes --> <a href="#" class="button secondary">Secondary Button</a> <a href="#" class="button success">Success Button</a> <a href="#" class="button alert">Alert Button</a> <!-- Radius Classes --> <a href="#" class="button radius">Radius Button</a> <a href="#" class="button round">Round Button</a> <!-- Disabled Class --> <a href="#" class="button disabled">Disabled Button</a>
To create a simple dropdown button you only need to add the dropdown class after the last class, like so:
<a href="#" class="button dropdown">Dropdown Button</a>
The typography in Foundation uses Helvetica Neue and it also uses em’s instead of pixels to make it easier to adapt your type across all platforms and breakpoints. Using the headers is pretty self explanatory; you just need an h1 and the text you wish inside it, but there are also some other classes that can come in handy when dealing with typography in Foundation.
<!-- subheader --> <h1 class="subheader">h1.subheader</h1> <!-- Segment header, the text inside the small tag will act like a sub header --> <h1>h1. <small>Smaller</small></h1> <!-- Use .circle or .square to change the style of the bullets in unordered lists --> <ul class="disc"> <li>List item</li> </uL> <ul class="square"> <li>List item</li> </uL> <!-- create an inline list--> <ul class="inline-list"> <li><a href="#">Link 1</a></li> <li><a href="#">Link 2</a></li> </ul>
As you can see, when it comes to typography, Foundation provides us with some basic help and then some additional classes to meet all our needs.
If this demonstration of the Foundation framework has whet your appetite to learn more and start building with Foundation you should really take a look at the documentation because Foundation also offers additional CSS components such as:
And also some helper JavaScript such as:
As you can see, there’s a lot of Foundation to explore and I strongly advise you to look at all of its CSS and JavaScript properties.
We covered just enough in this article to see how Foundation can help building faster and more responsive websites, using its grid you get a lot more control over the structure of your website than when using a normal flexible grid and Foundation also gives you plenty of helpers to create your website. I hope this article has given you the push to learn and use Foundation for your next project.
Have you used Foundation for a project? What features did you find the most useful? Let us know in the comments.
| 250+ Creative Photo Overlays to Enhance Your Images – only $29! |  |
|
|
 In his junior year at UMBC, Collin Wojciechowski ’13, political science, represented nearly 180,000 students within the University System of Maryland (USM) as their sole student representative on the Board of Regents. Wojciechowski advocated against “doomsday” budget cuts and tuition increases and successfully lobbied to overhaul the USM policy for assessing student fees, making students an active part of the discussion.
Without the aid of scholarships, he would never have been able to serve his fellow students in this way. We sat down with the newly graduated Sondheim Scholar to talk a little bit about the part scholarships have played in his life.
Help UMBC students do AMAZING things. Make a gift to the 30 Days/30 Scholarships campaign today!
 Q: How important was it to your college career to have the support of scholarships?
A: Being the son of a firemen and a public school teacher and the oldest of three brothers who all aspire to seek higher education, having the support of a scholarship was extremely important to my college career.
Q: Can you tell us a little about what it meant to you to be able to serve as the student regent, and then to continue working with legislators?
A: If I did not have a scholarship, I would not have been able to be the USM Student Regent; it’s as simple as that. I only had the time and ability to serve at that post because I did not have to work a side job to pay for college.
Being the Student Regent was one of the most meaningful experiences of my life. Representing students through such trying times as merger debate and the doomsday budget was the thrill of a lifetime. To then be able to take what I had learned on the Board and use it to represent Dr. Hrabowski in Annapolis was a dream. I have never had more fun then the Session I spent advocating for UMBC before legislators.
Q: Has that work given you added insight into education funding, and if so, can you talk a little about the significance of alumni support of education in Maryland?
A: Having been a member of the Advancement Committee of the USM Board of Regents, which oversees alumni giving, I feel I have a unique perspective on the significance that alumni support plays in higher education in Maryland. While our state, specifically Governor Martin O’Malley, has done tremendous things for public universities in terms of funding, student support and financial aid always need assistance. As students and their families continue to face economic difficulty it is up to the alumni base to ensure UMBC is a place welcoming to everyone.
Read more about Collin and his UMBC experiences on the Class of 2013 site.
Early investors in Bitcoin got rich. Now they are the cryptocurrency’s most powerful gatekeepers.
Every time you spend bitcoins to buy a drink at Evr, a swanky bar in midtown Manhattan that accepts the digital currency, you make its co-owner, Charlie Shrem, just a little bit richer.
]]>Automation is reducing the need for people in many jobs. Are we facing a future of stagnant income and worsening inequality?
Given his calm and reasoned academic demeanor, it is easy to miss just how provocative Erik Brynjolfsson’s contention really is. Brynjolfsson, a professor at the MIT Sloan School of Management, and his collaborator and coauthor Andrew McAfee have been arguing for the last year and a half that impressive advances in computer technology—from improved industrial robotics to automated translation services—are largely behind the sluggish employment growth of the last 10 to 15 years. Even more ominous for workers, the MIT academics foresee dismal prospects for many types of jobs as these powerful new technologies are increasingly adopted not only in manufacturing, clerical, and retail work but in professions such as law, financial services, education, and medicine.
]]>Sails.js is an up and coming Node.js framework, with a focus on freedom and smart defaults. In this article we’ll take a look at some of the data features Sails provides out-of-the-box, for easily making complex apps.
The reason to choose Sails is best put by the Sails creator, Mike McNeil, "Sails was created out of necessity". Many frameworks you see around, are built almost for the academic side of things, these frameworks usually foster best practices, and create a platform for developers to create things faster, or better.
Sails on the other hand, was created for production, it’s not trying to feed you a new syntax or platform, it’s a solid base, meant for creating 'client-work' with speed. The contrast may be subtle, but there are a few distinct differences.
To illustrate what I’m referring to, let's take a look at Meteor. Meteor is probably the leading JS platform around today, but it’s a prime example of a framework, for the sake of a framework. Now this is not a bad thing, I am a big supporter of Meteor, what I mean is, they set out to build a framework and they did a good job at it, Mike on the other hand set out to make client-work faster. Sails is just a means to reach an end.
In Meteor, pretty much everything is abstracted away and you use JavaScript plus the Meteor API to code everything. Whereas Sails is not meant to be a new platform, so nothing is hidden.
It rests on top of Socket.io and the popular Express framework, and you have access to them in their entirety, natively. Are you beginning to see the difference?
Furthermore, since Sails is geared for production first, it’s built with multiple options for scaling and security.
There is alot to talk about, but in this article I would like to focus on how Sails handles data, and how you can leverage some of Sails' more advanced features to perform some really cool actions.
Just in case you do not have Sails intalled yet, you can do so via NPM by running:
sudo npm install -g sails
Now let's talk a little bit about Socket.io and Express before we get into Sails. There’s a good premium series on Express by Andrew Burgess if you’re interested, but I'll run through the relevant basics of both of these libraries here:
Socket.io is a pub/sub library, which is run on both the server and on the client, and it allows them to speak via web sockets.
A brief example could look something like this:
//Code For Server
    var io = require("socket.io");
    io.sockets.on("connection", function (sock) {
        sock.emit("welcomeMessage", { hello: "world" });
    }
    io.listen(80);
This code starts out by requiring the socket.io library, listening for a connection, and then when another socket connects, it will send it a message, addressed to the welcomeMessage event, and finally passing along some JSON.
Next, on the client you would write something like:
//Code For Client
    var sock = io.connect('http://localhost');
    sock.on('welcomeMessage', function (json) {
        //Handle Event Received
    });
Here we’re connecting to the server and listening for that welcomeMessage event we just created. As you can see it's a fairly simple publish / subscribe server, which is bidirectional (the client could emit messages for the server as well).
Now let's take a look at Express:
The simplest form of an Express route could be something like:
app.get('/users', function(req, res) {
        res.send("Hello from '/users' !");
    });
This defines a simple route, so that when a user goes to your site's address and tries to access the /users page, they will be presented with the message "Hello from '/users' !".
So Express is a framework for handling HTTP requests and Socket.io is a websocket communications library. What the Sails team have done though, is map all Express routes to Socket.io internally. What this means is, you can call any of the HTTP routes through web sockets.
Now that’s pretty cool! But, there is still one piece of the puzzle missing and that is the Sails Blueprints.
Sails allows you to generate models just like in other frameworks, the difference is, Sails can also generate a production ready RESTfull API to go with them. This means if you generate a model named 'users' you can immediately run RESTfull queries on the '/users' resource without any coding necessary.
If you are new to RESTful APIs, it’s just a way of accessing data, to where CRUD operations are mapped to various HTTP methods.
So a GET request to '/users' will get all of the users, a POST request will create a new user, etc.
So what does all of this mean?
It means we have a full RESTfull API, mapped to Socket.io via Sails, without writing a single line of code!
But why are sockets better at retrieving data then an Ajax request? Well, besides being a leaner protocol, sockets stay open for bidirectional communication, and Sails has taken advantage of this. Not only will Sails pass you the data, but it will automatically subscribe you to updates on that database, and whenever something gets added, removed, or updated, your client will receive a notification via the web socket, letting you know about it.
This is why Sails is so awesome!
The next topic I’d like to cover is Backbone integration, because if you aren't using a JavaScript framework, you are doing it wrong.
With this in mind, Sails and Backbone are the perfect pair. Backbone, like Sails, is extremely unobtrusive, all of its features are available, capable of being overridden, and optional.
If you have used Backbone before then you may know it connects natively with REST APIs, so out of the box, you can sync the data on the front-end with your Sails application.
But enough talk for now, let's take a look at all of this in action by creating a basic chat application. To get started, open up a terminal window and type:
sails new ChatApp
    cd ChatApp
    sails generate model users
    sails generate model messages
    sails generate controller messages
    sails generate controller main
This will create a new app and generate some files for us. You can see from above, there are two different resources that you can generate; models and controllers. If you are familiar with the MVC design pattern, then you should know what these are, but in short, models are your data and controllers hold your logic code. So we are going to need two collections, one to hold the users, and one for the messages.
Next, for the controllers, we need one to handle the page routes, I called it 'main', then we have a second controller named 'messages'. Now you might wonder why I created a controller with the same name as our messages model? Well, if you remember, I said that Sails can create a REST API for you. What happens is, by creating a blank controller with the same name as a model, Sails will know to fall back and build a REST API for the corresponding resource.
So, we’ve created a controller for our messages model, but there’s no need to create one for the users model, so I just left it out. And that’s all there is to creating models and controllers.
Next, let’s setup some routes.
Routes are always a safe place to begin, because you usually have a good idea of which pages are going to be made.
So open up the routes.js file which is in the config folder, it may look a little overwhelming at first, but if you remove all of the comments and add the in the following routes, you will be left with something like this:
module.exports.routes = {
        '/' : {
             controller: 'main',
             action: 'index'
        },
        '/signup' : {
             controller: 'main',
             action: 'signup'
        },
        '/login' : {
             controller: 'main',
             action: 'login'
        },
        '/chat' : {
             controller: 'main',
             action: 'chat'
        }
    };
We have a home page, a chat page, and then two pages for handling both the login and signup pages. I put them all in the same controller, but in Sails, you can create as many controllers as you’d like.
Next, let's take a look at the generated messages model which can be located at "api > models > Messages.js". We need to add the necessary columns to our model. Now this is not absolutely necessary, but it will create some helper functions for us that we can use:
//Messages Model
    module.exports = {
        attributes  : {
            userId: 'INT',
            username: 'STRING',
            message: 'STRING'
        }
    };
For the messages model, we start with the id of the user that this message belongs to, a username so we won't have to query this separately, and then the actual message.
Now let's fill in the user's model:
//Users Model
    module.exports = {
        attributes  : {
             username: 'STRING',
             password: 'STRING'
        }
    };
And that’s it, we have just the username and password attributes. The next step is to create our route functions inside of the MainController.
So open up the MainController, which can be found at "api > controllers > MainController.js". Let's begin by creating a function for each of the routes we defined above:
var MainController = {
        index: function (req, res) {

        },
        signup: function (req, res) {

        },
        login: function (req, res) {

        },
        chat: function (req, res) {

        }
    };
    module.exports = MainController;
If you’re familiar with Express, then you’ll be happy to see that these functions are standard Express route functions. They receive two variables, req for the HTTP request and res to create the response.
Following the MVC pattern, Sails offers a function for rendering views. The home page doesn't need anything special, so let's just render the view.
index: function (req, res) {
        res.view();
    },
Sails leans more toward convention over configuration, so when you call res.view(); Sails will look for a view file (with a .ejs extension by default) using the following pattern: 'views > controllerName > methodName.ejs'. So for this call, it will search for 'views > main > index.ejs'. It's also worth noting, these views only contain the view specific parts of the page. If you take a look at 'views > layout.ejs', you will see a call in the middle for <%- body %>, this is where your view file will be inserted. By default it uses this 'layout.ejs' file, but you can use other layout files just by passing the layout name into the res.view() function, under the property named 'layout'. For example: 'res.view( { layout: "other.ejs" } );'.
I’m going to use the default layout file with a small adjustment, I’m going to add jQuery, Backbone, and Underscore. So in the 'layout.ejs' file right before the closing </head> tag, add the following lines:
<script src="//cdnjs.cloudflare.com/ajax/libs/jquery/1.9.1/jquery.min.js"></script>
    <script src="//cdnjs.cloudflare.com/ajax/libs/underscore.js/1.4.4/underscore-min.js"></script>
    <script src="//cdnjs.cloudflare.com/ajax/libs/backbone.js/1.0.0/backbone-min.js"></script>
With that in place we’re now ready to create the home page.
Let’s create a new folder inside of the views folder named main, and inside of our new main folder, we’ll create a new file named 'index.ejs'.
Inside the file let's just create a login and signup form:
<h1>Code Chat</h1>
    <div>
        <h3>Login</h3>
        <input type="text" id="loginName" placeholder="name" />
        <input type="password" id="loginPassword" placeholder="password" />
        <button id="loginButton">Login</button>
    </div>
    <div>
        <h3>Signup</h3>
        <input type="text" id="signupName" placeholder="name" />
        <input type="password" id="signupPassword" placeholder="password" />
        <input type="password" id="signupConfirmPassword" placeholder="confirm password" />
        <button id="signupButton">Signup</button>
    </div>
Pretty simple, just the essentials.
Next we need to add a little JS to get this communicating with the server. Now this won’t be Sails specific, we are just going to send an AJAX request via jQuery to the Sails server.
This code can either be included on the page itself or loaded in via a separate JS file. For the sake of convenience, I’m just going to put it at the bottom of the same page:
<script>
        $("#loginButton").click(function(){
            var username = $("#loginName").val();
            var password = $("#loginPassword").val();
            if (username && password) {
                $.post(
                    '/login',
                    {username: username, password:password},
                    function () {
                        window.location = "/chat";
                    }
                ).fail(function(res){
                    alert("Error: " + res.getResponseHeader("error"));
                });
            } else {
                alert("A username and password is required");
            }
        });
    </script>
This is all just standard JS and jQuery, we’re listening for the click event on the login button, making sure the username and password fields are filled in, and posting the data to the '/login' route. If the login is successful, we redirect the user to the chat page, otherwise we will display the error returned by the server.
Next, let's create the same thing for the signup area:
$("#signupButton").click(function(){
        var username = $("#signupName").val();
        var password = $("#signupPassword").val();
        var confirmPassword = $("#signupConfirmPassword").val();
        if (username && password) {
            if (password === confirmPassword) {
                $.post(
                    '/signup',
                    {username: username, password:password},
                    function () {
                        window.location = "/chat";
                    }
                ).fail(function(res){
                    alert("Error: " + res.getResponseHeader("error"));
                });
            } else {
                alert("Passwords don't match");
            }
        } else {
            alert("A username and password is required");
        }
    });
This code is almost identical, so much so, that you can probably just abstract the whole Ajax part out into its own function, but for this tutorial it's fine.
Now we need to go back to our 'MainController' and handle these two routes, but before we do that, I want to install a Node module. We’re going to need to hash the password, as plain text passwords are not a good thing, not even for demonstration! I found a nice module named 'password-hash' by David Wood which will work out nicely.
To install it, just go to the root of your Sails app, from within your terminal and type: npm install password-hash.
Once that installs, let's open the MainController and implement the two needed routes. Let’s start with signup:
signup: function (req, res) {
            var username = req.param("username");
            var password = req.param("password");

            Users.findByUsername(username).done(function(err, usr){
                if (err) {
                    res.send(500, { error: "DB Error" });
                } else if (usr) {
                    res.send(400, {error: "Username already Taken"});
                } else {
                    var hasher = require("password-hash");
                    password = hasher.generate(password);

                    Users.create({username: username, password: password}).done(function(error, user) {
                    if (error) {
                        res.send(500, {error: "DB Error"});
                    } else {
                        req.session.user = user;
                        res.send(user);
                    }
                });
            }
        });
    }
It's a bit verbose, but all we’re doing here is reading the username and password from the POST request and making sure the username is not already taken. You can see I’m also using the password-hasher we just installed, it's super simple to use, just pass the password into the generate method and it will hash it using a random salt.
It's also worth mentioning, that at every possible location where we may run into an error or issue, we’re sending back an HTTP error code and returning a message via a custom header named 'error' which, if you remember, we’re displaying in an alert message on the index page.
Another noteworthy point, is the fact that we’re using a 'magic' function named 'findByUsername', this is made possible because we have a username column inside of our Users model.
Finally, at the bottom you can see if everything went well, we’re storing the user in a session variable and returning it with a default status code of 200, which will tell jQuery that the AJAX request was successful.
Next, let's write the login function:
login: function (req, res) {
        var username = req.param("username");
        var password = req.param("password");

        Users.findByUsername(username).done(function(err, usr) {
            if (err) {
                res.send(500, { error: "DB Error" });
            } else {
                if (usr) {
                    var hasher = require("password-hash");
                    if (hasher.verify(password, usr.password)) {
                        req.session.user = usr;
                        res.send(usr);
                    } else {
                        res.send(400, { error: "Wrong Password" });
                    }
                } else {
                    res.send(404, { error: "User not Found" });
                }
            }
        });
    }
Again, this is very similar to the previous signup function, we’re searching for a user with the same username that was posted from the form and if it finds one, we check if the password matches using the hasher’s verify method. The reason we can't just hash the password again and pass it into the models find function is because the hasher uses a random salt, so if we hashed the password again it would be equal to something else.
The rest of the code is the same; if everything checks out, we store the user in a session and return it, otherwise we send back an error message.
The login system is now complete and we’re finally able to move on to building the chat feature.
Since we’ll be using Backbone for getting the messages, the actual route function will be very simple. Here’s the complete chat function:
chat: function (req, res) {
        if (req.session.user) {
            res.view({username: req.session.user.username});
        } else {
            res.redirect('/');
        }
    }
We start off by checking if the user is logged in or not, if this checks out, then it will load the view, passing it the username that was in the session, otherwise we just redirect to the home page.
Now let’s create a new view named 'chat.ejs' inside of the main folder. Open it up and let's create a simple form to post new messages and a div container for displaying all of them.
<h2>Welcome <%= username %></h2>
    <div id="newMessageForm">
        <textarea id="message" placeholder="Enter your message here:"></textarea>
        <button id="postMessageButton">Add Message</button>
    </div>
    <div id="messagesContainer">
    </div>
So for this view, we just used some pretty standard HTML. The only thing that may require some explanation is the <%= username %> code, this style of coding is not specific to Sails, it’s actually the syntax for EJS. This syntax is very similar to PHP’s short tags. <% is the equivalent of <? in PHP and <%= is the same as <?=. The first snippet of EJS allows you to integrate standard JS code on the page, whereas the second prints out the code within. Here we’re just printing out the username that we passed in from the controller.
The rest of our chat feature will be all JavaScript. To get started, let's take a look at how you would write the chat functionality using standard Backbone, and then we’ll see how to take advantage of web sockets.
At the bottom of the page, add the following JS:
<script>
        var MessageModel = Backbone.Model.extend({
            urlRoot: '/messages',
        });

        var MessageCollection = Backbone.Collection.extend({
            url: '/messages',
            model: MessageModel,
        });

        var messages = new MessageCollection();
        messages.fetch();

        $("#postMessageButton").click(function(){
            var messageText = $("#message").val();
            messages.create({message: messageText}, {wait: true});
            $("#message").val("");
        });
    </script>
Since Sails automatically creates an API that Backbone understands natively, no extra server code has to be written, it doesn’t get much easier than that. This is what I was talking about when I said that Sails was not made to be a 'framework'. It doesn't try to make you use its own syntax, it was made to get things done and as you can see, it delivers.
To test it out, open up a terminal window and navigate to your Sails app folder, then type 'sails lift' to start it up. By default it will launch to http://localhost:1337. Now just signup and post a few messages.
To see your posted messages you can console.log the messages variable, or look at it inside of the browser’s console. Now the next thing we should implement is a view so we can see the posted messages in the browser.
_.templateSettings = {
        interpolate : /\{\{(.+?)\}\}/g
    };
    var MessagesView = Backbone.View.extend({
        el: '#messagesContainer',
        initialize: function () {
            this.collection.on('add', this.render, this);
            this.render();
        },
        template: _.template("<div><p>{{ message }}</p></div>"),
            render: function () {
                this.$el.html("");
                this.collection.each(function(msg){
                    this.$el.append(this.template(msg.toJSON()));
                }, this)
        }
    });

    var mView = new MessagesView({collection: messages});
We start off by defining a view, attaching it to the div that we created earlier, then we add an event handler on the collection to re-render the div every time a new model gets added to the collection.
You can see at the top, I had to change the default Underscore settings from using the EJS syntax inside of the templates, to instead, use Mustache’s syntax. This is because the page is already an EJS document, so it would be processed out on the server and not in Underscore.
Note: I didn't come up with the Regex for this, that credit goes to the Underscore docs itself.
Lastly, at the bottom you can see we created a new instance of this view, passing it the collection variable.
If all went well, you should now see your messages in the browser, and it should update whenever you create a new post.
Now you may have noticed that we’re not setting the userId or the username when we submit the posts, and this is for security purposes.
You don't want to put this kind of control on the client side. If all someone has to do is modify a JavaScript variable to control another user’s account, you’ll have a major problem.
So, how should you handle this? Well, with policies of course.
Policies are basically middleware, which run before the actual web request, where you can stop, modify, or even redirect the request, as needed.
For this app, let's create a policy for our messages. Policies are applied to controllers, so they can even be run on normal pages, but for this tutorial let's just stick with one for our messages Model.
Create a file named 'MessagesPolicy.js' inside the 'api > policies' folder, and enter the following:
module.exports = function (req, res, next) {
        if (req.session.user) {
            var action = req.param('action');
            if (action == "create") {
                req.body.userId = req.session.user.id;
                req.body.username = req.session.user.username;
            }
            next();
        } else {
            res.send("You Must Be Logged In", 403);
        }
    };
So, what’s going on here? You can see this function resembles a normal route function, the difference though is the third parameter, which will call the next middleware in the stack. If you’re new to the idea of middleware, you can think of it like a Russian nesting doll. Each layer gets the request, along with the response variables and they can modify them as they see fit. If they pass all of the requirements, the layer can pass it further in, until it reaches the center, which is the route function.
So here we are, checking if the user is logged in, if the user isn't, we display a 403 error and the request ends here. Otherwise, (i.e. the user is logged in) we call next(); to pass it on. In the middle of the above code, is where we inject some post variables. We’re applying this to all calls on the 'messages' controller (basically the API), so we get the action and check if this request is trying to create a new message, in which case we add the post fields for the user's id and username.
Next, open up the policies.js file which is in the config folder, and add in the policy that we just created. So your file should look like this:
module.exports.policies = {
        '*': true,
        'messages': 'MessagesPolicy'
    };
With this put in to place, we’ll need to delete all of the old records, as they do not have these new pieces of information. So, close the Sails server (ctrl-c) and in the same terminal window type: rm -r .tmp to remove the temporary database giving us a clean slate.
Next, let's add the username to the actual posts, so in the 'chat.ejs' change the template to:
template: _.template("<div><p><b>{{ username }}: </b>{{ message }}</p></div>"),
Restart the Sails server (again using sails lift) and signup another new user to test it out. If everything is working correctly, you should be able to add messages and see your name in the post.
At this point we have a pretty good setup, we fetch the post automatically using Backbone and the API, plus we have some basic security in place. The problem is, it won't update when other people post messages. Now you could solve this by creating a JavaScript interval and poll for updates, but we can do better.
I mentioned earlier that Sails leverages websockets’ bidirectional abilities to post updates on the subscribed data. Using these updates, we can listen for new additions to the messages table and update the collection accordingly.
So in the chat.ejs file, let's create a new kind of collection; a SailsCollection:
var SailsCollection = Backbone.Collection.extend({
        sailsCollection: "",
        socket: null,
        sync: function(method, model, options){
            var where = {};
            if (options.where) {
                where = {
                    where: options.where
                }
            }
            if(typeof this.sailsCollection === "string" && this.sailsCollection !== "") {
                this.socket = io.connect();
                this.socket.on("connect", _.bind(function(){
                    this.socket.request("/" + this.sailsCollection, where, _.bind(function(users){
                        this.set(users);
                    }, this));

                    this.socket.on("message", _.bind(function(msg){
                        var m = msg.uri.split("/").pop();
                        if (m === "create") {
                            this.add(msg.data);
                        } else if (m === "update") {
                            this.get(msg.data.id).set(msg.data);
                        } else if (m === "destroy") {
                            this.remove(this.get(msg.data.id));
                        }
                    }, this));
                }, this));
            } else {
                console.log("Error: Cannot retrieve models because property 'sailsCollection' not set on the collection");
            }
        }
    });
Now it may be long, but it's actually very simple, let's walk through it. We start off by adding two new properties to the Collection object, one to hold the name of the Sails 'model' and one to hold the web socket. Next, we modify the sync function, if you’re familiar with Backbone, then you’ll know that this is the function which interfaces with the server when you call things such as fetch. Usually, it fires off Ajax requests, but we’re going to customize it for socket communication.
Now, we’re not using most of the functionality that the sync function offers, mainly because we haven't added the ability for users to update or delete messages, but just to be complete, I will include them within the function definition.
Let’s take a look at the first part of the sync function:
var where = {};
    if (options.where) {
        where = {
            where: options.where
        }
    }
This code first checks if any 'where' clauses were sent through, this would let you do things like: messages.fetch({ where : { id: 4 } }); to only fetch rows where the id equals four.
After that, we then have some code that makes sure the 'sailsCollection' property has been set, otherwise we log an error message. Afterwards, we create a new socket and connect to the server, listening for the connection with the on('connect') event.
Once connected, we request the index of the 'sailsCollection' specified to pull in the current list of models. When it receives the data, we use the collection's set function to initially set the models.
Alright, now so far, we have the equivalent of the standard fetch command. The next block of code is where the push notifications happen:
this.socket.on("message", _.bind(function(msg){
        var m = msg.uri.split("/").pop();
        if (m === "create") {
            this.add(msg.data);
        } else if (m === "update") {
            this.get(msg.data.id).set(msg.data);
        } else if (m === "destroy") {
            this.remove(this.get(msg.data.id));
        }
    }, this));
Now the action that’s being performed (whether we’re creating, updating, or destroying a message) can be found inside of the actual msg, which is then inside of the uri. To get the action, we split the URI on forward slashes ('/') and grab just the last segment using the pop function. We then try to match it up with the three possible actions of create, update, or destroy.
The rest is standard Backbone, we either add, edit, or remove the specified model. With our new class almost complete, all that’s left to do is change the current MessageCollection. Instead of extending the Backbone collection, it needs to extend our new collection, like so:
var MessageCollection = SailsCollection.extend({
        sailsCollection: 'messages',
        model: MessageModel
    });
In addition to extending our new collection, we’ll make another change so that instead of setting the URL property, we now set the sailsCollection property. And that's all there is to it. Open up the application into two different browsers (e.g. Chrome and Safari) and signup two separate users. You should see that posted messages from either of the browsers get immediately shown on the other, no polling, no trouble.

Sails is a breath of fresh air, within a clutter of frameworks. It checks its ego at the door, and does what it can to help the developer instead of the brand. I have been chatting with the Sails devs and I can tell you that there’s even more awesomeness in the works, and it will be interesting to see where this framework goes.
So in conclusion, you’ve learned how to setup, use, and secure your data from within Sails, as well as how to interface it with the popular Backbone library.
Like always, if you have any comments, feel free to leave them below, or join us on the Nettuts+ IRC channel ("#nettuts" on freenode). Thank you for reading.
]]>
