How to Get Your Web Development Projects Off to a Good Start
If you’re anything like my team, you probably want to dive right in head first into a web development project as soon as you possibly can. Because we love our jobs — we’re all very passionate about it.
We’re eager to get started without having to deal with the "boring parts" and we have a laser-beam focus towards the more enjoyable, fun aspects of web development — coding, setting up servers, designing the user interface, you know, the good stuff.
Early in my web development agency’s history, this is how we worked: The moment we returned from a project’s contract signing, Photoshop would fly open, databases would be fumbled together, and code would be quickly written. We couldn’t wait to get started with production.
The result of insufficient planning and coordination? A project of any size and scope, big or small, ended up becoming a mess quite quickly.
The Secret to a Good Start: Project Kickoff Meetings
To get web development projects off to a good start, we now realize that effective kickoff meetings are essential.
What is a Kickoff Meeting?
An important component of planning your web development project is the kickoff meeting.
The project kickoff meeting is the initial meeting consisting of the project’s team and the client/decision-makers. It involves getting your team and all the decision-makers in a room to hash out the details about the project.
This meeting is important to web development projects because:
It familiarizes all the individuals involved in the project with each other
It extracts important details from the appropriate individuals to avoid information silos
It gives everyone clarity about the core objectives of the project
It gets everyone on the same page
It promotes active communication lines
It gets the project off to a great start
Let me share with you how I prepare and conduct my company’s web development project kickoff meetings. I promise that you and your client will have a better experience and will come out with a better product if you install a good kickoff meeting as part of your web development process.
The Project Kickoff Meeting Outline
Here is a brief digest of our project kickoff meeting structure:
I’ll discuss each of these items below.
Before The Kickoff Meeting
I suggest having a template for your kickoff meetings to promote efficiency and to ensure that you get the most value out of the meeting.
It’s nice to have a template guiding you for all the things you’re going to need from the client. You can print your template and then immediately start filling it up with information you already know well before the meeting’s date.
If you do several types of development (e.g. mobile app development, web app development, e-commerce site development, etc.) you may have to create a few different versions of your kickoff meeting template.
To help you get started, you can download my kickoff meeting template for web development projects. It’s a 7-page PDF document. It’s simple, but it serves as a fantastic way to start your projects off. You can look over this template and see exactly what you’ll need.
Be sure and read through the template and add to it based on your own business processes, workflow, and custom requirements.
Gather Basic Internal Information
The first thing you should do before getting everyone together for the kickoff meeting is to gather basic information about the project.
On your end, write down basic project details such as:
The project’s primary goals
Your project manager’s contact information
Secondary contact’s information in case the project manager is unavailable
Gather Basic Client Information
We are going to need technical information from the client such as server info, domain information, analytics data, previous SEO campaigns, and so forth.
Give your client a chance to get some of their information together before your kickoff meeting and send them a quick worksheet to fill out plenty of time before your first kickoff meeting sit down.
If enough time is given (1 week is enough time in my experience) it’s a good litmus test on how responsive and communicative your client is going to be throughout the web development project. Of course, this isn’t always guaranteed, but I like to use it as an indicator.
You should now be ready for the kickoff meeting after this.
Before getting into the specifics of the kickoff meeting, I’d like to first share some basic tips about meetings in general.
Fundamental Kickoff Meeting Tips
Your project kickoff meeting is an exciting time. Deposits have been paid, and the client is ready to get started on their project ASAP.
I find the more prepared I am for the kickoff meeting, the more likely the client will follow my lead and trust my judgment during the meeting as well as throughout the lifecycle of the project.
So, how can we guarantee a great kickoff meeting planning session?
Limit the Number of Attendants
Early in my career, I was working on a project for the board of education for a county near my hometown. We had just won the job and I was told the client’s team was coming into the office to meet with our staff.
When it was time for the meeting, ten people attended. That translated to ten opinions, ten people interrupting one another, ten potential bathroom breaks — ten cooks in the kitchen spoiling the broth.
It was a nightmare and we accomplished nothing but frustrating our brand new client.
When scheduling your first meeting, be sure to indicate that only the decision maker needs to attend. And if ten people make the decision, put your boots on and start walking because you should have never accepted the project under those terms.
I would suggest one or two people max come to your kickoff meeting. You will get more done, have less interruption, and have one or two people accountable for deliverables you will be requesting. Guess what? The finger pointing just got reduced as well.
State the Intended Results and Outcome
Open your meeting with what you’ll be going over, and what the client will be walking away with.
Setting expectations is something you should try to do every time you meet with a client to maintain efficiency and to show that you take their time seriously.
Most importantly, they will understand why they are meeting and be in the right mental state for your chat.
The Kickoff Meeting
Here is my meeting structure for kickoff meetings.
As you work through the meeting structure, you should be assigning responsibilities to your client and to your team.
After each task assignment, you should be asking the person being assigned the task, "When can you have that by?"
What I typically do is have a calendar nearby and I give them a little more time than they suggest. Typically, the client is eager to please and is sometimes unrealistic. Give them a little more time if you can spare it.
I do gently remind clients that if their deliverable is late, all dates are pushed back and we typically will charge extra unless given 15 days notice. It’s harsh, but it keeps people accountable and, in the end, makes them a happier customer because their project is on time.
In general, a good kickoff meeting can be accomplished in 2 hours.
Scope and Goal Review
I like to start my kickoff meeting like a thesis statement in a scientific paper: I state the primary goal of the project and provide a brief summary.
The SMARTer the primary goal, the better. For example, depending on the scale of the project, it might even be as specific as: "The goal of the project is to drive traffic to the site’s contact form and have users fill it out."
Then I review the scope of work that has been signed by the client. This allows you to set the stage and confirm what it is you are building, while refreshing everyone on what the project is all about.
Mechanical
Get the server, email, and analytics information out of the way early. You don’t want to be two weeks away from launch and have to set up a server.
Technical
Your technical discussion will absolutely take the most of the time.
This portion defines the project and you may need more than just the half sheet of space so have some scrap paper ready.
What you ultimately want to walk away with are three important pieces of information that everyone should agree on:
What are the primary and secondary goals of the project?
What do we want people to do?
What features will the project have to support these goals?
Copy and Media
Content, imagery, and rich media (like videos) is a subject neglected in a lot in planning meetings, but it’s one of the most expensive and time-consuming things to produce so it should be covered as soon as possible.
For example, most companies that I work with that produce video don’t do it quickly or cheaply. Get the ball rolling early on any video production needed, as well as reinforce who is purchasing any needed stock photography (it was in your contract right?).
Aesthetic
The look and feel of a site is tough to nail down.
Early in my career, the conversation usually went something like this: "How did you envision your site looking?" That question would be followed by the client mentioning five of their competitors’ websites — all which would typically looked horrible.
You are the professional. You know what looks good and what doesn’t.
Instead of having them start and govern the conversation about the look-and-feel of the website project, ask them a few questions about how they want their site to feel and the general style. They hired you to figure out the rest.
Release
When and how a site will launch seems like an obvious thing you will want to establish as soon as possible. The "when" is usually covered by the contract, but the "how" is sometimes forgotten.
Will there be a beta testing period prior to launch? How about slowly rolling it out to gain interest and test the load on our servers? These are some things to cover in the kickoff meeting.
Support and Revisions
This is a great discussion that can potentially generate recurring revenue for your company.
How do they plan on updating the site after it has launched? What if the web server crashes? What about additional features? What happens if a great idea comes up in the middle of the project that requires augmenting the original scope of work — how do we deal with that?
Marketing
What type of marketing materials need to be prepared for this project? Do social media accounts need to be set up? What about traditional marketing methods? Do any parts of the marketing campaign need assets from our creative department? When and how should these efforts go live?
Review
By this time, your customer (and you) are probably exhausted, but it’s a good exercise to quickly run through the deliverables, due dates, and a summary of the key points discussed in the kickoff meeting.
After the Kickoff Meeting
After the client has left, what I typically do is I will punch in the due dates into our project management software (we use activeCollab).
Then I’ll run a quick report. I’ll send the report to the client via email as a reminder of the things we’ve discussed, along with a note thanking them for the time they have invested into the kickoff meeting.
Gary Williams is the co-founder and CEO of the web development agency LogicBomb Media (Twitter: @lmb_co) near Atlanta, Georgia. He and his team specialize in data-heavy Web and mobile applications for companies like Nintendo, ESPN, and Travel Channel. Follow him on Twitter @dolbex.
]]>
If you’re anything like my team, you probably want to dive right in head first into a web development project as soon as you possibly can. Because we love our jobs — we’re all very passionate...http://feedproxy.google.com/~r/SixRevisions/~3/TQEgsh79AoI/https://my3.my.umbc.edu/api/v0/pixel/news/31315/guest@my.umbc.edu/61e4e7a3a4774365599644a81eb49089/api/pixelcssdatabasedesigndevelopmenthtmljavascriptmysqlproject-managementsqlwebWeb Developer - Build Grouphttps://my3.my.umbc.edu/groups/retired-583https://assets3-my.umbc.edu/system/shared/avatars/groups/000/000/583/fc60f5d7abc2e080599bb6dc465db54d/xsmall.png?1363101197https://assets4-my.umbc.edu/system/shared/avatars/groups/000/000/583/fc60f5d7abc2e080599bb6dc465db54d/original.jpg?1363101197https://assets4-my.umbc.edu/system/shared/avatars/groups/000/000/583/fc60f5d7abc2e080599bb6dc465db54d/xxlarge.png?1363101197https://assets4-my.umbc.edu/system/shared/avatars/groups/000/000/583/fc60f5d7abc2e080599bb6dc465db54d/xlarge.png?1363101197https://assets3-my.umbc.edu/system/shared/avatars/groups/000/000/583/fc60f5d7abc2e080599bb6dc465db54d/large.png?1363101197https://assets3-my.umbc.edu/system/shared/avatars/groups/000/000/583/fc60f5d7abc2e080599bb6dc465db54d/medium.png?1363101197https://assets4-my.umbc.edu/system/shared/avatars/groups/000/000/583/fc60f5d7abc2e080599bb6dc465db54d/small.png?1363101197https://assets3-my.umbc.edu/system/shared/avatars/groups/000/000/583/fc60f5d7abc2e080599bb6dc465db54d/xsmall.png?1363101197https://assets4-my.umbc.edu/system/shared/avatars/groups/000/000/583/fc60f5d7abc2e080599bb6dc465db54d/xxsmall.png?1363101197Web Developer - Build Group00trueFri, 14 Jun 2013 06:00:04 -0400Fri, 14 Jun 2013 06:00:04 -0400Get off to a fast start with jQuery
In this introduction, you’ll learn what jQuery is, how to include it in your applications, and how jQuery, jQuery UI, and plugins can simplify JavaScript development
]]>
In this introduction, you’ll learn what jQuery is, how to include it in your applications, and how jQuery, jQuery UI, and plugins can simplify JavaScript development http://feedproxy.google.com/~r/net/topstories/~3/UZxvNj3hwk0/story01.htmhttps://my3.my.umbc.edu/api/v0/pixel/news/31317/guest@my.umbc.edu/1babb382f6f32c6a14bc07182d228742/api/pixelcssdevelopmenthtmljavascriptmysqlnetphpsqlwebWeb Developer - Build Grouphttps://my3.my.umbc.edu/groups/retired-583https://assets3-my.umbc.edu/system/shared/avatars/groups/000/000/583/fc60f5d7abc2e080599bb6dc465db54d/xsmall.png?1363101197https://assets4-my.umbc.edu/system/shared/avatars/groups/000/000/583/fc60f5d7abc2e080599bb6dc465db54d/original.jpg?1363101197https://assets4-my.umbc.edu/system/shared/avatars/groups/000/000/583/fc60f5d7abc2e080599bb6dc465db54d/xxlarge.png?1363101197https://assets4-my.umbc.edu/system/shared/avatars/groups/000/000/583/fc60f5d7abc2e080599bb6dc465db54d/xlarge.png?1363101197https://assets3-my.umbc.edu/system/shared/avatars/groups/000/000/583/fc60f5d7abc2e080599bb6dc465db54d/large.png?1363101197https://assets3-my.umbc.edu/system/shared/avatars/groups/000/000/583/fc60f5d7abc2e080599bb6dc465db54d/medium.png?1363101197https://assets4-my.umbc.edu/system/shared/avatars/groups/000/000/583/fc60f5d7abc2e080599bb6dc465db54d/small.png?1363101197https://assets3-my.umbc.edu/system/shared/avatars/groups/000/000/583/fc60f5d7abc2e080599bb6dc465db54d/xsmall.png?1363101197https://assets4-my.umbc.edu/system/shared/avatars/groups/000/000/583/fc60f5d7abc2e080599bb6dc465db54d/xxsmall.png?1363101197Web Developer - Build Group00trueFri, 14 Jun 2013 06:00:00 -0400What Leap Motion And Google Glass Mean For Future User Experience
With the Leap Motion controller being released on June 27th and the Google Glass Explorer program already live, it is obvious that our reliance on the mouse or even the monitor to interact with the Web will eventually become obsolete.
The above statement seems like a given, considering that technology moves at such a rapid pace. Yet in 40 years of personal computing, our methods of controlling our machines haven’t evolved beyond using a mouse, keyboard and perhaps a stylus. Only in the last six years have we seen mainstream adoption of touchscreens.
Given that emerging control devices such as the Leap Controller are enabling us to interact with near pixel-perfect accuracy in 3-D space, our computers will be less like dynamic pages of a magazine and more like windows to another world. To make sure we’re on the same page, please take a minute to check out what the Leap Motion controller can do:
Thanks to monitors becoming portable with Google Glass (and the competitors that are sure to follow), it’s easy to see that the virtual world will no longer be bound to flat two-dimensional surfaces.
In this article, we’ll travel five to ten years into the future and explore a world where Google Glass, Leap Motion and a few other technologies are as much a part of our daily lives as our smartphones and desktops are now. We’ll be discussing a new paradigm of human-computer interface. The goal of this piece is to start a discussion with forward-thinking user experience designers, and to explore what’s possible when the mainstream starts to interact with computers in 3-D space.
Please note: We’re exploring an entirely hypothetical scenario, and these are opinions, some of which you may not agree with. However, the opinions are based on current trends, statistics and existing technology. If you’re the kind of designer who is interested in developing the future, I encourage you to read the sources that are linked throughout the article.
Setting The Stage: A Few Things To Consider
Prior to the introduction of the iPhone in 2007, many considered the smartphone to be for techies and business folk. But in 2013, you’d be hard pressed to find someone in the developed world who isn’t checking their email or tweeting at random times.
So, it’s understandable to think that a conversation about motion control, 3-D interaction and portable monitors is premature. But if the mobile revolution has taught us anything, it’s that people crave connection without being tethered to a stationary device.
To really understand how user experience (UX) will change, we first have to consider the possibility that social and utilitarian UX will be taking place in different environments. In the future, people will use the desktop primarily for utilitarian purposes, while “social” UX will happen on a virtual layer, overlaying the real world (thanks to Glass). Early indicators of this are that Facebook anticipates its mobile growth to outpace its PC growth and that nearly one-seventh of the world’s population own smartphones.
The only barrier right now is that we lack the technology to truly merge the real and virtual worlds. But I’m getting ahead of myself. Let’s start with something more familiar.
The Desktop
Right now, UX on the desktop cannot be truly immersive. Every interaction requires physically dragging a hunk of plastic across a flat surface, which approximates a position on screen. While this is accepted as commonplace, it’s quite unnatural. The desktop is the only environment where you interact with one pixel at a time.
Sure, you could create the illusion of three dimensions with drop shadows and parallax effects, but that doesn’t change the fact that the user may interact with only one portion of the screen at a time.
This is why the Leap Motion controller is revolutionary. It allows you to interact with the virtual environment using all 10 fingers and real-world tools in 3-D space. It is as important to computing as analog sticks were to video games.
The Shift In The Way We Interact With Machines
To wrap our heads around just how game-changing this will be, let’s go back to basics. One basic UX and artificial intelligence test for any new platform is a simple game of chess.
In the game of chess below, thanks to motion controllers and webcams, you’ll be able to “reach in” and grab a piece, as you watch your friend stress over which move to make next.
In a game of The Sims, you’ll be able to rearrange furniture by moving it with your hands. CAD designers will use their hands to “physically” manipulate components (and then send their design to the 3-D printer they bought from Staples for prototyping.)
While the lack of tactile feedback might deter mainstream adoption early on, research into haptics is already enabling developers to simulate physical feedback in the real world to correspond with the actions of a user’s virtual counterpart. Keep this in mind as you continue reading.
Over time, this level of 3-D interactivity will fundamentally change the way we use our desktops and laptops altogether.
Think about it: The desktop is a perfect, quiet, isolated place to do more involved work like writing, photo editing or “hands-on” training to learn something new. However, a 3-D experience like those mentioned above doesn’t make sense for social interactions such as on Facebook or even reading the news, which are more becoming of mobile.
With immersive, interactive experiences being available primarily via the desktop, it’s hard to imagine users wanting these two experiences to share the same screen.
So, what would a typical desktop experience look like?
Imagine A Cooking Website For People Who Can’t Cook
With this cooking website for people who can’t cook, we’re not just talking about video tutorials or recipes with unsympathetic instructions, but rather immersive simulations in which an instructor leads you through making a virtual meal from prep to presentation.
Interactions in this environment would be so natural that the real design challenge is to put the user in a kitchen that’s believable as their own.
You wouldn’t click and drag the icon that represents sugar; you would reach out with your virtual five-fingered hand and grab the life-sized “box” of Domino-branded sugar. You wouldn’t click to grease the pan; you’d mimic pushing the aerosol nozzle of a bottle of Pam.
The Tokyo Institute of Technology has already built such a simulation in the real world. So, transferring the experience to the desktop is only a matter of time.
UX on the future desktop will be about simulating physics and creating realistic environments, as well as tracking head, body and eyes to create intuitive 3-D interfaces, based on HTML5 and WebGL.
Aside from the obvious hands-on applications, such as CAD and art programs, the technology will shift the paradigm of UX and user interface (UI) design in ways that are currently difficult to fathom.
The problem right now is that we currently lack a set of clearly defined 3-D gestures to interact with a 3-D UI. Designing UIs will be hard without knowing what our bodies will have to do to interact.
The closest we have right now to defined gestures are those created by Kinect hackers and John Underkoffler of Oblong Technology (the team behind Minority Report’s UI).
In his TED talk from 2010, Underkoffler demonstrates probably the most advanced example of 3-D computer interaction that you’re going to see for a while. If you’ve got 15 minutes to spare, I highly recommend watching it:
Now, before you start arguing, “Minority Report isn’t practical — humans aren’t designed for that!” consider two things:
We won’t likely be interacting with 60-inch room-wrapping screens the way Tom Cruise does in Minority Report; therefore, our gestures won’t need to be nearly as big.
However, because the Leap Motion controller is less than $80 and will be available at Best Buy, this technology isn’t just hypothetical, sitting in a lab somewhere, with a bunch of geeks saying “Wouldn’t it be cool if…”
It’s real and it’s cheap, which really means we’re about to enter the Wild West of true 3-D design.
Social Gets Back To The Real World
So, where does that leave social UX? Enter Glass.
It’s easy to think that head-mounted augmented reality (AR) displays, such as Google Glass, will not be adopted by the public, and in 2013 that might be true.
So, while first-generation Glass won’t likely be met with widespread adoption, it’s the introduction of a new phase. ABI Research predicts that the wearable device market will exceed 485 million annual shipments by 2018.
According to Steve Lee, Glass’ product director, the goal is to “allow people to have more human interactions” and to “get technology out of the way.”
First-generation Glass performs Google searches, tells time, gives turn-by-turn directions, reports the weather, snaps pictures, records video and does Hangouts — which are many of the reasons why our phones are in front of our faces now.
Moving these interactions to a heads-up display, while moving important and more heavy-duty social interactions to a wrist-mounted display, like the Pebble smartwatch, eliminates the phone entirely and enables you to truly see what’s in front of you.
Now, consider the possibility that something like the Leap Motion controller could become small enough to integrate into a wrist-mounted smartwatch. This, combined with a head-mounted display, would essentially give us the ability to create an interactive virtual layer that overlays the real world.
Add haptic wristband technology and a Bluetooth connection to the smartwatch, and you’ll be able to “feel” virtual objects as you physically manipulate them in both the real world and on the desktop. While this might still sound like science fiction, with Glass reportedly to be priced between $299 and $499 and Leap Motion at $80 and Pebble being $150, widespread affordability of these technologies isn’t entirely impossible.
Social UX In The Future: A Use Case
Picture yourself walking out of the mall, and your close friend Jon updates his status. A red icon appears in the top right of your field of vision. Your watch displays Jon’s avatar, which says, “Sooo hungry right now.”
You say, “OK, Glass. Update status: How about lunch? What do you want?” and keep walking.
“Tacos.”
You say, “OK, Glass. Where can I get good Mexican food?” 40 friends have favorably rated Rosa’s Cafe. Would you like directions? “Yes.” The navigation starts, and you’re en route.
You reach the cafe, but Jon is 10 minutes away. Would you like an audiobook while you wait? “No, play music.” A smart playlist compiles exactly 10 minutes of music that perfectly fits your mood.
“OK, Glass. Play Angry Birds 4.”
Across the table, 3-D versions of the little green piggies and their towers materialize.
In front of you are a red bird, a yellow bird, two blue birds and a slingshot. The red bird jumps up, you pull back on the slingshot, the trajectory beam shows you a path across the table, you let go and knock down a row of bad piggies.
Suddenly, an idea comes to you. “OK, Glass. Switch to Evernote.”
A piece of paper and a pen are projected onto the table in front of you, and a bulletin board appears to the left.
You pick up the AR pen, jot down your note, move the paper to the appropriate bulletin, and return to Angry Birds.
You could make your game visible to other Glass wearers. That way, others could play with you — or, at the very least, would know you’re not some crazy person pretending to do… whatever you’re doing across the table.
When Jon arrives, notifications are disabled. You push the menu icon on the table and select your meal. Your meal arrives; you take photos of your food; eat; publish to Instagram 7.
Before you leave, the restaurant gives a polite notification, letting you know that a coupon for 10% off will be sent to your phone if you write a review.
How Wearable Technology Interacts With Desktops
Later, having finished the cooking tutorial on the desktop, you decide it’s time to make the meal for real. You put on Glass and go to the store. The headset guides you directly to the brands that were advertised “in game.” After picking out your ingredients, you receive a notification that a manufacturer’s coupon has been sent to your phone and can be used at the check-out.
When you get home, you lay a carrot on the cutting board and an overlay projects guidelines on where to cut. You lay out the meat, and a POW graphic is overlaid, showing you where to hit for optimal tenderness:
Image source?
You put the meat in the oven; Glass starts the timer. You put the veggies in the pan; Glass overlays a pattern to show where and when to stir.
While you were at the store, Glass helped you to pick out the perfect bottle of wine to pair with your meal (based on reviews, of course). So, you pour yourself a glass and relax while you wait for the timer to go off.
In the future, augmented real-world UX experiences will be turned into real business. The more you enhance real life, the more successful your business will be. After all, is it really difficult to imagine this cooking experience being turned into a game?
What Can We Do About This Today?
If you’re the kind of UI designer who seeks to push boundaries, then the best thing you can do right now is think. Because the technology isn’t 100% available, the best you can do is open your imagination to what will be possible when the average person has evolved beyond the keyboard and mouse.
Draw inspiration from websites and software that simulate depth to create dynamic, layered experiences that can be easily operated without a mouse. The website of agency Black Negative is a good example of future-inspired “flat” interaction. It’s easy to imagine interacting with this website without needing a mouse. The new Myspace is another.
To go really deep, look at the different Chrome Experiments, and find a skilled HTML5 and WebGL developer to discuss what’s in store for the future. The software and interactions that come from your mind will determine whether these technologies will be useful.
Conclusion
While everything I’ve talked about here is conceptual, I’m curious to hear what you think about how (or even if) these devices will affect UIs. I’d also love to hear your vision of future UIs.
To get started, let me ask you two questions:
How will the ability to reach into the screen and interact with the virtual world shape our expectations of computing?
How will untethering content from flat surfaces fundamentally change the medium?
I look forward to your feedback. Please share this article if you’ve enjoyed this trip into the future.
]]>
With the Leap Motion controller being released on June 27th and the Google Glass Explorer program already live, it is obvious that our reliance on the mouse or even the monitor to interact...http://www.smashingmagazine.com/2013/06/14/what-leap-motion-and-google-glass-mean-for-future-user-experience/https://my3.my.umbc.edu/api/v0/pixel/news/31313/guest@my.umbc.edu/9456d3548896db11e0aec9e5c76df6f6/api/pixelcssdesigndevelopmenthtmljavascriptmysqlphpsqlux-designwebWeb Developer - Build Grouphttps://my3.my.umbc.edu/groups/retired-583https://assets3-my.umbc.edu/system/shared/avatars/groups/000/000/583/fc60f5d7abc2e080599bb6dc465db54d/xsmall.png?1363101197https://assets4-my.umbc.edu/system/shared/avatars/groups/000/000/583/fc60f5d7abc2e080599bb6dc465db54d/original.jpg?1363101197https://assets4-my.umbc.edu/system/shared/avatars/groups/000/000/583/fc60f5d7abc2e080599bb6dc465db54d/xxlarge.png?1363101197https://assets4-my.umbc.edu/system/shared/avatars/groups/000/000/583/fc60f5d7abc2e080599bb6dc465db54d/xlarge.png?1363101197https://assets3-my.umbc.edu/system/shared/avatars/groups/000/000/583/fc60f5d7abc2e080599bb6dc465db54d/large.png?1363101197https://assets3-my.umbc.edu/system/shared/avatars/groups/000/000/583/fc60f5d7abc2e080599bb6dc465db54d/medium.png?1363101197https://assets4-my.umbc.edu/system/shared/avatars/groups/000/000/583/fc60f5d7abc2e080599bb6dc465db54d/small.png?1363101197https://assets3-my.umbc.edu/system/shared/avatars/groups/000/000/583/fc60f5d7abc2e080599bb6dc465db54d/xsmall.png?1363101197https://assets4-my.umbc.edu/system/shared/avatars/groups/000/000/583/fc60f5d7abc2e080599bb6dc465db54d/xxsmall.png?1363101197Web Developer - Build Group00trueFri, 14 Jun 2013 05:42:31 -040030 fresh WordPress business themes
Most of the time, the first contact a customer will have with your business is through your website. Consequently, the website could make or break your business. To ensure that the website makes it, having it be both aesthetically pleasing and user friendly is imperative.
Look for five main features in a corporate WordPress theme before purchasing it: responsive design, colorization capabilities, browser compatibility, an advanced options panel, and support.
First, a responsive design will allow your users to view the website from any device (smartphone, tablet, laptop, etc). Colorization capabilities free you to select any colors you like for the website. This is important because you want to match your brand’s colors. Hence, choose only a WordPress theme that offers unlimited colors. The theme should be supported by most internet browsers, including Firefox, internet Explorer, Safari, Opera and Chrome. Nowadays, many theme developers sell their themes with an advanced options panel, which enables you to set a myriad of preferences without the hassle of learning code. Don’t go for a theme that doesn’t offer support into the future, including periodic updates and email support.
Now that that’s said, I have compiled a list of 30 splendid corporate WordPress themes to help web designers and businesses make informed decisions when developing or buying a corporate theme.
PAX
Pax is a corporate WordPress theme supported by all devices and tested on iPad, iPhone and Android 2.3+. Over and above being responsive, Pax has unlimited colorization capabilities. This theme looks incredible on most internet browsers, including internet Explorer 10+, Safari, Chrome and Firefox. Created by Adaptive Themes, Pax also packs a punch in its other features. It comes with a ton of shortcodes, a free Uslider plugin (which would normally cost you about $30), layered PSD files and an options panel. From the panel, you can set many options since the theme is highly customizable. Lastly, you get two layout styles, boxed and wide.
Customize
Customize is a fully responsive WordPress theme. This incredibly attractive theme supports modern browsers, old browsers (IE 7+), touch devices and responsive designs. Other browsers supported by this theme are Firefox, Chrome, Opera and Safari. Technical support is also prompt. The sales page claims that your queries will be answered within 24 hours of logging them. Created by Kopasoft, Customize also has integrated social media, which enables a business to connect with and satisfy its customers promptly. Additionally, it comes with an easy drag-and-drop layout manager, a visual shortcode generator and multiple sliders. It makes for a great corporate theme, especially for tech businesses.
Super Spark
Super Spark is an awesomely constructed theme. It is responsive, it supports unlimited colors, most browsers support it, and its creator has gone to great lengths to assist users with their queries about it. Created by Good Layers, the theme also features a live color changer, multiple footer layouts, multiple blog styles, a built-in translator, and a font and logo uploader. Additionally, the theme has a custom pricing table, which sets it apart from other business themes. It was created with the creative industry in mind.
Grander
Grander is a beautiful multipurpose WordPress theme that could be used to make a breathtaking corporate website. It is responsive and comes with multiple color schemes, 25 to be exact. Its advanced admin panel is also to die for, allowing you to change settings for pricing, typography, meta data, contact information and social media. Created by Holobest, it also features a minimal design, a shortcode generator, multiple custom post types, page templates for members and services, Google Maps support, pagination capabilities, and custom widgets (including for Twitter and video). The theme is compatible with most browsers.
Proma
Proma is an incredible WordPress 3.5+ theme. It is responsive, easy to customize, and compatible with major browsers. It supports unlimited colors and, get this, unlimited fonts, and it has an options panel where you can easily set preferences. Created by Final Destiny, Proma also comes with a “revolution” slider, a “flex” slider, custom widgets, a custom color scheme, multiple page templates, custom post types, and a unique filterable portfolio. You also get appropriate documentation, and the creator will do his best to address your concerns.
FreshBiz
FreshBiz is a cool multipurpose theme that can be used for any type of corporate website. It comes with unlimited color and styles and is compatible with internet Explorer 8+, Chrome, Firefox and Safari. Created by MNKY, this theme has an intelligent options panel, where you can set the logo, header, menu, title area, footer, typography, blog area and much more. And it is responsive.
FreshLook
Freshlook is, well, a breath of fresh air. This responsive theme is highly customizable, with a rich feature set, including a visual shortcode editor, over 300 Google Web Fonts, unlimited sidebars and more. In addition, the theme supports unlimited color skins, which could generate profit for the creator. Created by Designare, Freshlook is supported by major browsers and has a powerful settings panel where you can build custom skins and change all of the main styles. You also get to choose from custom patterns and colors for every section of a page.
Nebraska
Nebraska is a fully translation-ready corporate theme. It comes with many features. From the advanced options panel, you can set custom codes and sidebar options. You also get a page creator to help you create a unique corporate theme. Created by United Themes, Nebraska offers unlimited accent colors and compatibility with internet Explorer 10+, Firefox, Chrome and more. The custom widgets (including for posts, Twitter, Flickr and social icons) enable businesses to reduce their workload while streamlining their processes.
Inovado
Inovado is aesthetically pleasing, to say the least. And this is complemented by a myriad of features. The theme is responsive and Retina-ready, meaning that your images will not lose their sharpness and clarity, whatever the device. It also comes with an impressive 500+ Google Web Fonts and unlimited colors. Created by Minti, it is compatible with internet Explorer 8 and 9, Firefox, Safari and Chrome. It also has sharp graphics, localization functionality, a built-in SEO base, premium sliders, and child-theme compatibility. It works with WordPress 3.5+.
Nautica
Nautica is an HTML5-, CSS3- and widget-ready theme, compatible with WordPress 3.4+ and major browsers. Judging by its ratings and comments, Nautica has a lot to offer businesses. Created by BeOpen, the theme pays great attention to detail. The responsive multi-platform theme allows you to customize almost all aspects, including the logo, slider, menu, call to action, services, portfolio, tabs, processes and testimonials.
Eudora
Eudora is easy to edit and responsive. It packs a punch in features: a myriad of page templates, a powerful admin panel, unlimited colors, multiple widgets, multiple post formats, Google Web Fonts, multiple portfolio layouts, Google Maps support, video support and SEO-ready features. Created by ThemeProfuse, Eudora is equipped with an impressive options panel for general settings, the slider, navigation, the footer and the blog. It is compatible with major browsers.
Avino
Avino is a responsive theme with a powerful options page and unlimited home page layouts, which is an advantage for those looking to develop a unique layout. Created by WSGraphic, Avino is designed for any business, although photographers and those in tech and consulting would especially reap its benefits because it is clean, minimalist and responsive. In addition, the theme has a built-in SEO plugin.
Helios
Helios comes in two styles: boxed and wide. Its minimalist, responsive design gives it an edge. And it incorporates valid HTML5 and PSD files. The theme is compatible with major browsers and comes with an advanced options page. Created by Indonez, Helios’ settings panel has options for general settings, fonts and the logo. Additional features are Google Web Fonts support, two blog page layouts, custom page templates, an AJAX contact form, and translation-ready capabilities.
Grider
Grider is a responsive corporate theme that allows you to pick any color from a color picker. Pick also from multiple page templates, including for the home page and contact page, as well as a full-width template. Created by iWebStudio, Grider also comes with a myriad of other attributes: elastic slider, flex slider, skitter slider, multiple shortcodes, translation-ready capabilities, and an under-construction template with a countdown. The theme is compatible with internet Explorer 10+, Firefox, Safari, Chrome and Opera.
TouchM
TouchM is beautifully crafted. Apart from being viewable on any device, TouchM comes with unlimited color and font capabilities. Its advanced panel helps you set preferences for the header, main content, body, menu and footer. Created by 4GraFx, TouchM comes with full integration with WooCommerce, an e-commerce toolkit. It also features 404 and under-construction page templates, which are not included in most WordPress themes nowadays. It also features a visual shortcode generator, multiple icons and more than 20 page layouts.
Architecture
Architecture is a beautiful theme with a responsive design. The name of the theme gives away its target industry: architecture. And its minimal and contemporary look and feel are appropriate to it. It also features a live color changer and is compatible with most browsers. Created by Good Layers, the theme comes with an advanced options panel for colors, sliders, fonts, the favicon, Google Analytics, the footer, the portfolio and the body. Other features are a built-in translator and built-in shortcodes.
Lawyer
Do not be fooled by the name. Lawyer is designed for all types of businesses. However, lawyers will reap the most benefit. It is attractive and Retina-ready, has unlimited colors through a color picker and is compatible with internet Explorer 8 and 9, Firefox, Chrome and Safari. Created by AitThemes, Lawyers comes with an easy-to-use admin panel for colors, images, widgets, sliders, portfolios, galleries and more. The theme also features practical shortcodes, multiple tools and accessories.
Maximus
Want to know what you can tweak easily with the Maximus WordPress theme? Here is just a brief list: the main accent color, page layout, theme color, social icon positioning, home page slider, general slider, content, navigation, and layout. Created by Dynamic Press, Maximus supports most browsers and comes with a custom skin creator, more than 100 shortcodes, multiple background patterns and SEO support.
Camouflet
One of the outstanding features of Camouflet its responsiveness, not to mention that it is clean and minimalist. With the options panel, you can upload your own background image and change colors. Created by iWebStudios, Camouflet makes it easy for users to style many elements with shortcodes, including for columns, drop caps, lists, dividers, block quotes, testimonials, pricing boxes, buttons, information boxes, accordions, tabs, YouTube and Vimeo videos and Google maps.
CoolBlue
CoolBlue is a responsive theme that comes with an amazing layer slider, unlimited colors and an advanced options panel. Created by Anps Themes, CoolBlue is also compatible with internet Explorer 8 and 9, Firefox, Safari and Opera. Additional features include a set of 500+ Google Web Fonts, unlimited sidebars, multiple shortcodes, 30 PSD files and multiple blog layouts. True to its name, it comes with relaxing color schemes, different icon shapes, different layout styles and the all-amazing Revolution Slider.
Ageless
Ageless is a modern WordPress 3.5+-compatible theme. It is responsive, translation-ready and HTML5-ready. Ageless is also flawless on most browsers, including Firefox, Safari, Opera, internet Explorer 8 and 9, and Chrome. Created by Damojo, it incorporates smart options for styles and colors, and it features unlimited sidebars, unlimited portfolios, custom widgets, multiple post formats, localization capabilities, customizable contact forms and multiple shortcodes.
WP Consultant
WP Consultant is a premium theme suitable for all types of businesses. Coded in HTML5 and CSS3, it is fully responsive and comes with free updates for life (making your website dynamic and responsive and building trust with your customers). Created by Contempoinc, the theme packs many features: multiple page templates (including for testimonials, site map and FAQ), full width pages, three-column pages, a client page, contact page and several home page styles. The theme is also equipped with a powerful page builder.
Impact
Impact is a fully responsive WordPress theme. Built with HTML5 and CSS3, it has some of the best WordPress functions built in, making for an easy-to-use and simply awesome theme. It is compatible with WordPress 3.5+ and comes with multiple color options. Created by WpExplorer, this theme is compatible with the most browsers. And the creator also offers reliable support and updates.
Vanguard
Vanguard is a clean, responsive theme with unlimited color capabilities. Created by Unisphere, the corporate theme comes with 500+ fonts, which you can add to. It is compatible with internet Explorer 8 and 9, Safari, Firefox and Chrome, has both wide and narrow layouts, and has an advanced options panel.
November
November is an amazing premium theme. It comes with a wide array of features, one of the most impressive of which is the page builder, which allows you to build pages by dragging and dropping. Another is the Revolution Slider, which you get free of charge, a $30 value. Created by PWvintage, this WordPress 3.5+ theme is compatible with major browsers and comes equipped with Google Web Fonts, unlimited color capabilities, an advanced options page and multiple customizable slider transitions.
Savior Business
Savior Business is a powerful theme. It is responsive and comes in two styles: light and dark. It even includes a calendar with recurring events. The theme also has goodies in the form of the Nivo slider, which is provided for free. Created by Justin Scheetz, this theme is ideal for any business. It is compatible with major browsers and incorporates custom widgets, shortcodes and an options panel.
Sirius
Sirius is a modern, minimalist theme. Newbies and advanced users will have an easy time using this theme. In addition to being responsive, it comes with a wide array of features. Created by Indonez, the theme features thumbnail support with dynamic image resizing, custom page templates, shortcodes and a powerful options panel. Mainstream browsers are supported.
OpenSpace
OpenSpace is also a responsive theme, supported by WordPress 3.0+. It would suit any industry, particularly photography. One feature that stands out is the admin panel, which is fully brandable and comes with multiple color schemes. Created by Dynamic Press, OpenSpace is compatible with internet Explorer 7 to 9, Safari, Firefox, Chrome and Opera. It comes with multiple patterns, a multicolored menu, custom skin creator, multiple sliders and shortcodes, as well as two layouts: fluid and boxed.
Brandspace
Brandspace is a responsive theme that supports WordPress 3.4+. It comes with unlimited color capabilities, chosen from a powerful options panel and is compatible with most browsers. Created by Pixel Entity, the theme comes with a set of awesome attributes: Google Web Fonts, Google maps, oodles of shortcodes, light and dark skins, Twitter Bootstrap, unlimited widget areas, unlimited portfolios, child theme support, built-in social media, video support, and multiple page types.
BlueDiamond
BlueDiamond is clean, minimalist and responsive. It is equipped with the Layer Slider, which allows you to manage all sliders with an easy drag-and-drop module. It also comes with two styles: boxed and wide. Created by Good Layers, Blue Diamond supports internet Explorer 8 and 9, Chrome, Safari and Firefox. From its advanced options panel, you can configure the slider settings, the background, thumbnails, the page builder and social media.
What do you look for in a WordPress business theme? Have we missed any of your favorites? Let us know in the comments.
]]>
Most of the time, the first contact a customer will have with your business is through your website. Consequently, the website could make or break your business. To ensure that the website makes...http://rss.feedsportal.com/c/35285/f/661066/s/2d475b2d/l/0L0Swebdesignerdepot0N0C20A130C0A60C30A0Efresh0Ewordpress0Ebusiness0Ethemes0C/story01.htmhttps://my3.my.umbc.edu/api/v0/pixel/news/31314/guest@my.umbc.edu/0cb2bcedb8d9f96c62670857269f0a06/api/pixelartbest-business-themes-for-wordpressbest-wordpress-themesbusiness-themescssdesigndevelopmenthtmlhtml5illustratorjavascriptmysqloraclephotoshopphpresourcessqlwordpresswordpress-themes-roundupWeb Developer - Build Grouphttps://my3.my.umbc.edu/groups/retired-583https://assets3-my.umbc.edu/system/shared/avatars/groups/000/000/583/fc60f5d7abc2e080599bb6dc465db54d/xsmall.png?1363101197https://assets4-my.umbc.edu/system/shared/avatars/groups/000/000/583/fc60f5d7abc2e080599bb6dc465db54d/original.jpg?1363101197https://assets4-my.umbc.edu/system/shared/avatars/groups/000/000/583/fc60f5d7abc2e080599bb6dc465db54d/xxlarge.png?1363101197https://assets4-my.umbc.edu/system/shared/avatars/groups/000/000/583/fc60f5d7abc2e080599bb6dc465db54d/xlarge.png?1363101197https://assets3-my.umbc.edu/system/shared/avatars/groups/000/000/583/fc60f5d7abc2e080599bb6dc465db54d/large.png?1363101197https://assets3-my.umbc.edu/system/shared/avatars/groups/000/000/583/fc60f5d7abc2e080599bb6dc465db54d/medium.png?1363101197https://assets4-my.umbc.edu/system/shared/avatars/groups/000/000/583/fc60f5d7abc2e080599bb6dc465db54d/small.png?1363101197https://assets3-my.umbc.edu/system/shared/avatars/groups/000/000/583/fc60f5d7abc2e080599bb6dc465db54d/xsmall.png?1363101197https://assets4-my.umbc.edu/system/shared/avatars/groups/000/000/583/fc60f5d7abc2e080599bb6dc465db54d/xxsmall.png?1363101197Web Developer - Build Group00trueFri, 14 Jun 2013 05:15:30 -0400Fri, 14 Jun 2013 05:15:30 -0400Study Gauges Value of Technology in Schools
A review of federal data found that technology investments in schools had not changed the nature of education.
]]>
A review of federal data found that technology investments in schools had not changed the nature of education. http://www.nytimes.com/2013/06/14/education/study-gauges-value-of-technology-in-schools.html?partner=rss&emc=rsshttps://my3.my.umbc.edu/api/v0/pixel/news/31312/guest@my.umbc.edu/e614ef4f6609cd97f57d4cc25c792e00/api/pixelcomputers-and-the-internete-learningeducation-k-12mathematicsnational-assessment-of-educational-progressnewtechnologytests-and-examinationsyorkWeb Developer - Build Grouphttps://my3.my.umbc.edu/groups/retired-583https://assets3-my.umbc.edu/system/shared/avatars/groups/000/000/583/fc60f5d7abc2e080599bb6dc465db54d/xsmall.png?1363101197https://assets4-my.umbc.edu/system/shared/avatars/groups/000/000/583/fc60f5d7abc2e080599bb6dc465db54d/original.jpg?1363101197https://assets4-my.umbc.edu/system/shared/avatars/groups/000/000/583/fc60f5d7abc2e080599bb6dc465db54d/xxlarge.png?1363101197https://assets4-my.umbc.edu/system/shared/avatars/groups/000/000/583/fc60f5d7abc2e080599bb6dc465db54d/xlarge.png?1363101197https://assets3-my.umbc.edu/system/shared/avatars/groups/000/000/583/fc60f5d7abc2e080599bb6dc465db54d/large.png?1363101197https://assets3-my.umbc.edu/system/shared/avatars/groups/000/000/583/fc60f5d7abc2e080599bb6dc465db54d/medium.png?1363101197https://assets4-my.umbc.edu/system/shared/avatars/groups/000/000/583/fc60f5d7abc2e080599bb6dc465db54d/small.png?1363101197https://assets3-my.umbc.edu/system/shared/avatars/groups/000/000/583/fc60f5d7abc2e080599bb6dc465db54d/xsmall.png?1363101197https://assets4-my.umbc.edu/system/shared/avatars/groups/000/000/583/fc60f5d7abc2e080599bb6dc465db54d/xxsmall.png?1363101197Web Developer - Build Group00trueThu, 13 Jun 2013 21:57:49 -0400Thu, 13 Jun 2013 21:57:49 -0400Secret Court Ruling Put Tech Companies in Data Bind
In 2008, a ruling by a surveillance court said to be against Yahoo discouraged technology firms from fighting data requests from the government.
]]>
In 2008, a ruling by a surveillance court said to be against Yahoo discouraged technology firms from fighting data requests from the government. http://www.nytimes.com/2013/06/14/technology/secret-court-ruling-put-tech-companies-in-data-bind.html?partner=rss&emc=rsshttps://my3.my.umbc.edu/api/v0/pixel/news/31311/guest@my.umbc.edu/de939642bff0a2480b86c24bf51f05bf/api/pixelfacebook-inc-fb-nasdaqforeign-intelligence-surveillance-act-fisagoogle-inc-goog-nasdaqmicrosoft-corporation-msft-nasdaqnewprivacysurveillance-of-citizens-by-governmenttechnologytwitteryahoo-inc-yhoo-nasdaqyorkWeb Developer - Build Grouphttps://my3.my.umbc.edu/groups/retired-583https://assets3-my.umbc.edu/system/shared/avatars/groups/000/000/583/fc60f5d7abc2e080599bb6dc465db54d/xsmall.png?1363101197https://assets4-my.umbc.edu/system/shared/avatars/groups/000/000/583/fc60f5d7abc2e080599bb6dc465db54d/original.jpg?1363101197https://assets4-my.umbc.edu/system/shared/avatars/groups/000/000/583/fc60f5d7abc2e080599bb6dc465db54d/xxlarge.png?1363101197https://assets4-my.umbc.edu/system/shared/avatars/groups/000/000/583/fc60f5d7abc2e080599bb6dc465db54d/xlarge.png?1363101197https://assets3-my.umbc.edu/system/shared/avatars/groups/000/000/583/fc60f5d7abc2e080599bb6dc465db54d/large.png?1363101197https://assets3-my.umbc.edu/system/shared/avatars/groups/000/000/583/fc60f5d7abc2e080599bb6dc465db54d/medium.png?1363101197https://assets4-my.umbc.edu/system/shared/avatars/groups/000/000/583/fc60f5d7abc2e080599bb6dc465db54d/small.png?1363101197https://assets3-my.umbc.edu/system/shared/avatars/groups/000/000/583/fc60f5d7abc2e080599bb6dc465db54d/xsmall.png?1363101197https://assets4-my.umbc.edu/system/shared/avatars/groups/000/000/583/fc60f5d7abc2e080599bb6dc465db54d/xxsmall.png?1363101197Web Developer - Build Group00trueThu, 13 Jun 2013 21:50:32 -0400Fri, 14 Jun 2013 21:25:05 -0400Combining Laravel 4 and Backbone
For this tutorial, we’re going to be building a single page app using Laravel 4 and Backbone.js. Both frameworks make it very easy to use a different templating engine other than their respective default, so we’re going to use Mustache, which is an engine that is common to both. By using the same templating language on both sides of our application, we’ll be able to share our views betweem them, saving us from having to repeat our work multiple times.
Our Backbone app will be powered by a Laravel 4 JSON API which we’ll develop together. Laravel 4 comes with some new features that make the development of this API very easy. I’ll show you a few tricks along the way to allow you to stay a bit more organized.
All of our dependencies will be managed by Package Managers, there will be no manual downloading or updating of libraries for this application! In addition, I’ll be showing you how to leverage a little extra power from some of our dependencies.
Mockery: Used for mocking PHP Objects while testing.
Backbone.js: A Javascript MVC for our single page app.
Underscore.js: A dependency of Backbone, and a great little toolkit of functions.
To complete this tutorial, you’ll need the following items installed:
Composer: You can download this from the homepage, I recommend the global install instructions located here.
Node + NPM: the installer on the homepage will install both items.
LESS Compiler: If you’re on a Mac, I recommend CodeKit. However, regardless of your operating system, or if you do not feel like paying for CodeKit, you can just install the LESS Compiler for Node.js by typing npm install -g less at the command prompt.
Part 1: The Base Architecture
First things first, we need to get our application setup before we can begin adding our business logic to it. We’ll do a basic setup of Laravel 4 and get all of our dependencies installed using our Package Managers.
Laravel 4 uses Composer to install all of its dependencies, but first we’ll need an application structure to install into. The “develop” branch on Laravel's Github repository is the home for this application structure. However, at the time of writing this article, Laravel 4 was still in beta, so I needed to be prepared for this structure to change at any time. By adding Laravel as a remote repository, we can pull in these changes whenever we need to. In fact, while something is in beta-mode, it’s a good practice to run these commands after each composer update. However, Laravel 4 is now the newest, stable version.
So we have the application structure, but all of the library files that Laravel needs are not yet installed. You’ll notice at the root of our application there’s a file called composer.json. This is the file that will keep track of all the dependencies that our Laravel application requires. Before we tell Composer to download and install them, let's first add a few more dependencies that we’re going to need. We’ll be adding:
Jeffrey Way's Generators: Some very useful commands to greatly improve our workflow by automatically generating file stubs for us.
Laravel 4 Mustache: This will allow us to seamlessly use Mustache.php in our Laravel project, just as we would Blade.
Twitter Bootstrap: We’ll use the LESS files from this project to speed up our front-end development.
PHPUnit: We’ll be doing some TDD for our JSON API, PHPUnit will be our testing engine.
Mockery: Mockery will help us "mock" objects during our testing.
PHPUnit and Mockery are only required in our development environment, so we’ll specify that in our composer.json file.
Now we just need to tell Composer to do all of our leg work! Below, notice the --dev switch, we’re telling composer that we’re in our development environment and that it should also install all of our dependencies listed in "require-dev".
composer install --dev
After that finishes installing, we’ll need to inform Laravel of a few of our dependencies. Laravel uses "service providers" for this purpose. These service providers basically just tell Laravel how their code is going to interact with the application and to run any necessary setup procedures. Open up app/config/app.php and add the following two items to the "providers" array. Not all packages require this, only those that will enhance or change the functionality of Laravel.
Lastly, we just need to do some generic application tweaks to complete our Laravel installation. Let's open up bootstrap/start.php and tell Laravel our machine name so that it can determine what environment it’s in.
bootstrap/start.php
/*
    |--------------------------------------------------------------------------
    | Detect The Application Environment
    |--------------------------------------------------------------------------
    |
    | Laravel takes a dead simple approach to your application environments
    | so you can just specify a machine name or HTTP host that matches a
    | given environment, then we will automatically detect it for you.
    |
    */

    $env = $app->detectEnvironment(array(

      'local' => array('your-machine-name'),

    ));
Replace "your-machine-name" with whatever the hostname for your machine is. If you are unsure of what your exact machine name is, you can just type hostname at the command prompt (on Mac or Linux), whatever it prints out is the value that belongs in this setting.
We want our views to be able to be served to our client from a web request. Currently, our views are stored outside of our public folder, which would mean that they are not publicly accessible. Luckily, Laravel makes it very easy to move or add other view folders. Open up app/config/view.php and change the paths setting to point to our public folder. This setting works like the PHP native include path, it will check in each folder until it finds a matching view file, so feel free to add several here:
app/config/view.php
'paths' => array(__DIR__.'/../../public/views'),
Next you will need to configure your database. Open up app/config/database.php and add in your database settings.
Note: It is recommended to use 127.0.0.1 instead of localhost. You get a bit of a performance boost on most systems, and with some system configurations, localhost will not even connect properly.
Finally, you just need to make sure that your storage folder is writable.
chmod -R 755 app/storage
Laravel is now installed, with all of its dependencies, as well as our own dependencies. Now let's setup our Backbone installation!
Just like our composer.json installed all of our server-side dependencies, we’ll create a package.json in our public folder to install all of our client-side dependencies.
For our client-side dependencies we’ll use:
Underscore.js: This is a dependency of Backbone.js, and a handy toolbelt of functions.
Backbone.js: This is our client-side MVC that we’ll use to build out our application.
Mustache.js: The Javascript version of our templating library, by using the same templating language both on the client and the server, we can share views, as opposed to duplicating logic.
Now just switch into your public folder, and run npm install. After that completes, lets switch back to our application root so we’re prepared for the rest of our commands.
cd public
    npm install
    cd ..
Package managers save us from a ton of work, should you want to update any of these libraries, all you have to do is run npm update or composer update. Also, should you want to lock any of these libraries in at a specific version, all you have to do is specify the version number, and the package manager will handle the rest.
To wrap up our setup process we’ll just add in all of the basic project files and folders that we’ll need, and then test it out to ensure it all works as expected.
Twitter Bootstrap also has two JavaScript dependencies that we’ll need, so let's just copy them from the vendor folder into our public folder. They are:
html5shiv.js: allows us to use HTML5 elements without fear of older browsers not supporting them
bootstrap.min.js: the supporting JavaScript libraries for Twitter Bootstrap
For our layout file, the Twitter Bootstrap also provides us with some nice starter templates to work with, so let's copy one into our layouts folder for a head start:
Notice that I am using a blade extension here, this could just as easily be a mustache template, but I wanted to show you how easy it is to mix the templating engines. Since our layout will be rendered on page load, and will not need to be re-rendered by the client, we are safe to use PHP here exclusively. If for some reason you find yourself needing to render this file on the client-side, you would want to switch this file to use the Mustache templating engine instead.
Now that we have all of our basic files in place, let's add some starter content that we can use to test that everything is working as we would expect. I’m providing you with some basic stubs to get you started.
public/css/styles.less
We’ll just import the Twitter Bootstrap files from the vendor directory as opposed to copying them. This allows us to update Twitter Bootstrap with nothing but a composer update.
We declare our variables at the end of the file, the LESS compiler will figure out the value of all of its variables before parsing the LESS into CSS. This means that by re-defining a Twitter Bootstrap variable at the end of the file, the value will actually change for all of the files included, allowing us to do simple overrides without modifying the Twitter Bootstrap core files.
/**
     * Import Twitter Bootstrap Base File
     ******************************************************************************************
     */
    @import "../../vendor/twitter/bootstrap/less/bootstrap";
    /**
     * Define App Styles
     * Do this before the responsive include, so that it can override properly as needed.
     ******************************************************************************************
     */
    body {
      padding-top: 60px; /* 60px to make the container go all the way to the bottom of the topbar */
    }

    /* this will set the position of our alerts */
    #notifications {
      width: 300px;
      position: fixed;
      top: 50px;
      left: 50%;
      margin-left: -150px;
      text-align: center;
    }

    /**
     * Import Bootstrap's Responsive Overrides
     * now we allow bootstrap to set the overrides for a responsive layout
     ******************************************************************************************
     */
    @import "../../vendor/twitter/bootstrap/less/responsive";
    /**
     * Define our variables last, any variable declared here will be used in the includes above
     * which means that we can override any of the variables used in the bootstrap files easily
     * without modifying any of the core bootstrap files
     ******************************************************************************************
     */

    // Scaffolding
    // -------------------------
    @bodyBackground:    #f2f2f2;
    @textColor:       #575757;

    // Links
    // -------------------------
    @linkColor:       #41a096;

    // Typography
    // -------------------------
    @sansFontFamily:    Arial, Helvetica, sans-serif;
public/js/app.js
Now we’ll wrap all of our code in an immediately-invoking-anonymous-function that passes in a few global objects. We’ll then alias these global objects to something more useful to us. Also, we’ll cache a few jQuery objects inside the document ready function.
//alias the global object
    //alias jQuery so we can potentially use other libraries that utilize $
    //alias Backbone to save us on some typing
    (function(exports, $, bb){

      //document ready
      $(function(){

        /**
         ***************************************
         * Cached Globals
         ***************************************
         */
        var $window, $body, $document;

        $window  = $(window);
        $document = $(document);
        $body   = $('body');
      });//end document ready

    }(this, jQuery, Backbone));
public/views/layouts/application.blade.php
Next is just a simple HTML layout file. We’re however using the asset helper from Laravel to aid us in creating paths to our assets. It is good practice to use this type of helper, because if you ever happen to move your project into a sub-folder, all of your links will still work.
We made sure that we included all of our dependencies in this file, and also added the jQuery dependency. I chose to request jQuery from the Google CDN, because chances are the visiting user of this site will already have a copy from that CDN cached in their browser, saving us from having to complete the HTTP request for it.
One important thing to note here is the way in which we are nesting our view. Mustache does not have Block Sections like Blade does, so instead, the contents of the nested view will be made available under a variable with the name of the section. I will point this out when we render this view from our route.
<!DOCTYPE html>
    <html lang="en">
    <head>
     <meta charset="utf-8">
     <title>Laravel4 & Backbone | Nettuts</title>
     <meta name="viewport" content="width=device-width, initial-scale=1.0">
     <meta name="description" content="A single page blog built using Backbone.js, Laravel, and Twitter Bootstrap">
     <meta name="author" content="Conar Welsh">

     <link href="{{ asset('css/styles.css') }}" rel="stylesheet">

     <!-- HTML5 shim, for IE6-8 support of HTML5 elements -->
     <!--[if lt IE 9]>
     <script src="{{ asset('js/html5shiv.js') }}"></script>
     <![endif]-->
    </head>
    <body>

     <div id="notifications">
     </div>

     <div class="navbar navbar-inverse navbar-fixed-top">
      <div class="navbar-inner">
       <div class="container">
        <button type="button" class="btn btn-navbar" data-toggle="collapse" data-target=".nav-collapse">
         <span class="icon-bar"></span>
         <span class="icon-bar"></span>
         <span class="icon-bar"></span>
        </button>
        <a class="brand" href="#">Nettuts Tutorial</a>
        <div class="nav-collapse collapse">
         <ul class="nav">
          <li class="active"><a href="#">Blog</a></li>
         </ul>
        </div><!--/.nav-collapse -->
       </div>
      </div>
     </div>

     <div class="container" data-role="main">
      {{--since we are using mustache as the view, it does not have a concept of sections like blade has, so instead of using @yield here, our nested view will just be a variable that we can echo--}}

      {{ $content }}

     </div> <!-- /container -->

     <!-- Placed at the end of the document so the pages load faster -->
     <script src="//ajax.googleapis.com/ajax/libs/jquery/1.9.1/jquery.min.js"></script> <!-- use Google CDN for jQuery to hopefully get a cached copy -->
     <script src="{{ asset('node_modules/underscore/underscore-min.js') }}"></script>
     <script src="{{ asset('node_modules/backbone/backbone-min.js') }}"></script>
     <script src="{{ asset('node_modules/mustache/mustache.js') }}"></script>
     <script src="{{ asset('js/bootstrap.min.js') }}"></script>
     <script src="{{ asset('js/app.js') }}"></script>
     @yield('scripts')
    </body>
    </html>
public/views/app.mustache
Next is just a simple view that we’ll nest into our layout.
<dl>
      <dt>Q. What did Biggie say when he watched inception?</dt>
      <dd>A. "It was all a dream!"</dd>
    </dl>
app/routes.php
Laravel should have already provided you with a default route, all we’re doing here is changing the name of the view which that route is going to render.
Remember from above, I told you that the nested view was going to be available under a variable named whatever the parent section was? Well, when you nest a view, the first parameter to the function is the section name:
In our nest command we called the section "content", that means if we echo $content from our layout, we’ll get the rendered contents of that view. If we were to do return View::make('layouts.application')->nest('foobar', 'app'); then our nested view would be available under a variable named $foobar.
<?php

    //backbone app route
    Route::get('/', function()
    {
      //change our view name to the view we created in a previous step
      //notice that we do not need to provide the .mustache extension
      return View::make('layouts.application')->nest('content', 'app');
    });
With all of our basic files in place, we can test to ensure everything went OK. Laravel 4 utilizes the new PHP web server to provide us with a great little development environment. So long to the days of having a million virtual hosts setup on your development machine for every project that you work on!
Note: make sure that you’ve compiled your LESS file first!
php artisan serve
If you followed along correctly, you should be laughing hysterically at my horrible sense of humor, and all of our assets should be properly included into the page.
Part 2: Laravel 4 JSON API
Now we’ll build the API that will power our Backbone application. Laravel 4 makes this process a breeze.
API Guidelines
First let's go over a few general guidelines to keep in mind while we build our API:
Status Codes: Responses should reply with proper status codes, fight the temptation to just place an { error: "this is an error message" } in the body of your response. Use the HTTP protocol to its fullest!
200: success
201: resource created
204: success, but no content to return
400: request not fulfilled //validation error
401: not authenticated
403: refusal to respond //wrong credentials, do not have permission (un-owned resource)
404: not found
500: other error
Resource Methods: Even though controllers will be serving different resources, they should still have very similar behavior. The more predictable your API is, the easier it is to implement and adopt.
index: Return a collection of resources.
show: Return a single resource.
create: Return a form. This form should detail out the required fields, validation, and labels as best as possible. As well as anything else needed to properly create a resource. Even though this is a JSON API, it is very useful to return a form here. Both a computer and a person can parse through this form, and very easily decipher which items are needed to fill out this form successsfully. This is a very easy way to “document” the needs of your API.
store: Store a new resource and return with the proper status code: 201.
edit: Return a form filled with the current state of a resource. This form should detail out the required fields, validation, and labels as best as possible. As well as anything else needed to properly edit a resource.
update: Update an existing resource and return with the proper status code.
delete: Delete an existing resource and return with the proper status code: 204.
Routing & Versioning
API's are designed to be around for a while. This is not like your website where you can just change its functionality at the drop of a dime. If you have programs that use your API, they are not going to be happy with you if you change things around and their program breaks. For this reason, it’s important that you use versioning.
We can always create a "version two" with additional, or altered functionality, and allow our subscribing programs to opt-in to these changes, rather than be forced.
Laravel provides us with route groups that are perfect for this, place the following code ABOVE our first route:
<?php

    //create a group of routes that will belong to APIv1
    Route::group(array('prefix' => 'v1'), function()
    {
      //... insert API routes here...
    });
Generating Resources
We’re going to use Jeffrey Way's generators to generate our resources. When we generate a resource, it will create the following items for us:
We’re only going to need two resources for this app: a Post resource and a Comment resource.
Note: in a recent update to the generators, I have been receiving a permissions error due to the way my web servers are setup. To remedy this problem, you must allow write permissions to the folder that the generators write the temp file to.
We decided that we wanted our API to be versioned, so we’ll need to move the routes that the generator created for us into the version group. We’ll also want to namespace our controllers with the corresponding version, so that we can have a different set of controllers for each version we build. Also the comments resource needs to be nested under the posts resource.
<?php

    //create a group of routes that will belong to APIv1
    Route::group(array('prefix' => 'v1'), function()
    {
      //... insert API routes here...
      Route::resource('posts', 'V1\PostsController'); //notice the namespace
      Route::resource('posts.comments', 'V1\PostsCommentsController'); //notice the namespace, and the nesting
    });

    //backbone app route
    Route::get('/', function()
    {
      //change our view name to the view we created in a previous step
      //notice that we do not need to provide the .mustache extension
      return View::make('layouts.application')->nest('content', 'app');
    });
Since we namespaced our controllers, we should move them into their own folder for organization, let's create a folder named V1 and move our generated controllers into it. Also, since we nested our comments controller under the posts controller, let's change the name of that controller to reflect the relationship.
We’ll need to update the controller files to reflect our changes as well. First of all, we need to namespace them, and since they are namespaced, any classes outside of that namespace will need to be manually imported with the use statement.
app/controllers/PostsController.php
<?php
    //use our new namespace
    namespace V1;

    //import classes that are not in this new namespace
    use BaseController;

    class PostsController extends BaseController {
app/controllers/PostsCommentsController.php
We also need to update our CommentsController with our new name: PostsCommentsController
<?php
    //use our new namespace
    namespace V1;

    //import classes that are not in this new namespace
    use BaseController;

    //rename our controller class
    class PostsCommentsController extends BaseController {
Adding in Repositories
By default, repositories are not part of Laravel. Laravel is extremely flexible though, and makes it very easy to add them in. We’re going to use repositories to help us separate our logic for code re-usability, as well as for testing. For now we’ll just get setup to use repositories, we’ll add in the proper logic later.
Let’s make a folder to store our repositories in:
mkdir app/repositories
To let our auto-loader know about this new folder, we need to add it to our composer.json file. Take a look at the updated "autoload" section of our file, and you’ll see that we added in the repositories folder.
Database seeds are a useful tool, they provide us with an easy way to fill our database with some content. The generators provided us with base files for seeding, we merely need to add in some actual seeds.
app/database/seeds/PostsTableSeeder.php
<?php

    class PostsTableSeeder extends Seeder {

      public function run()
      {
        $posts = array(
          array(
            'title'    => 'Test Post',
            'content'   => 'Lorem ipsum Reprehenderit velit est irure in enim in magna aute occaecat qui velit ad.',
            'author_name' => 'Conar Welsh',
            'created_at' => date('Y-m-d H:i:s'),
            'updated_at' => date('Y-m-d H:i:s'),
          ),
          array(
            'title'    => 'Another Test Post',
            'content'   => 'Lorem ipsum Reprehenderit velit est irure in enim in magna aute occaecat qui velit ad.',
            'author_name' => 'Conar Welsh',
            'created_at' => date('Y-m-d H:i:s'),
            'updated_at' => date('Y-m-d H:i:s'),
          ),
        );

        // Uncomment the below to run the seeder
        DB::table('posts')->insert($posts);
      }

    }
app/database/seeds/CommentsTableSeeder.php
<?php

    class CommentsTableSeeder extends Seeder {

      public function run()
      {
        $comments = array(
          array(
            'content'   => 'Lorem ipsum Nisi dolore ut incididunt mollit tempor proident eu velit cillum dolore sed',
            'author_name' => 'Testy McTesterson',
            'post_id'   => 1,
            'created_at' => date('Y-m-d H:i:s'),
            'updated_at' => date('Y-m-d H:i:s'),
          ),
          array(
            'content'   => 'Lorem ipsum Nisi dolore ut incididunt mollit tempor proident eu velit cillum dolore sed',
            'author_name' => 'Testy McTesterson',
            'post_id'   => 1,
            'created_at' => date('Y-m-d H:i:s'),
            'updated_at' => date('Y-m-d H:i:s'),
          ),
          array(
            'content'   => 'Lorem ipsum Nisi dolore ut incididunt mollit tempor proident eu velit cillum dolore sed',
            'author_name' => 'Testy McTesterson',
            'post_id'   => 2,
            'created_at' => date('Y-m-d H:i:s'),
            'updated_at' => date('Y-m-d H:i:s'),
          ),
        );

        // Uncomment the below to run the seeder
        DB::table('comments')->insert($comments);
      }

    }
Don’t forget to run composer dump-autoload to let the Composer auto loader know about the new migration files!
composer dump-autoload
Now we can run our migrations and seed the database. Laravel provides us with a single command to do both:
php artisan migrate --seed
Tests
Testing is one of those topics in development that no one can argue the importance of, however most people tend to ignore it due to the learning curve. Testing is really not that difficult and it can dramatically improve your application. For this tutorial, we’ll setup some basic tests to help us ensure that our API is functioning properly. We’ll build this API TDD style. The rules of TDD state that we are not allowed to write any production code until we have failing tests that warrants it. However, if I were to walk you through each test individually, this would prove to be a very long tutorial, so in the interest of brevity, I will just provide you with some tests to work from, and then the correct code to make those tests pass afterwards.
Before we write any tests though, we should first check the current test status of our application. Since we installed PHPUnit via composer, we have the binaries available to us to use. All you need to do is run:
vendor/phpunit/phpunit/phpunit.php
Whoops! We already have a failure! The test that is failing is actually an example test that comes pre-installed in our Laravel application structure, this tests against the default route that was also installed with the Laravel application structure. Since we modified this route, we cannot be surprised that the test failed. We can however, just delete this test altogether as it does not apply to our application.
rm app/tests/ExampleTest.php
If you run the PHPUnit command again, you will see that no tests were executed, and we have a clean slate for testing.
Note: it is possible that if you have an older version of Jeffrey Way's generators that you’ll actually have a few tests in there that were created by those generators, and those tests are probably failing. Just delete or overwrite those tests with the ones found below to proceed.
For this tutorial we’ll be testing our controllers and our repositories. Let's create a few folders to store these tests in:
Now for the test files. We’re going to use Mockery to mock our repositories for our controller tests. Mockery objects do as their name implies, they "mock" objects and report back to us on how those objects were interacted with.
In the case of the controller tests, we do not actually want the repositories to be called, after all, these are the controller tests, not the repository tests. So Mockery will set us up objects to use instead of our repositories, and let us know whether or not those objects were called as we expected them to.
In order to pull this off, we’ll have to tell the controllers to use our "mocked" objects as opposed to the real things. We’ll just tell our Application to use a mocked instance next time a certain class is requested. The command looks like this:
The overall mocking process will go something like this:
Create a new Mockery object, providing it the name of the class which it is to mock.
Tell the Mockery object which methods it should expect to receive, how many times it should receive that method, and what that method should return.
Use the command shown above to tell our Application to use this new Mockery object instead of the default.
Run the controller method like usual.
Assert the response.
app/tests/controllers/CommentsControllerTest.php
<?php

    class CommentsControllerTest extends TestCase {

      /**
       ************************************************************************
       * Basic Route Tests
       * notice that we can use our route() helper here!
       ************************************************************************
       */

      //test that GET /v1/posts/1/comments returns HTTP 200
      public function testIndex()
      {
        $response = $this->call('GET', route('v1.posts.comments.index', array(1)) );
        $this->assertTrue($response->isOk());
      }

      //test that GET /v1/posts/1/comments/1 returns HTTP 200
      public function testShow()
      {
        $response = $this->call('GET', route('v1.posts.comments.show', array(1,1)) );
        $this->assertTrue($response->isOk());
      }

      //test that GET /v1/posts/1/comments/create returns HTTP 200
      public function testCreate()
      {
        $response = $this->call('GET', route('v1.posts.comments.create', array(1)) );
        $this->assertTrue($response->isOk());
      }

      //test that GET /v1/posts/1/comments/1/edit returns HTTP 200
      public function testEdit()
      {
        $response = $this->call('GET', route('v1.posts.comments.edit', array(1,1)) );
        $this->assertTrue($response->isOk());
      }

      /**
       *************************************************************************
       * Tests to ensure that the controller calls the repo as we expect
       * notice we are "Mocking" our repository
       *
       * also notice that we do not really care about the data or interactions
       * we merely care that the controller is doing what we are going to want
       * it to do, which is reach out to our repository for more information
       *************************************************************************
       */

      //ensure that the index function calls our repository's "findAll" method
      public function testIndexShouldCallFindAllMethod()
      {
        //create our new Mockery object with a name of CommentRepositoryInterface
        $mock = Mockery::mock('CommentRepositoryInterface');

        //inform the Mockery object that the "findAll" method should be called on it once
        //and return a string value of "foo"
        $mock->shouldReceive('findAll')->once()->andReturn('foo');

        //inform our application that we have an instance that it should use
        //whenever the CommentRepositoryInterface is requested
        App::instance('CommentRepositoryInterface', $mock);

        //call our controller route
        $response = $this->call('GET', route('v1.posts.comments.index', array(1)));

        //assert that the response is a boolean value of true
        $this->assertTrue(!! $response->original);
      }

      //ensure that the show method calls our repository's "findById" method
      public function testShowShouldCallFindById()
      {
        $mock = Mockery::mock('CommentRepositoryInterface');
        $mock->shouldReceive('findById')->once()->andReturn('foo');
        App::instance('CommentRepositoryInterface', $mock);

        $response = $this->call('GET', route('v1.posts.comments.show', array(1,1)));
        $this->assertTrue(!! $response->original);
      }

      //ensure that our create method calls the "instance" method on the repository
      public function testCreateShouldCallInstanceMethod()
      {
        $mock = Mockery::mock('CommentRepositoryInterface');
        $mock->shouldReceive('instance')->once()->andReturn(array());
        App::instance('CommentRepositoryInterface', $mock);

        $response = $this->call('GET', route('v1.posts.comments.create', array(1)));
        $this->assertViewHas('comment');
      }

      //ensure that the edit method calls our repository's "findById" method
      public function testEditShouldCallFindByIdMethod()
      {
        $mock = Mockery::mock('CommentRepositoryInterface');
        $mock->shouldReceive('findById')->once()->andReturn(array());
        App::instance('CommentRepositoryInterface', $mock);

        $response = $this->call('GET', route('v1.posts.comments.edit', array(1,1)));
        $this->assertViewHas('comment');
      }

      //ensure that the store method should call the repository's "store" method
      public function testStoreShouldCallStoreMethod()
      {
        $mock = Mockery::mock('CommentRepositoryInterface');
        $mock->shouldReceive('store')->once()->andReturn('foo');
        App::instance('CommentRepositoryInterface', $mock);

        $response = $this->call('POST', route('v1.posts.comments.store', array(1)));
        $this->assertTrue(!! $response->original);
      }

      //ensure that the update method should call the repository's "update" method
      public function testUpdateShouldCallUpdateMethod()
      {
        $mock = Mockery::mock('CommentRepositoryInterface');
        $mock->shouldReceive('update')->once()->andReturn('foo');
        App::instance('CommentRepositoryInterface', $mock);

        $response = $this->call('PUT', route('v1.posts.comments.update', array(1,1)));
        $this->assertTrue(!! $response->original);
      }

      //ensure that the destroy method should call the repositories "destroy" method
      public function testDestroyShouldCallDestroyMethod()
      {
        $mock = Mockery::mock('CommentRepositoryInterface');
        $mock->shouldReceive('destroy')->once()->andReturn(true);
        App::instance('CommentRepositoryInterface', $mock);

        $response = $this->call('DELETE', route('v1.posts.comments.destroy', array(1,1)));
        $this->assertTrue( empty($response->original) );
      }
    }
app/tests/controllers/PostsControllerTest.php
Next, we’ll follow the exact same procedure for the PostsController tests
<?php

    class PostsControllerTest extends TestCase {

      /**
       * Test Basic Route Responses
       */
      public function testIndex()
      {
        $response = $this->call('GET', route('v1.posts.index'));
        $this->assertTrue($response->isOk());
      }

      public function testShow()
      {
        $response = $this->call('GET', route('v1.posts.show', array(1)));
        $this->assertTrue($response->isOk());
      }

      public function testCreate()
      {
        $response = $this->call('GET', route('v1.posts.create'));
        $this->assertTrue($response->isOk());
      }

      public function testEdit()
      {
        $response = $this->call('GET', route('v1.posts.edit', array(1)));
        $this->assertTrue($response->isOk());
      }

      /**
       * Test that controller calls repo as we expect
       */
      public function testIndexShouldCallFindAllMethod()
      {
        $mock = Mockery::mock('PostRepositoryInterface');
        $mock->shouldReceive('findAll')->once()->andReturn('foo');
        App::instance('PostRepositoryInterface', $mock);

        $response = $this->call('GET', route('v1.posts.index'));
        $this->assertTrue(!! $response->original);
      }

      public function testShowShouldCallFindById()
      {
        $mock = Mockery::mock('PostRepositoryInterface');
        $mock->shouldReceive('findById')->once()->andReturn('foo');
        App::instance('PostRepositoryInterface', $mock);

        $response = $this->call('GET', route('v1.posts.show', array(1)));
        $this->assertTrue(!! $response->original);
      }

      public function testCreateShouldCallInstanceMethod()
      {
        $mock = Mockery::mock('PostRepositoryInterface');
        $mock->shouldReceive('instance')->once()->andReturn(array());
        App::instance('PostRepositoryInterface', $mock);

        $response = $this->call('GET', route('v1.posts.create'));
        $this->assertViewHas('post');
      }

      public function testEditShouldCallFindByIdMethod()
      {
        $mock = Mockery::mock('PostRepositoryInterface');
        $mock->shouldReceive('findById')->once()->andReturn(array());
        App::instance('PostRepositoryInterface', $mock);

        $response = $this->call('GET', route('v1.posts.edit', array(1)));
        $this->assertViewHas('post');
      }

      public function testStoreShouldCallStoreMethod()
      {
        $mock = Mockery::mock('PostRepositoryInterface');
        $mock->shouldReceive('store')->once()->andReturn('foo');
        App::instance('PostRepositoryInterface', $mock);

        $response = $this->call('POST', route('v1.posts.store'));
        $this->assertTrue(!! $response->original);
      }

      public function testUpdateShouldCallUpdateMethod()
      {
        $mock = Mockery::mock('PostRepositoryInterface');
        $mock->shouldReceive('update')->once()->andReturn('foo');
        App::instance('PostRepositoryInterface', $mock);

        $response = $this->call('PUT', route('v1.posts.update', array(1)));
        $this->assertTrue(!! $response->original);
      }

      public function testDestroyShouldCallDestroyMethod()
      {
        $mock = Mockery::mock('PostRepositoryInterface');
        $mock->shouldReceive('destroy')->once()->andReturn(true);
        App::instance('PostRepositoryInterface', $mock);

        $response = $this->call('DELETE', route('v1.posts.destroy', array(1)));
        $this->assertTrue( empty($response->original) );
      }

    }
Now for the repository tests. In writing our controller tests, we pretty much already decided what most of the interface should look like for the repositories. Our controllers needed the following methods:
findById($id)
findAll()
instance($data)
store($data)
update($id, $data)
destroy($id)
The only other method that we’ll want to add here is a validate method. This will mainly be a private method for the repository to ensure that the data is safe to store or update.
For these tests, we’re also going to add a setUp method, which will allow us to run some code on our class, prior to the execution of each test. Our setUp method will be a very simple one, we’ll just make sure that any setUp methods defined in parent classes are also called using parent::setUp() and then simply add a class variable that stores an instance of our repository.
We’ll use the power of Laravel's IoC container again to get an instance of our repository. The App::make() command will return an instance of the requested class, now it may seem strange that we do not just do $this->repo = new EloquentCommentRepository(), but hold that thought, we’ll come back to it momentarily. You probably noticed that we’re asking for a class called EloquentCommentRepository, but in our controller tests above, we were calling our repository CommentRepositoryInterface… put this thought on the back-burner as well… explainations for both are coming, I promise!
<?php

    class EloquentCommentRepositoryTest extends TestCase {

      public function setUp()
      {
        parent::setUp();
        $this->repo = App::make('EloquentCommentRepository');
      }

      public function testFindByIdReturnsModel()
      {
        $comment = $this->repo->findById(1,1);
        $this->assertTrue($comment instanceof Illuminate\Database\Eloquent\Model);
      }

      public function testFindAllReturnsCollection()
      {
        $comments = $this->repo->findAll(1);
        $this->assertTrue($comments instanceof Illuminate\Database\Eloquent\Collection);
      }

      public function testValidatePasses()
      {
        $reply = $this->repo->validate(array(
          'post_id'   => 1,
          'content'   => 'Lorem ipsum Fugiat consectetur laborum Ut consequat aliqua.',
          'author_name' => 'Testy McTesterson'
        ));

        $this->assertTrue($reply);
      }

      public function testValidateFailsWithoutContent()
      {
        try {
          $reply = $this->repo->validate(array(
            'post_id'   => 1,
            'author_name' => 'Testy McTesterson'
          ));
        }
        catch(ValidationException $expected)
        {
          return;
        }

        $this->fail('ValidationException was not raised');
      }

      public function testValidateFailsWithoutAuthorName()
      {
        try {
          $reply = $this->repo->validate(array(
            'post_id'   => 1,
            'content'   => 'Lorem ipsum Fugiat consectetur laborum Ut consequat aliqua.'
          ));
        }
        catch(ValidationException $expected)
        {
          return;
        }

        $this->fail('ValidationException was not raised');
      }

      public function testValidateFailsWithoutPostId()
      {
        try {
          $reply = $this->repo->validate(array(
            'author_name' => 'Testy McTesterson',
            'content'   => 'Lorem ipsum Fugiat consectetur laborum Ut consequat aliqua.'
          ));
        }
        catch(ValidationException $expected)
        {
          return;
        }

        $this->fail('ValidationException was not raised');
      }

      public function testStoreReturnsModel()
      {
        $comment_data = array(
          'content'   => 'Lorem ipsum Fugiat consectetur laborum Ut consequat aliqua.',
          'author_name' => 'Testy McTesterson'
        );

        $comment = $this->repo->store(1, $comment_data);

        $this->assertTrue($comment instanceof Illuminate\Database\Eloquent\Model);
        $this->assertTrue($comment->content === $comment_data['content']);
        $this->assertTrue($comment->author_name === $comment_data['author_name']);
      }

      public function testUpdateSaves()
      {
        $comment_data = array(
          'content' => 'The Content Has Been Updated'
        );

        $comment = $this->repo->update(1, 1, $comment_data);

        $this->assertTrue($comment instanceof Illuminate\Database\Eloquent\Model);
        $this->assertTrue($comment->content === $comment_data['content']);
      }

      public function testDestroySaves()
      {
        $reply = $this->repo->destroy(1,1);
        $this->assertTrue($reply);

        try {
          $this->repo->findById(1,1);
        }
        catch(NotFoundException $expected)
        {
          return;
        }

        $this->fail('NotFoundException was not raised');
      }

      public function testInstanceReturnsModel()
      {
        $comment = $this->repo->instance();
        $this->assertTrue($comment instanceof Illuminate\Database\Eloquent\Model);
      }

      public function testInstanceReturnsModelWithData()
      {
        $comment_data = array(
          'title' => 'Un-validated title'
        );

        $comment = $this->repo->instance($comment_data);
        $this->assertTrue($comment instanceof Illuminate\Database\Eloquent\Model);
        $this->assertTrue($comment->title === $comment_data['title']);
      }

    }
<?php

    class EloquentPostRepositoryTest extends TestCase {

      public function setUp()
      {
        parent::setUp();
        $this->repo = App::make('EloquentPostRepository');
      }

      public function testFindByIdReturnsModel()
      {
        $post = $this->repo->findById(1);
        $this->assertTrue($post instanceof Illuminate\Database\Eloquent\Model);
      }

      public function testFindAllReturnsCollection()
      {
        $posts = $this->repo->findAll();
        $this->assertTrue($posts instanceof Illuminate\Database\Eloquent\Collection);
      }

      public function testValidatePasses()
      {
        $reply = $this->repo->validate(array(
          'title'    => 'This Should Pass',
          'content'   => 'Lorem ipsum Fugiat consectetur laborum Ut consequat aliqua.',
          'author_name' => 'Testy McTesterson'
        ));

        $this->assertTrue($reply);
      }

      public function testValidateFailsWithoutTitle()
      {
        try {
          $reply = $this->repo->validate(array(
            'content'   => 'Lorem ipsum Fugiat consectetur laborum Ut consequat aliqua.',
            'author_name' => 'Testy McTesterson'
          ));
        }
        catch(ValidationException $expected)
        {
          return;
        }

        $this->fail('ValidationException was not raised');
      }

      public function testValidateFailsWithoutAuthorName()
      {
        try {
          $reply = $this->repo->validate(array(
            'title'    => 'This Should Pass',
            'content'   => 'Lorem ipsum Fugiat consectetur laborum Ut consequat aliqua.'
          ));
        }
        catch(ValidationException $expected)
        {
          return;
        }

        $this->fail('ValidationException was not raised');
      }

      public function testStoreReturnsModel()
      {
        $post_data = array(
          'title'    => 'This Should Pass',
          'content'   => 'Lorem ipsum Fugiat consectetur laborum Ut consequat aliqua.',
          'author_name' => 'Testy McTesterson'
        );

        $post = $this->repo->store($post_data);

        $this->assertTrue($post instanceof Illuminate\Database\Eloquent\Model);
        $this->assertTrue($post->title === $post_data['title']);
        $this->assertTrue($post->content === $post_data['content']);
        $this->assertTrue($post->author_name === $post_data['author_name']);
      }

      public function testUpdateSaves()
      {
        $post_data = array(
          'title' => 'The Title Has Been Updated'
        );

        $post = $this->repo->update(1, $post_data);

        $this->assertTrue($post instanceof Illuminate\Database\Eloquent\Model);
        $this->assertTrue($post->title === $post_data['title']);
      }

      public function testDestroySaves()
      {
        $reply = $this->repo->destroy(1);
        $this->assertTrue($reply);

        try {
          $this->repo->findById(1);
        }
        catch(NotFoundException $expected)
        {
          return;
        }

        $this->fail('NotFoundException was not raised');
      }

      public function testInstanceReturnsModel()
      {
        $post = $this->repo->instance();
        $this->assertTrue($post instanceof Illuminate\Database\Eloquent\Model);
      }

      public function testInstanceReturnsModelWithData()
      {
        $post_data = array(
          'title' => 'Un-validated title'
        );

        $post = $this->repo->instance($post_data);
        $this->assertTrue($post instanceof Illuminate\Database\Eloquent\Model);
        $this->assertTrue($post->title === $post_data['title']);
      }

    }
Now that we have all of our tests in place, let's run PHPUnit again to watch them fail!
vendor/phpunit/phpunit/phpunit.php
You should have a whole ton of failures, and in fact, the test suite probably did not even finish testing before it crashed. This is OK, that means we have followed the rules of TDD and wrote failing tests before production code. Although, typically these tests would be written one at a time and you would not move on to the next test until you had code that allowed the previous test to pass. Your terminal should probably look something like mine at the moment:
What’s actually failing is the assertViewHas method in our controller tests. It’s kind of intimidating to deal with this kind of an error when we have lumped together all of our tests without any production code at all. This is why you should always write the tests one at a time, as you’ll find these errors in stride, as opposed to just a huge mess of errors at once. For now, just follow my lead into the implementation of our code.
Sidebar Discussion
Before we proceed with the implementations, let's break for a quick sidebar discussion on the responsibilities of the MVC pattern.
The Model is the application object, the View is its screen presentation, and the Controller defines the way the user interface reacts to user input.
The point of using a structure like this is to remain encapsulated and flexible, allowing us to exchange and reuse components. Let's go through each part of the MVC pattern and talk about its reusability and flexibility:
View
I think most people would agree that a View is supposed to be a simple visual representation of data and should not contain much logic. In our case, as developers for the web, our View tends to be HTML or XML.
reusable: always, almost anything can create a view
flexible: not having any real logic in these layers makes this very flexible
Controller
If a Controller "defines the way the user interface reacts to user input", then its responsibility should be to listen to user input (GET, POST, Headers, etc), and build out the current state of the application. In my opinion, a Controller should be very light and should not contain more code than is required to accomplish the above.
reusable: We have to remember that our Controllers return an opinionated View, so we cannot ever call that Controller method in a practical way to use any of the logic inside it. Therefore any logic placed in Controller methods, must be specific to that Controller method, if the logic is reusable, it should be placed elsewhere.
flexible: In most PHP MVCs, the Controller is tied directly to the route, which does not leave us very much flexibility. Laravel fixes this issue by allowing us to declare routes that use a controller, so we can now swap out our controllers with different implementations if need be:
The Model is the "application object" in our definition from the Gang of Four. This is a very generic definition. In addition, we just decided to offload any logic that needs to be reusable from our Controller, and since the Model is the only component left in our defined structure, it’s logical to assume that this is the new home for that logic. However, I think the Model should not contain any logic like this. In my opinion, we should think of our "application object", in this case as an object that represents its place in the data-layer, whether that be a table, row, or collection entirely depends on state. The model should contain not much more than getters and setters for data (including relationships).
reusable: If we follow the above practice and make our Models be an object that represents its place in the database, this object remains very reusable. Any part of our system can use this model and by doing so gain complete and unopinionated access to the database.
flexible: Following the above practice, our Model is basically an implementation of an ORM, this allows us to be flexible, because we now have the power to change ORM's whenever we’d like to just by adding a new Model. We should probably have a pre-defined interface that our Model's must abide by, such as: all, find, create, update, delete. Implementation of a new ORM would be as simple as ensuring that the previously mentioned interface was accomodated.
Repository
Just by carefully defining our MVC components, we orphaned all kinds of logic into no-man's land. This is where Repositories come in to fill the void. Repositories become the intermediary of the Controllers and Models. A typical request would be something like this:
The Controller receives all user input and passes it to the repository.
The Repository does any "pre-gathering" actions such as validation of data, authorization, authentication, etc. If these "pre-gathering" actions are successful, then the request is passed to the Model for processing.
The Model will process all of the data into the data-layer, and return the current state.
The Repository will handle any "post-gathering" routines and return the current state to the controller.
The Controller will then create the appropriate view using the information provided by the repository.
Our Repository ends up as flexible and organized as we have made our Controllers and Models, allowing us to reuse this in most parts of our system, as well as being able to swap it out for another implementation if needed.
We have already seen an example of swapping out a repository for another implementation in the Controller tests above. Instead of using our default Repository, we asked the IoC container to provide the controller with an instance of a Mockery object. We have this same power for all of our components.
What we have accomplised here by adding another layer to our MVC, is a very organized, scalable, and testable system. Let's start putting the pieces in place and getting our tests to pass.
Controller Implementation
If you take a read through the controller tests, you’ll see that all we really care about is how the controller is interacting with the repository. So let's see how light and simple that makes our controllers.
Note: in TDD, the objective is to do no more work than is required to make your tests pass. So we want to do the absolute bare minimum here.
app/controllers/V1/PostsController.php
<?php
    namespace V1;

    use BaseController;
    use PostRepositoryInterface;
    use Input;
    use View;

    class PostsController extends BaseController {

      /**
       * We will use Laravel's dependency injection to auto-magically
       * "inject" our repository instance into our controller
       */
      public function __construct(PostRepositoryInterface $posts)
      {
        $this->posts = $posts;
      }

      /**
       * Display a listing of the resource.
       *
       * @return Response
       */
      public function index()
      {
        return $this->posts->findAll();
      }

      /**
       * Show the form for creating a new resource.
       *
       * @return Response
       */
      public function create()
      {
        $post = $this->posts->instance();
        return View::make('posts._form', compact('post'));
      }

      /**
       * Store a newly created resource in storage.
       *
       * @return Response
       */
      public function store()
      {
        return $this->posts->store( Input::all() );
      }

      /**
       * Display the specified resource.
       *
       * @param int $id
       * @return Response
       */
      public function show($id)
      {
        return $this->posts->findById($id);
      }

      /**
       * Show the form for editing the specified resource.
       *
       * @param int $id
       * @return Response
       */
      public function edit($id)
      {
        $post = $this->posts->findById($id);
        return View::make('posts._form', compact('post'));
      }

      /**
       * Update the specified resource in storage.
       *
       * @param int $id
       * @return Response
       */
      public function update($id)
      {
        return $this->posts->update($id, Input::all());
      }

      /**
       * Remove the specified resource from storage.
       *
       * @param int $id
       * @return Response
       */
      public function destroy($id)
      {
        $this->posts->destroy($id);
        return '';
      }

    }
app/controllers/PostsCommentsController.php
<?php
    namespace V1;

    use BaseController;
    use CommentRepositoryInterface;
    use Input;
    use View;

    class PostsCommentsController extends BaseController {

      /**
       * We will use Laravel's dependency injection to auto-magically
       * "inject" our repository instance into our controller
       */
      public function __construct(CommentRepositoryInterface $comments)
      {
        $this->comments = $comments;
      }

      /**
       * Display a listing of the resource.
       *
       * @return Response
       */
      public function index($post_id)
      {
        return $this->comments->findAll($post_id);
      }

      /**
       * Show the form for creating a new resource.
       *
       * @return Response
       */
      public function create($post_id)
      {
        $comment = $this->comments->instance(array(
          'post_id' => $post_id
        ));

        return View::make('comments._form', compact('comment'));
      }

      /**
       * Store a newly created resource in storage.
       *
       * @return Response
       */
      public function store($post_id)
      {
        return $this->comments->store( $post_id, Input::all() );
      }

      /**
       * Display the specified resource.
       *
       * @param int $id
       * @return Response
       */
      public function show($post_id, $id)
      {
        return $this->comments->findById($post_id, $id);
      }

      /**
       * Show the form for editing the specified resource.
       *
       * @param int $id
       * @return Response
       */
      public function edit($post_id, $id)
      {
        $comment = $this->comments->findById($post_id, $id);

        return View::make('comments._form', compact('comment'));
      }

      /**
       * Update the specified resource in storage.
       *
       * @param int $id
       * @return Response
       */
      public function update($post_id, $id)
      {
        return $this->comments->update($post_id, $id, Input::all());
      }

      /**
       * Remove the specified resource from storage.
       *
       * @param int $id
       * @return Response
       */
      public function destroy($post_id, $id)
      {
        $this->comments->destroy($post_id, $id);
        return '';
      }

    }
It doesn’t get much simpler than that, all the Controllers are doing is handing the input data to the repository, taking the response from that, and handing it to the View, the View in our case is merely JSON for most of our methods. When we return an Eloquent Collection, or Eloquent Model from a Controller in Laravel 4, the object is parsed into JSON auto-magically, which makes our job very easy.
Note: notice that we added a few more "use" statements to the top of the file to support the other classes that we’re using. Do not forget this when you’re working within a namespace.
The only thing that is a bit tricky in this controller is the constructor. Notice we’re passing in a typed variable as a dependency for this Controller, yet there is no point that we have access to the instantiation of this controller to actually insert that class… welcome to dependency injection! What we’re actually doing here is hinting to our controller that we have a dependency needed to run this class and what its class name is (or its IoC binding name). Laravel uses App::make() to create its Controllers before calling them. App::make() will try to resolve an item by looking for any bindings that we may have declared, and/or using the auto-loader to provide an instance. In addition, it will also resolve any dependencies needed to instantiate that class for us, by more-or-less recursively calling App::make() on each of the dependencies.
The observant, will notice that what we’re trying to pass in as a dependency is an interface, and as you know, an interface cannot be instantiated. This is where it gets cool and we actually already did the same thing in our tests. In our tests however, we used App::instance() to provide an already created instance instead of the interface. For our Controllers, we’re actually going to tell Laravel that whenever an instance of PostRepositoryInterface is requested, to actually return an instance of EloquentPostRepository.
Open up your app/routes.php file and add the following to the top of the file
After adding those lines, anytime App::make() asks for an instance of PostRepositoryInterface, it will create an instance of EloquentPostRepository, which is assumed to implement PostRepositoryInterface. If you were to ever change your repository to instead use a different ORM than Eloquent, or maybe a file-based driver, all you have to do is change these two lines and you’re good to go, your Controllers will still work as normal. The Controllers actual dependency is any object that implements that interface and we can determine at run-time what that implementation actually is.
The PostRepositoryInterface and CommentRepositoryInterface must actually exist and the bindings must actually implement them. So let's create them now:
app/repositories/PostRepositoryInterface.php
<?php
interface PostRepositoryInterface {
public function findById($id);
public function findAll();
public function paginate($limit = null);
public function store($data);
public function update($id, $data);
public function destroy($id);
public function validate($data);
public function instance();
}
app/repositories/CommentRepositoryInterface.php
<?php
interface CommentRepositoryInterface {
public function findById($post_id, $id);
public function findAll($post_id);
public function store($post_id, $data);
public function update($post_id, $id, $data);
public function destroy($post_id, $id);
public function validate($data);
public function instance();
}
Now that we have our two interfaces built, we must provide implementations of these interfaces. Let's build them now.
app/repositories/EloquentPostRepository.php
As the name of this implementation implies, we’re relying on Eloquent, which we can call directly. If you had other dependencies, remember that App::make() is being used to resolve this repository, so you can feel free to use the same constructor method we used with our Controllers to inject your dependencies.
<?php
class EloquentPostRepository implements PostRepositoryInterface {
public function findById($id)
{
$post = Post::with(array(
'comments' => function($q)
{
$q->orderBy('created_at', 'desc');
}
))
->where('id', $id)
->first();
if(!$post) throw new NotFoundException('Post Not Found');
return $post;
}
public function findAll()
{
return Post::with(array(
'comments' => function($q)
{
$q->orderBy('created_at', 'desc');
}
))
->orderBy('created_at', 'desc')
->get();
}
public function paginate($limit = null)
{
return Post::paginate($limit);
}
public function store($data)
{
$this->validate($data);
return Post::create($data);
}
public function update($id, $data)
{
$post = $this->findById($id);
$post->fill($data);
$this->validate($post->toArray());
$post->save();
return $post;
}
public function destroy($id)
{
$post = $this->findById($id);
$post->delete();
return true;
}
public function validate($data)
{
$validator = Validator::make($data, Post::$rules);
if($validator->fails()) throw new ValidationException($validator);
return true;
}
public function instance($data = array())
{
return new Post($data);
}
}
app/repositories/EloquentCommentRepository.php
<?php
class EloquentCommentRepository implements CommentRepositoryInterface {
public function findById($post_id, $id)
{
$comment = Comment::find($id);
if(!$comment || $comment->post_id != $post_id) throw new NotFoundException('Comment Not Found');
return $comment;
}
public function findAll($post_id)
{
return Comment::where('post_id', $post_id)
->orderBy('created_at', 'desc')
->get();
}
public function store($post_id, $data)
{
$data['post_id'] = $post_id;
$this->validate($data);
return Comment::create($data);
}
public function update($post_id, $id, $data)
{
$comment = $this->findById($post_id, $id);
$comment->fill($data);
$this->validate($comment->toArray());
$comment->save();
return $comment;
}
public function destroy($post_id, $id)
{
$comment = $this->findById($post_id, $id);
$comment->delete();
return true;
}
public function validate($data)
{
$validator = Validator::make($data, Comment::$rules);
if($validator->fails()) throw new ValidationException($validator);
return true;
}
public function instance($data = array())
{
return new Comment($data);
}
}
If you take a look in our repositories, there are a few Exceptions that we are throwing, which are not native, nor do they belong to Laravel. Those are custom Exceptions that we’re using to simplify our code. By using custom Exceptions, we’re able to easily halt the progress of the application if certain conditions are met. For instance, if a post is not found, we can just toss a NotFoundException, and the application will handle it accordingly, but, not by showing a 500 error as usual, instead we’re going to setup custom error handlers. You could alternatively use App::abort(404) or something along those lines, but I find that this method saves me many conditional statements and repeat code, as well as allowing me to adjust the implementation of error reporting in a single place very easily.
First let's define the custom Exceptions. Create a file in your app folder called errors.php
touch app/errors.php
app/errors.php
<?php
class PermissionException extends Exception {
public function __construct($message = null, $code = 403)
{
parent::__construct($message ?: 'Action not allowed', $code);
}
}
class ValidationException extends Exception {
protected $messages;
/**
* We are adjusting this constructor to receive an instance
* of the validator as opposed to a string to save us some typing
* @param Validator $validator failed validator object
*/
public function __construct($validator)
{
$this->messages = $validator->messages();
parent::__construct($this->messages, 400);
}
public function getMessages()
{
return $this->messages;
}
}
class NotFoundException extends Exception {
public function __construct($message = null, $code = 404)
{
parent::__construct($message ?: 'Resource Not Found', $code);
}
}
These are very simple Exceptions, notice for the ValidationException, we can just pass it the failed validator instance and it will handle the error messages accordingly!
Now we need to define our error handlers that will be called when one of these Exceptions are thrown. These are basically Event listeners, whenever one of these exceptions are thrown, it’s treated as an Event and calls the appropriate function. It’s very simple to add logging or any other error handling procedures here.
app/filters.php
...
/**
* General HttpException handler
*/
App::error( function(Symfony\Component\HttpKernel\Exception\HttpException $e, $code)
{
$headers = $e->getHeaders();
switch($code)
{
case 401:
$default_message = 'Invalid API key';
$headers['WWW-Authenticate'] = 'Basic realm="CRM REST API"';
break;
case 403:
$default_message = 'Insufficient privileges to perform this action';
break;
case 404:
$default_message = 'The requested resource was not found';
break;
default:
$default_message = 'An error was encountered';
}
return Response::json(array(
'error' => $e->getMessage() ?: $default_message
), $code, $headers);
});
/**
* Permission Exception Handler
*/
App::error(function(PermissionException $e, $code)
{
return Response::json($e->getMessage(), $e->getCode());
});
/**
* Validation Exception Handler
*/
App::error(function(ValidationException $e, $code)
{
return Response::json($e->getMessages(), $code);
});
/**
* Not Found Exception Handler
*/
App::error(function(NotFoundException $e)
{
return Response::json($e->getMessage(), $e->getCode());
});
We now need to let our auto-loader know about these new files. So we must tell Composer where to check for them:
We must now tell Composer to actually check for these files and include them in the auto-load registry.
composer dump-autoload
Great, so we have completed our controllers and our repositories, the last two items in our MVRC that we have to take care of is the models and views, both of which are pretty straight forward.
app/models/Post.php
<?php
/**
* Represent a Post Item, or Collection
*/
class Post extends Eloquent {
/**
* Items that are "fillable"
* meaning we can mass-assign them from the constructor
* or $post->fill()
* @var array
*/
protected $fillable = array(
'title', 'content', 'author_name'
);
/**
* Validation Rules
* this is just a place for us to store these, you could
* alternatively place them in your repository
* @var array
*/
public static $rules = array(
'title' => 'required',
'author_name' => 'required'
);
/**
* Define the relationship with the comments table
* @return Collection collection of Comment Models
*/
public function comments()
{
return $this->hasMany('Comment');
}
}
app/models/Comment.php
<?php
/**
* Represent a Comment Item, or Collection
*/
class Comment extends Eloquent {
/**
* Items that are "fillable"
* meaning we can mass-assign them from the constructor
* or $comment->fill()
* @var array
*/
protected $fillable = array(
'post_id', 'content', 'author_name'
);
/**
* Validation Rules
* this is just a place for us to store these, you could
* alternatively place them in your repository
* @var array
*/
public static $rules = array(
'post_id' => 'required|numeric',
'content' => 'required',
'author_name' => 'required'
);
/**
* Define the relationship with the posts table
* @return Model parent Post model
*/
public function post()
{
return $this->belongsTo('Post');
}
}
As far as views are concerned, I’m just going to mark up some simple bootstrap-friendly pages. Remember to change each files extension to .mustache though, since our generator thought that we would be using .blade.php. We’re also going to create a few "partial" views using the Rails convention of prefixing them with an _ to signify a partial.
Note: I skipped a few views, as we will not be using them in this tutorial.
public/views/posts/index.mustache
For the index page view we’ll just loop over all of our posts, showing the post partial for each.
{{#posts}}
{{> posts._post}}
{{/posts}}
public/views/posts/show.mustache
For the show view we’ll show an entire post and its comments:
Here’s the partial that we’ll use to show a post in a list. This is used on our index view.
<article data-toggle="view" data-target="posts/{{ id }}">
<h3>{{ title }} {{ id }}</h3>
<cite>{{ author_name }} on {{ created_at }}</cite>
</article>
public/views/posts/_form.mustache
Here’s the form partial needed to create a post, we’ll use this from our API, but this could also be a useful view in an admin panel and other places, which is why we choose to make it a partial.
Great, we have all of our API components in place. Let's run our unit tests to see where we’re at!
vendor/phpunit/phpunit/phpunit.php
Your first run of this test should pass with flying (green) colors. However, if you were to run this test again, you’ll notice that it fails now with a handful of errors, and that is because our repository tests actually tested the database, and in doing so deleted some of the records our previous tests used to assert values. This is an easy fix, all we have to do is tell our tests that they need to re-seed the database after each test. In addition, we did not receive a noticable error for this, but we did not close Mockery after each test either, this is a requirement of Mockery that you can find in their docs. So let's add both missing methods.
Open up app/tests/TestCase.php and add the following two methods:
/**
* setUp is called prior to each test
*/
public function setUp()
{
parent::setUp();
$this->seed();
}
/**
* tearDown is called after each test
* @return [type] [description]
*/
public function tearDown()
{
Mockery::close();
}
This is great, we now said that at every "setUp", which is run before each test, to re-seed the database. However we still have one problem, everytime you re-seed, it’s only going to append new rows to the tables. Our tests are looking for items with a row ID of one, so we still have a few changes to make. We just need to tell the database to truncate our tables when seeding:
app/database/seeds/CommentsTableSeeder.php
Before we insert the new rows, we’ll truncate the table, deleting all rows and resetting the auto-increment counter.
<?php
class CommentsTableSeeder extends Seeder {
public function run()
{
$comments = array(
array(
'content' => 'Lorem ipsum Nisi dolore ut incididunt mollit tempor proident eu velit cillum dolore sed',
'author_name' => 'Testy McTesterson',
'post_id' => 1,
'created_at' => date('Y-m-d H:i:s'),
'updated_at' => date('Y-m-d H:i:s'),
),
array(
'content' => 'Lorem ipsum Nisi dolore ut incididunt mollit tempor proident eu velit cillum dolore sed',
'author_name' => 'Testy McTesterson',
'post_id' => 1,
'created_at' => date('Y-m-d H:i:s'),
'updated_at' => date('Y-m-d H:i:s'),
),
array(
'content' => 'Lorem ipsum Nisi dolore ut incididunt mollit tempor proident eu velit cillum dolore sed',
'author_name' => 'Testy McTesterson',
'post_id' => 2,
'created_at' => date('Y-m-d H:i:s'),
'updated_at' => date('Y-m-d H:i:s'),
),
);
//truncate the comments table when we seed
DB::table('comments')->truncate();
DB::table('comments')->insert($comments);
}
}
app/database/seeds/PostsTableSeeder.php
<?php
class PostsTableSeeder extends Seeder {
public function run()
{
$posts = array(
array(
'title' => 'Test Post',
'content' => 'Lorem ipsum Reprehenderit velit est irure in enim in magna aute occaecat qui velit ad.',
'author_name' => 'Conar Welsh',
'created_at' => date('Y-m-d H:i:s'),
'updated_at' => date('Y-m-d H:i:s'),
),
array(
'title' => 'Another Test Post',
'content' => 'Lorem ipsum Reprehenderit velit est irure in enim in magna aute occaecat qui velit ad.',
'author_name' => 'Conar Welsh',
'created_at' => date('Y-m-d H:i:s'),
'updated_at' => date('Y-m-d H:i:s'),
)
);
//truncate the posts table each time we seed
DB::table('posts')->truncate();
DB::table('posts')->insert($posts);
}
}
Now you should be able to run the tests any number of times and get passing tests each time! That means we have fulfilled our TDD cycle and we’re not allowed to write anymore production code for our API!! Let's just commit our changes to our repo and move onto the Backbone application!
git add . && git commit -am "built out the API and corresponding tests"
Backbone App
Now that we have completed all of the back-end work, we can move forward to creating a nice user interface to access all of that data. We’ll keep this part of the project a little bit on the simpler side, and I warn you that my approach can be considered an opinionated one. I have seen many people with so many different methods for structuring a Backbone application. My trials and errors have led me to my current method, if you do not agree with it, my hope is that it may inspire you to find your own!
We’re going to use the Mustache templating engine instead of Underscore, this will allow us to share our views between the client and server! The trick is in how you load the views, we’re going to use AJAX in this tutorial, but it’s just as easy to load them all into the main template, or precompile them.
Router
First we’ll get our router going. There are two parts to this, the Laravel router, and the Backbone router.
Laravel Router
There are two main approaches we can take here:
Approach #1: The catch-all
Remember I told you when you were adding the resource routes that it was important that you placed them ABOVE the app route?? The catch-all method is the reason for that statement. The overall goal of this method is to have any routes that have not found a match in Laravel, be caught and sent to Backbone. Implementing this method is easy:
app/routes.php
// change your existing app route to this:
// we are basically just giving it an optional parameter of "anything"
Route::get('/{path?}', function($path = null)
{
return View::make('app');
})
->where('path', '.*'); //regex to match anything (dots, slashes, letters, numbers, etc)
Now, every route other than our API routes will render our app view.
In addition, if you have a multi-page app (several single page apps), you can define several of these catch-alls:
Note: Keep in mind the '/' before {path?}. If that slash is there, it’ll be required in the URL (with the exception of the index route), sometimes this is desired and sometimes not.
Approach #2:
Since our front and back end share views… wouldn't it be extremely easy to just define routes in both places? You can even do this in addition to the catch-all approach if you want.
The routes that we’re going to end up defining for the app are simply:
GET /
GET /posts/:id
app/routes.php
<?php
App::bind('PostRepositoryInterface', 'EloquentPostRepository');
    App::bind('CommentRepositoryInterface', 'EloquentCommentRepository');
//create a group of routes that will belong to APIv1
Route::group(array('prefix' => 'v1'), function()
{
Route::resource('posts', 'V1\PostsController');
Route::resource('posts.comments', 'V1\PostsCommentsController');
});
/**
* Method #1: use catch-all
* optionally commented out while we use Method 2
*/
// change your existing app route to this:
// we are basically just giving it an optional parameter of "anything"
// Route::get('/{path?}', function($path = null)
// {
// return View::make('layouts.application')->nest('content', 'app');
// })
// ->where('path', '.*'); //regex to match anything (dots, slashes, letters, numbers, etc)
/**
* Method #2: define each route
*/
Route::get('/', function()
{
$posts = App::make('PostRepositoryInterface')->paginate();
return View::make('layouts.application')->nest('content', 'posts.index', array(
'posts' => $posts
));
});
Route::get('posts/{id}', function($id)
{
$post = App::make('PostRepositoryInterface')->findById($id);
return View::make('layouts.application')->nest('content', 'posts.show', array(
'post' => $post
));
});
Pretty cool huh?! Regardless of which method we use, or the combination of both, your Backbone router will end up mostly the same.
Notice that we’re using our Repository again, this is yet another reason why Repositories are a useful addition to our framework. We can now run almost all of the logic that the controller does, but without repeating hardly any of the code!
Keep in mind a few things while choosing which method to use, if you use the catch-all, it will do just like the name implies… catch-ALL. This means there is no such thing as a 404 on your site anymore. No matter the request, its landing on the app page (unless you manually toss an exception somewhere such as your repository). The inverse is, with defining each route, now you have two sets of routes to manage. Both methods have their ups and downs, but both are equally easy to deal with.
Base View
One view to rule them all! This BaseView is the view that all of our other Views will inherit from. For our purposes, this view has but one job… templating! In a larger app this view is a good place to put other shared logic.
We’ll simply extend Backbone.View and add a template function that will return our view from the cache if it exists, or get it via AJAX and place it in the cache. We have to use synchronous AJAX due to the way that Mustache.js fetches partials, but since we’re only retrieving these views if they are not cached, we shouldn’t receive much of a performance hit here.
/**
     ***************************************
     * Array Storage Driver
     * used to store our views
     ***************************************
     */
    var ArrayStorage = function(){
      this.storage = {};
    };
    ArrayStorage.prototype.get = function(key)
    {
      return this.storage[key];
    };
    ArrayStorage.prototype.set = function(key, val)
    {
      return this.storage[key] = val;
    };
    /**
     ***************************************
     * Base View
     ***************************************
     */
    var BaseView = bb.View.extend({

      /**
       * Set our storage driver
       */
      templateDriver: new ArrayStorage,

      /**
       * Set the base path for where our views are located
       */
      viewPath: '/views/',

      /**
       * Get the template, and apply the variables
       */
      template: function()
      {
        var view, data, template, self;

        switch(arguments.length)
        {
          case 1:
            view = this.view;
            data = arguments[0];
            break;
          case 2:
            view = arguments[0];
            data = arguments[1];
            break;
        }

        template = this.getTemplate(view, false);
        self = this;

        return template(data, function(partial)
        {
          return self.getTemplate(partial, true);
        });
      },

      /**
       * Facade that will help us abstract our storage engine,
       * should we ever want to swap to something like LocalStorage
       */
      getTemplate: function(view, isPartial)
      {
        return this.templateDriver.get(view) || this.fetch(view, isPartial);
      },

      /**
       * Facade that will help us abstract our storage engine,
       * should we ever want to swap to something like LocalStorage
       */
      setTemplate: function(name, template)
      {
        return this.templateDriver.set(name, template);
      },

      /**
       * Function to retrieve the template via ajax
       */
      fetch: function(view, isPartial)
      {
        var markup = $.ajax({
          async: false,

          //the URL of our template, we can optionally use dot notation
          url: this.viewPath + view.split('.').join('/') + '.mustache'
        }).responseText;

        return isPartial
          ? markup
          : this.setTemplate(view, Mustache.compile(markup));
      }
    });
PostView
The PostView renders a single blog post:
// this view will show an entire post
    // comment form, and comments
    var PostView = BaseView.extend({

      //the location of the template this view will use, we can use dot notation
      view: 'posts.show',

      //events this view should subscribe to
      events: {
        'submit form': function(e)
        {
          e.preventDefault();
          e.stopPropagation();

          return this.addComment( $(e.target).serialize() );
        }
      },

      //render our view into the defined `el`
      render: function()
      {
        var self = this;

        self.$el.html( this.template({
          post: this.model.attributes
        }) );
      },

      //add a comment for this post
      addComment: function(formData)
      {
        var
          self = this,

          //build our url
          action = this.model.url() + '/comments'
        ;

        //submit a post to our api
        $.post(action, formData, function(comment, status, xhr)
        {
          //create a new comment partial
          var view = new CommentViewPartial({
            //we are using a blank backbone model, since we done have any specific logic needed
            model: new bb.Model(comment)
          });

          //prepend the comment partial to the comments list
          view.render().$el.prependTo(self.$('[data-role="comments"]'));

          //reset the form
          self.$('input[type="text"], textarea').val('');

          //prepend our new comment to the collection
          self.model.attributes.comments.unshift(comment);

          //send a notification that we successfully added the comment
          notifications.add({
            type: 'success',
            message: 'Comment Added!'
          });
        });

      }
    });
Partial Views
We’ll need a few views to render partials. We mainly just need to tell the view which template to use and that it should extend our view that provides the method to fetch our template.
// this will be used for rendering a single comment in a list
    var CommentViewPartial = BaseView.extend({
      //define our template location
      view: 'comments._comment',
      render: function()
      {
        this.$el.html( this.template(this.model.attributes) );
        return this;
      }
    });

    //this view will be used for rendering a single post in a list
    var PostViewPartial = BaseView.extend({
      //define our template location
      view: 'posts._post',
      render: function()
      {
        this.$el.html( this.template(this.model.attributes) );
        return this;
      }
    });
Blog View
This is our overall application view. It contains our configuration logic, as well as handling the fetching of our PostCollection. We also setup a cool little infinite scroll feature. Notice how we’re using jQuery promises to ensure that the fetching of our collection has completed prior to rendering the view.
var Blog = BaseView.extend({
      //define our template location
      view: 'posts.index',

      //setup our app configuration
      initialize: function()
      {
        this.perPage = this.options.perPage || 15;
        this.page   = this.options.page || 0;
        this.fetching = this.collection.fetch();

        if(this.options.infiniteScroll) this.enableInfiniteScroll();
      },

      //wait til the collection has been fetched, and render the view
      render: function()
      {
        var self = this;
        this.fetching.done(function()
        {
          self.$el.html('');
          self.addPosts();

          // var posts = this.paginate()

          // for(var i=0; i<posts.length; i++)
          // {
          //   posts[i] = posts[i].toJSON();
          // }

          // self.$el.html( self.template({
          //   posts: posts
          // }) );

          if(self.options.infiniteScroll) self.enableInfiniteScroll();
        });
      },

      //helper function to limit the amount of posts we show at a time
      paginate: function()
      {
        var posts;
        posts = this.collection.rest(this.perPage * this.page);
        posts = _.first(posts, this.perPage);
        this.page++;

        return posts;
      },

      //add the next set of posts to the view
      addPosts: function()
      {
        var posts = this.paginate();

        for(var i=0; i<posts.length; i++)
        {
          this.addOnePost( posts[i] );
        }
      },

      //helper function to add a single post to the view
      addOnePost: function(model)
      {
        var view = new PostViewPartial({
          model: model
        });
        this.$el.append( view.render().el );
      },

      //this function will show an entire post, we could alternatively make this its own View
      //however I personally like having it available in the overall application view, as it
      //makes it easier to manage the state
      showPost: function(id)
      {
        var self = this;

        this.disableInifiniteScroll();

        this.fetching.done(function()
        {
          var model = self.collection.get(id);

          if(!self.postView)
          {
            self.postView = new self.options.postView({
              el: self.el
            });
          }
          self.postView.model = model;
          self.postView.render();
        });
      },

      //function to run during the onScroll event
      infiniteScroll: function()
      {
        if($window.scrollTop() >= $document.height() - $window.height() - 50)
        {
          this.addPosts();
        }
      },

      //listen for the onScoll event
      enableInfiniteScroll: function()
      {
        var self = this;

        $window.on('scroll', function()
        {
          self.infiniteScroll();
        });
      },

      //stop listening to the onScroll event
      disableInifiniteScroll: function()
      {
        $window.off('scroll');
      }
    });
PostCollection
Setup our PostCollection – we just need to tell the Collection the URL it should use to fetch its contents.
// the posts collection is configured to fetch
    // from our API, as well as use our PostModel
    var PostCollection = bb.Collection.extend({
      url: '/v1/posts'
    });
Blog Router
Notice that we’re not instantiating new instances of our views, we’re merely telling them to render. Our initialize functions are designed to only be ran once, as we don’t want them to run but once, on page load.
var BlogRouter = bb.Router.extend({
      routes: {
        "": "index",
        "posts/:id": "show"
      },
      initialize: function(options)
      {
        // i do this to avoid having to hardcode an instance of a view
        // when we instantiate the router we will pass in the view instance
        this.blog = options.blog;
      },
      index: function()
      {
        //reset the paginator
        this.blog.page = 0;

        //render the post list
        this.blog.render();
      },
      show: function(id)
      {
        //render the full-post view
        this.blog.showPost(id);
      }
    });
Notifications Collection
We’re just going to setup a simple Collection to store user notifications:
var notifications = new bb.Collection();
NotificationsView
This view will handle the displaying and hiding of user notifications:
Since we used the custom exception handlers for our API, it makes it very easy to handle any error our API may throw. Very similar to the way we defined our event listeners for our API in the app/filters.php file, we’ll define event listeners for our app here. Each code that could be thrown can just show a notification very easily!
$.ajaxSetup({
      statusCode: {
        401: function()
        {
          notification.add({
            type: null, //error, success, info, null
            message: 'You do not have permission to do that'
          });
        },
        403: function()
        {
          notification.add({
            type: null, //error, success, info, null
            message: 'You do not have permission to do that'
          });
        },
        404: function()
        {
          notification.add({
            type: 'error', //error, success, info, null
            message: '404: Page Not Found'
          });
        },
        500: function()
        {
          notification.add({
            type: 'error', //error, success, info, null
            message: 'The server encountered an error'
          });
        }
      }
    });
Event Listeners
We’ll need a few global event listeners to help us navigate through our app without refreshing the page. We mainly just hijack the default behavior and call Backbone.history.navigate(). Notice how on our first listener, we’re specifying the selector to only match those that don’t have a data attribute of bypass. This will allow us to create links such as <a href="/some/non-ajax/page" data-bypass="true">link</a> that will force the page to refresh. We could also go a step further here and check whether the link is a local one, as opposed to a link to another site.
Now we just need to boot the app, passing in any config values that we need. Notice the line that checks for the silentRouter global variable, this is kind of a hacky way to be able to use both back-end routing methods at the same time. This allows us to define a variable in the view called silentRouter and set it to true, meaning that the router should not actually engage the backbone route, allowing our back-end to handle the initial rendering of the page, and just wait for any needed updates or AJAX.
var BlogApp = new Blog({
      el       : $('[data-role="main"]'),
      collection   : new PostCollection(),
      postView    : PostView,
      perPage    : 15,
      page      : 0,
      infiniteScroll : true
    });

    var router = new BlogRouter({
      blog: BlogApp
    });

    if (typeof window.silentRouter === 'undefined') window.silentRouter = true;

    bb.history.start({ pushState: true, root: '/', silent: window.silentRouter });
Conclusion
Notice that for the Backbone portion of our app, all we had to do was write some Javascript that knew how to interact with the pre-existing portions of our application? That’s what I love about this method! It may seem like we had a lot of steps to take to get to that portion of things, but really, most of that work was just a foundation build-up. Once we got that initial foundation in place, the actual application logic falls together very simply.
Try adding another feature to this blog, such as User listings and info. The basic steps you would take would be something like this:
Use the generator tool to create a new "User" resource.
Make the necessary modifications to ensure that the UserController is in the V1 API group.
Create your Repository and setup the proper IoC bindings in app/routes.php.
Write your Controller tests one at a time using Mockery for the repository, following each test up with the proper implementation to make sure that test passes.
Write your Repository tests one at a time, again, following each test up with the implementation.
Add in the new functionality to your Backbone App. I suggest trying two different approaches to the location of the User views. Decide for yourself which is the better implementation.
First place them in their own routes and Main view.
Then try incorporating them into the overall BlogView.
I hope this gave you some insight into creating a scalable single page app and API using Laravel 4 and Backbone.js. If you have any questions, please ask them in the comment section below!
]]>
For this tutorial, we’re going to be building a single page app using Laravel 4 and Backbone.js. Both frameworks make it very easy to use a different templating engine other than their respective...http://feedproxy.google.com/~r/nettuts/~3/sp8nPXhAUws/https://my3.my.umbc.edu/api/v0/pixel/news/31309/guest@my.umbc.edu/460439162ee0e35324fb86306a676c82/api/pixelbackbone-jscssdevelopmenthtmljavascriptjavascript-and-ajaxlaravelmysqlphpsqlwedWeb Developer - Build Grouphttps://my3.my.umbc.edu/groups/retired-583https://assets3-my.umbc.edu/system/shared/avatars/groups/000/000/583/fc60f5d7abc2e080599bb6dc465db54d/xsmall.png?1363101197https://assets4-my.umbc.edu/system/shared/avatars/groups/000/000/583/fc60f5d7abc2e080599bb6dc465db54d/original.jpg?1363101197https://assets4-my.umbc.edu/system/shared/avatars/groups/000/000/583/fc60f5d7abc2e080599bb6dc465db54d/xxlarge.png?1363101197https://assets4-my.umbc.edu/system/shared/avatars/groups/000/000/583/fc60f5d7abc2e080599bb6dc465db54d/xlarge.png?1363101197https://assets3-my.umbc.edu/system/shared/avatars/groups/000/000/583/fc60f5d7abc2e080599bb6dc465db54d/large.png?1363101197https://assets3-my.umbc.edu/system/shared/avatars/groups/000/000/583/fc60f5d7abc2e080599bb6dc465db54d/medium.png?1363101197https://assets4-my.umbc.edu/system/shared/avatars/groups/000/000/583/fc60f5d7abc2e080599bb6dc465db54d/small.png?1363101197https://assets3-my.umbc.edu/system/shared/avatars/groups/000/000/583/fc60f5d7abc2e080599bb6dc465db54d/xsmall.png?1363101197https://assets4-my.umbc.edu/system/shared/avatars/groups/000/000/583/fc60f5d7abc2e080599bb6dc465db54d/xxsmall.png?1363101197Web Developer - Build Group00trueThu, 13 Jun 2013 21:33:16 -0400Thu, 13 Jun 2013 21:33:16 -0400Appointment of Professor Tim Nohe as Director of the Center for Innovation, Research, and Creativity in the Arts
To: The UMBC Community
From: John Jeffries, Dean of Arts, Humanities, and Social Sciences
Date: June 13, 2013
Re: Appointment of Professor Tim Nohe as Director of the Center for Innovation, Research, and Creativity in the Arts
I am pleased to announce the appointment of Professor Tim Nohe of the Department of Visual Arts as the founding Director of the new UMBC arts research center—the Center for Innovation, Research, and Creativity in the Arts [CIRCA]. Professor Nohe has achieved a remarkable record at UMBC as a multi-talented and interdisciplinary artist who has exhibited and performed widely, as a fine teacher and mentor, and as a leader in shared governance, most recently as President of the Faculty Senate for two years. His work has included collaborations with all of the arts departments at UMBC and with numerous local, regional, national, and international artists, arts organizations, and universities. He is currently Adjunct Professor at La Trobe University, Melbourne, Australia, and his many distinctions include two Fulbright awards and four Maryland State Arts Council Individual Artist Awards. Professor Nohe will bring his wide-ranging skills, experience, and connections to his new position of Director of CIRCA. I look forward to his working with others, at UMBC and elsewhere, to facilitate innovation, research, and creativity in the arts and to raise the visibility and enhance the already strong reputation of the arts at UMBC.
]]>
To: The UMBC Community From: John Jeffries, Dean of Arts, Humanities, and Social Sciences Date: June 13, 2013 Re: Appointment of Professor Tim Nohe as Director of the Center for Innovation,...https://umbc.edu/stories/appointment-of-professor-tim-nohe-as-director-of-the-center-for-innovation-research-and-creativity-in-the-arts/https://my3.my.umbc.edu/api/v0/pixel/news/123247/guest@my.umbc.edu/ae768510fa16bd8a80c0823bf8d7310f/api/pixelarts-and-cultureUMBC News & Magazinehttps://my3.my.umbc.edu/groups/umbc-news-magazinehttps://assets1-my.umbc.edu/system/shared/avatars/groups/000/001/943/24435aa6207c452e7bc15cc74b42c7bb/xsmall.png?1748556657https://assets1-my.umbc.edu/system/shared/avatars/groups/000/001/943/24435aa6207c452e7bc15cc74b42c7bb/original.png?1748556657https://assets2-my.umbc.edu/system/shared/avatars/groups/000/001/943/24435aa6207c452e7bc15cc74b42c7bb/xxlarge.png?1748556657https://assets2-my.umbc.edu/system/shared/avatars/groups/000/001/943/24435aa6207c452e7bc15cc74b42c7bb/xlarge.png?1748556657https://assets3-my.umbc.edu/system/shared/avatars/groups/000/001/943/24435aa6207c452e7bc15cc74b42c7bb/large.png?1748556657https://assets1-my.umbc.edu/system/shared/avatars/groups/000/001/943/24435aa6207c452e7bc15cc74b42c7bb/medium.png?1748556657https://assets2-my.umbc.edu/system/shared/avatars/groups/000/001/943/24435aa6207c452e7bc15cc74b42c7bb/small.png?1748556657https://assets1-my.umbc.edu/system/shared/avatars/groups/000/001/943/24435aa6207c452e7bc15cc74b42c7bb/xsmall.png?1748556657https://assets2-my.umbc.edu/system/shared/avatars/groups/000/001/943/24435aa6207c452e7bc15cc74b42c7bb/xxsmall.png?1748556657UMBC News & Magazine00falseThu, 13 Jun 2013 21:05:36 -0400Apple Negotiator Defends Tactics in E-Book Trial
Eddy Cue, a senior vice president for Apple, denied that the company colluded with publishers to fix e-book prices.
]]>
Eddy Cue, a senior vice president for Apple, denied that the company colluded with publishers to fix e-book prices. http://www.nytimes.com/2013/06/14/technology/apple-negotiator-defends-tactics-in-e-book-trial.html?partner=rss&emc=rsshttps://my3.my.umbc.edu/api/v0/pixel/news/31310/guest@my.umbc.edu/45b019482df5546f16578fcb3c309dbc/api/pixelamazon-com-inc-amzn-nasdaqapple-inc-aapl-nasdaqcue-eddye-books-and-readersjobs-steven-pnewtechnologyyorkWeb Developer - Build Grouphttps://my3.my.umbc.edu/groups/retired-583https://assets3-my.umbc.edu/system/shared/avatars/groups/000/000/583/fc60f5d7abc2e080599bb6dc465db54d/xsmall.png?1363101197https://assets4-my.umbc.edu/system/shared/avatars/groups/000/000/583/fc60f5d7abc2e080599bb6dc465db54d/original.jpg?1363101197https://assets4-my.umbc.edu/system/shared/avatars/groups/000/000/583/fc60f5d7abc2e080599bb6dc465db54d/xxlarge.png?1363101197https://assets4-my.umbc.edu/system/shared/avatars/groups/000/000/583/fc60f5d7abc2e080599bb6dc465db54d/xlarge.png?1363101197https://assets3-my.umbc.edu/system/shared/avatars/groups/000/000/583/fc60f5d7abc2e080599bb6dc465db54d/large.png?1363101197https://assets3-my.umbc.edu/system/shared/avatars/groups/000/000/583/fc60f5d7abc2e080599bb6dc465db54d/medium.png?1363101197https://assets4-my.umbc.edu/system/shared/avatars/groups/000/000/583/fc60f5d7abc2e080599bb6dc465db54d/small.png?1363101197https://assets3-my.umbc.edu/system/shared/avatars/groups/000/000/583/fc60f5d7abc2e080599bb6dc465db54d/xsmall.png?1363101197https://assets4-my.umbc.edu/system/shared/avatars/groups/000/000/583/fc60f5d7abc2e080599bb6dc465db54d/xxsmall.png?1363101197Web Developer - Build Group00trueThu, 13 Jun 2013 21:02:55 -0400New Resources for Registered Apple Developers
As a Registered Apple Developer, you already have free access to developer tools and resources for creating iOS apps and Mac apps. Now you can take advantage of more great content, with access to pre-release documentation, videos, and sample code. You can also sign in to view discussions in the Apple Developer Forums and gain further insight into developing for iOS, OS X, and more. Sign in to Member Center.
]]>
As a Registered Apple Developer, you already have free access to developer tools and resources for creating iOS apps and Mac apps. Now you can take advantage of more great content, with access to...https://developer.apple.com/news/index.php?id=6132013bhttps://my3.my.umbc.edu/api/v0/pixel/news/31306/guest@my.umbc.edu/2863fe4a6d4469ac0f1d615690cb504f/api/pixelappledeveloperiosipadiphoneipodobjective-cWeb Developer - Build Grouphttps://my3.my.umbc.edu/groups/retired-583https://assets3-my.umbc.edu/system/shared/avatars/groups/000/000/583/fc60f5d7abc2e080599bb6dc465db54d/xsmall.png?1363101197https://assets4-my.umbc.edu/system/shared/avatars/groups/000/000/583/fc60f5d7abc2e080599bb6dc465db54d/original.jpg?1363101197https://assets4-my.umbc.edu/system/shared/avatars/groups/000/000/583/fc60f5d7abc2e080599bb6dc465db54d/xxlarge.png?1363101197https://assets4-my.umbc.edu/system/shared/avatars/groups/000/000/583/fc60f5d7abc2e080599bb6dc465db54d/xlarge.png?1363101197https://assets3-my.umbc.edu/system/shared/avatars/groups/000/000/583/fc60f5d7abc2e080599bb6dc465db54d/large.png?1363101197https://assets3-my.umbc.edu/system/shared/avatars/groups/000/000/583/fc60f5d7abc2e080599bb6dc465db54d/medium.png?1363101197https://assets4-my.umbc.edu/system/shared/avatars/groups/000/000/583/fc60f5d7abc2e080599bb6dc465db54d/small.png?1363101197https://assets3-my.umbc.edu/system/shared/avatars/groups/000/000/583/fc60f5d7abc2e080599bb6dc465db54d/xsmall.png?1363101197https://assets4-my.umbc.edu/system/shared/avatars/groups/000/000/583/fc60f5d7abc2e080599bb6dc465db54d/xxsmall.png?1363101197Web Developer - Build Group00trueThu, 13 Jun 2013 20:20:00 -0400
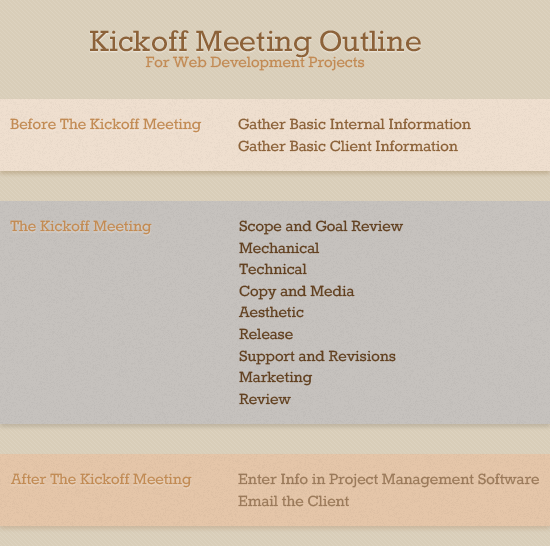
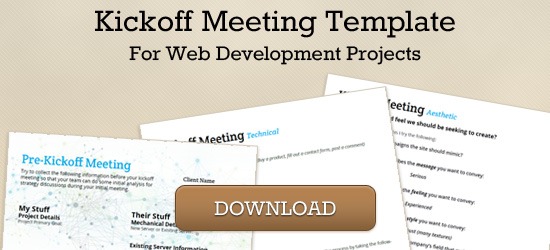
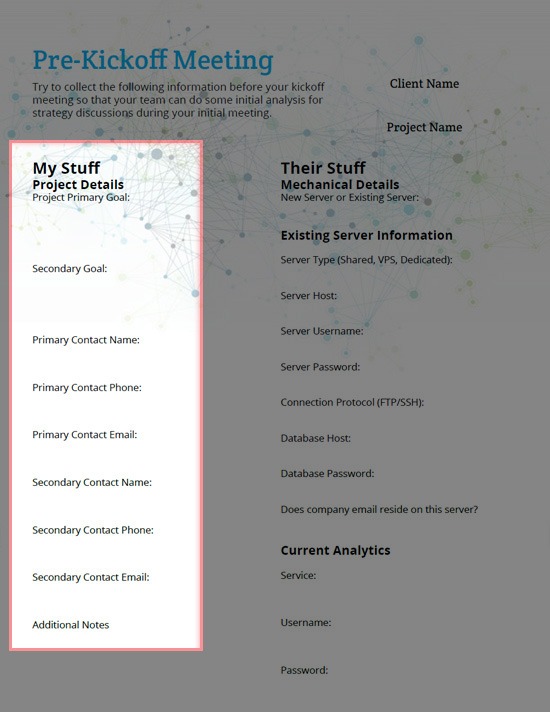
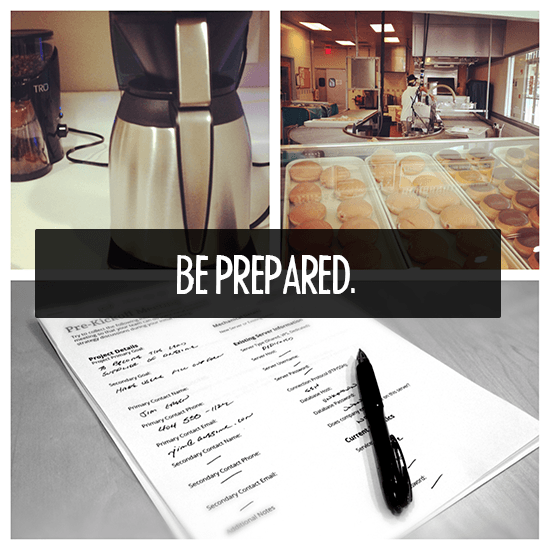
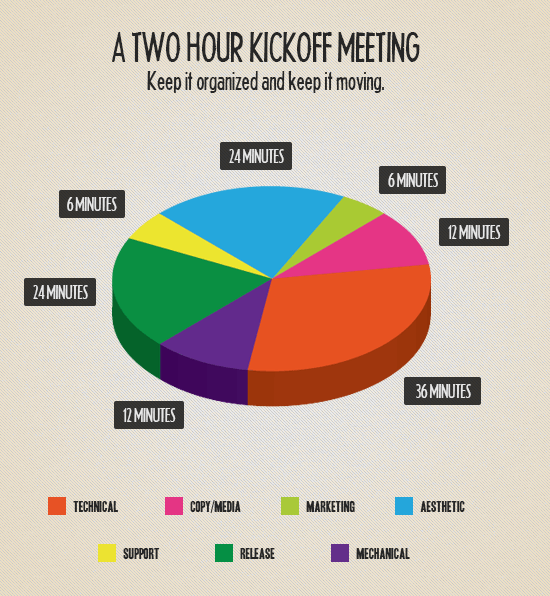
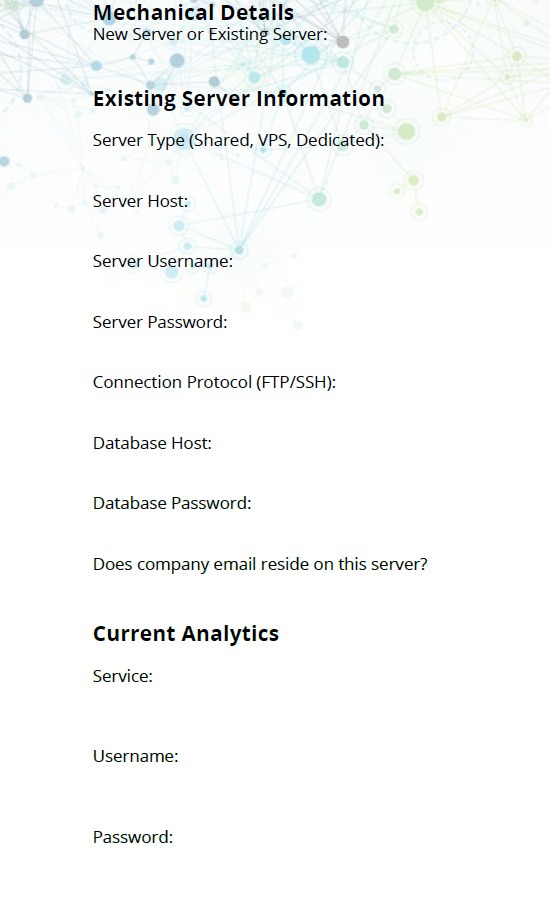
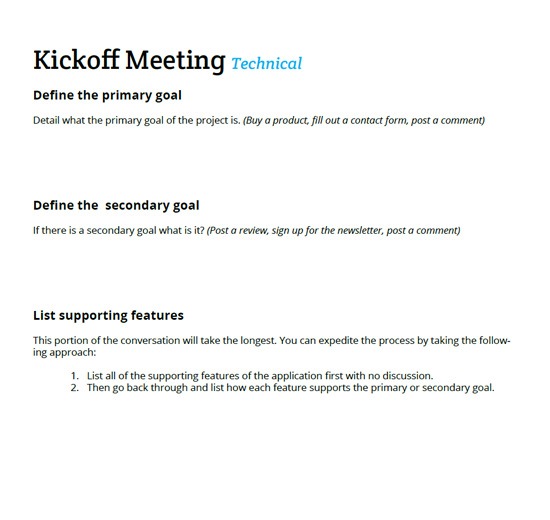
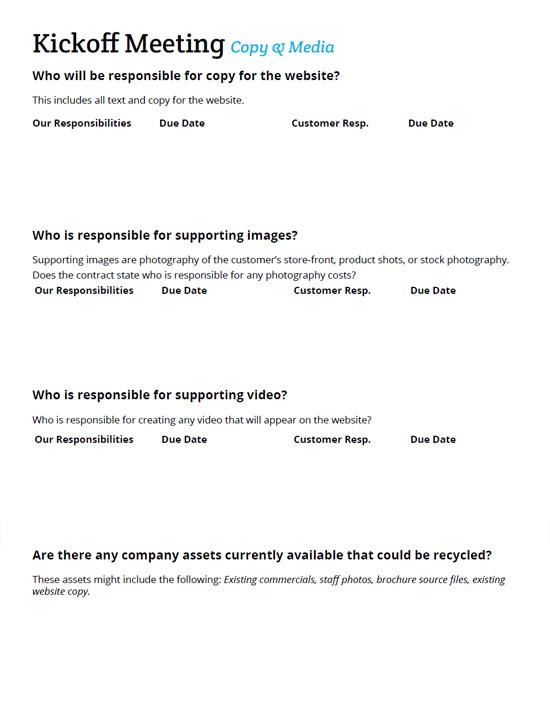
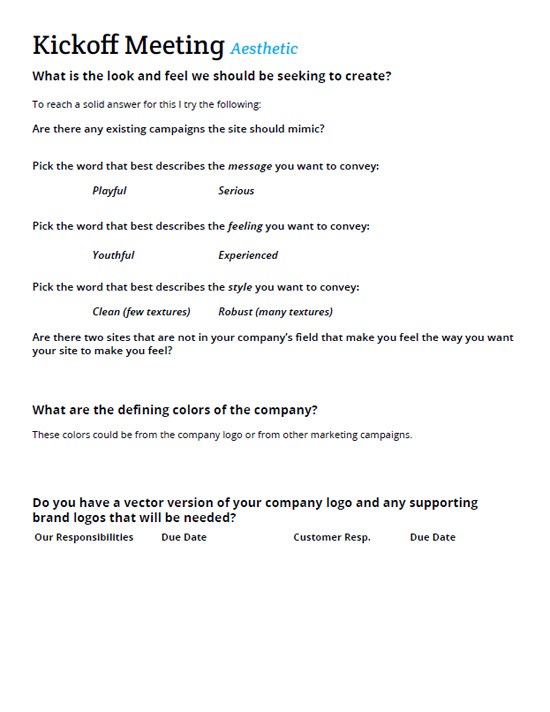
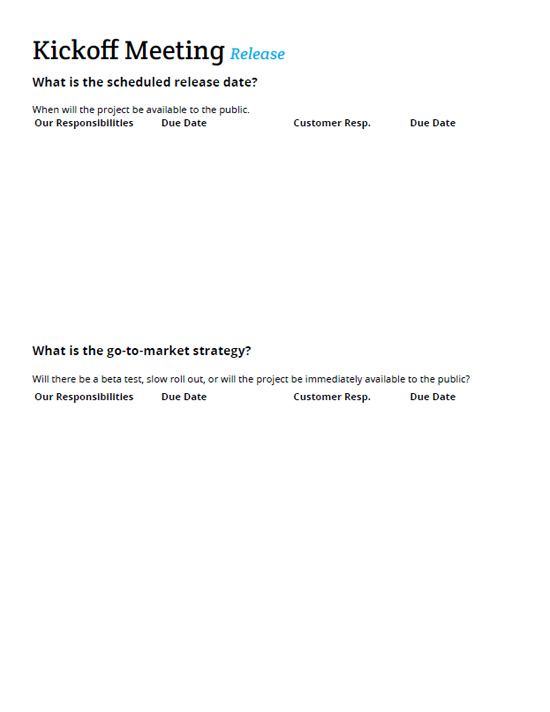
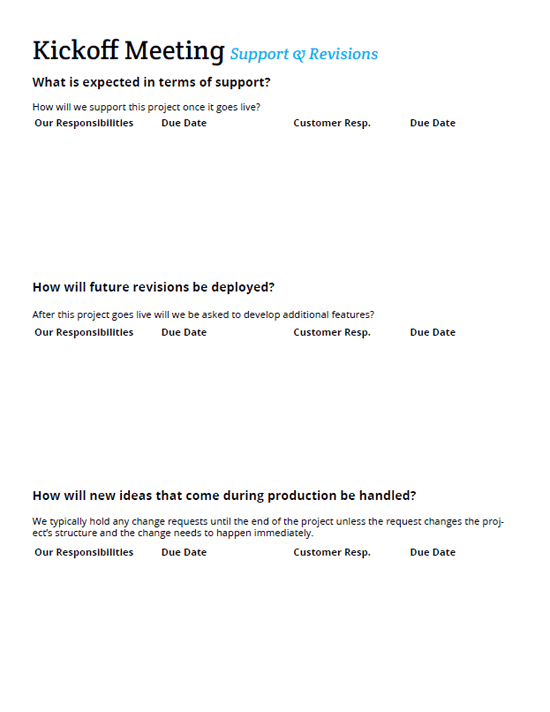
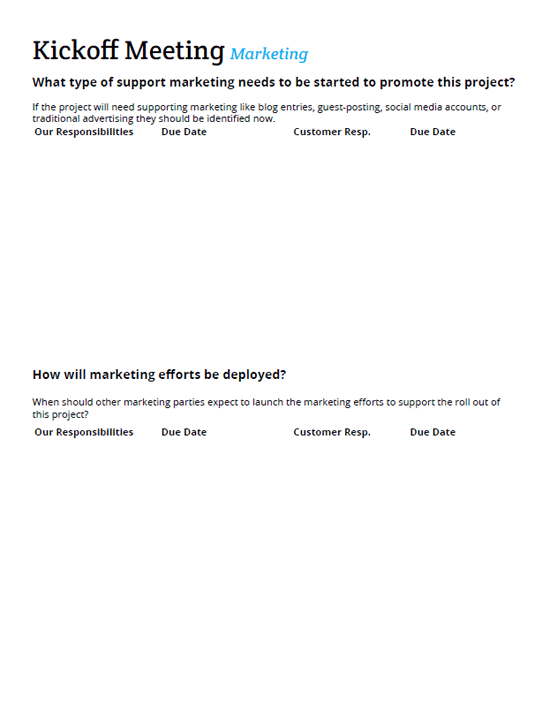
 Gary Williams is the co-founder and CEO of the web development agency LogicBomb Media (Twitter: @lmb_co) near Atlanta, Georgia. He and his team specialize in data-heavy Web and mobile applications for companies like Nintendo, ESPN, and Travel Channel. Follow him on Twitter @dolbex.


 Most of the time, the first contact a customer will have with your business is through your website. Consequently, the website could make or break your business. To ensure that the website makes it, having it be both aesthetically pleasing and user friendly is imperative.


